In this post, I’ll show you how to streamline the Out-of-Box Experience (OOBE) setup process even if you’re using Autopilot Device Preparation (AP-DP). While AP-DP is great for device provisioning, it doesn’t include all the customization options that Autopilot offers: Hide Privacy Settings, Software License Terms, or changing account options during OOBE. But don’t worry; I’ll walk you through how to work around this with a PowerShell script!
1. Introduction
Suppose you’re new to Autopilot Device Preparation (AP-DP). In that case, I recommend checking out my introductory blog post on AVP2 to understand why it doesn’t include options to hide privacy settings, unlike the full Autopilot profile.

Certain OOBE customizations, like hiding privacy prompts or changing account settings, aren’t available directly in Autopilot device preparation.

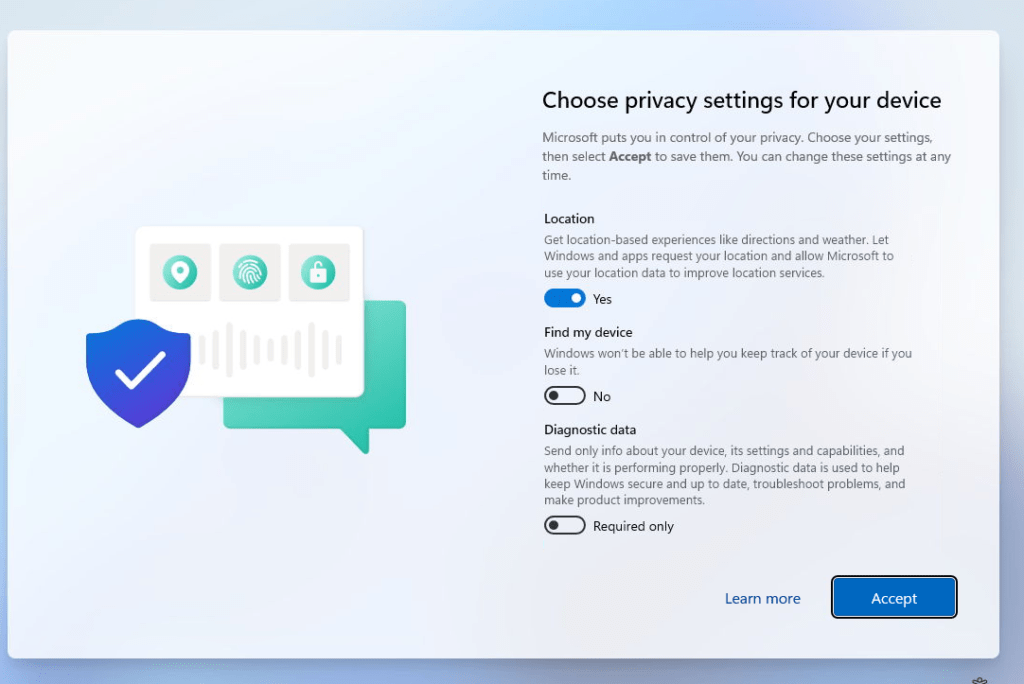
So, if you want to keep the OOBE process as smooth as possible (without extra user prompts), you’ll need to handle it manually. Here’s an example of the privacy settings prompt that typically appears during the Autopilot Device Preparation Enrollment when you have not changed anything.

As shown above, it still shows the window to choose your device’s privacy settings (Location/Find My device/Diagnostic Data).
This is where a PowerShell Script or a settings catalog workaround comes in handy. We can use a PowerShell script or a Settings Catalog to modify registry settings and disable these OOBE prompts, ensuring a faster and more streamlined setup without those annoying questions about how you want to configure your privacy settings.
2. Changing the OOBE Experience on our own!
Since Autopilot Device Preparation lacks these built-in options, let’s fix it!
Using A PowerShell Script
We’ll create a PowerShell script to modify the OOBE settings directly in the registry. Here’s how you can implement this workaround.
Step 1: Create a PowerShell Script
Below is a PowerShell script that disables specific OOBE settings by adjusting registry keys. This allows you to bypass certain prompts that normally appear during the setup process.
$registryPath = "HKLM:\SOFTWARE\Microsoft\Windows\CurrentVersion\OOBE"
$registryPath2 = "HKLM:\Software\Microsoft\Windows\CurrentVersion\Policies\System"
$Name1 = "DisablePrivacyExperience"
$Name2 = "DisableVoice"
$Name3 = "PrivacyConsentStatus"
$Name4 = "Protectyourpc"
$Name5 = "HideEULAPage"
$Name6 = "EnableFirstLogonAnimation"
New-ItemProperty -Path $registryPath -Name $name1 -Value 1 -PropertyType DWord -Force
New-ItemProperty -Path $registryPath -Name $name2 -Value 1 -PropertyType DWord -Force
New-ItemProperty -Path $registryPath -Name $name3 -Value 1 -PropertyType DWord -Force
New-ItemProperty -Path $registryPath -Name $name4 -Value 3 -PropertyType DWord -Force
New-ItemProperty -Path $registryPath -Name $name5 -Value 1 -PropertyType DWord -Force
New-ItemProperty -Path $registryPath2 -Name $name6 -Value 1 -PropertyType DWord -Force
Here’s an explanation of what this script does:
This PowerShell script modifies registry settings in two registry paths to customize Windows Out-of-Box Experience (OOBE) and system behavior. Specifically, it: Disables certain OOBE privacy-related screens and voice interactions by setting the following keys:
DisablePrivacyExperience: Disables the privacy experience.DisableVoice: Disables voice features.PrivacyConsentStatus: Sets privacy consent.Protectyourpc: Adjusts protection settings.HideEULAPage: Hides the End User License Agreement (EULA) page.
Disables the first logon animation by setting the EnableFirstLogonAnimation key under system policies.
Step 2: Upload the PowerShell Script to Intune
Once you’ve created the script, you must ensure you have uploaded it to Intune and assigned it.

Remember to add the PowerShell script to the Autopilot Device Preparation profile; otherwise, it will not be deployed during Enrollment!

This PowerShell script will ensure the settings are applied during enrollment.
3. Result: A Streamlined OOBE with Autopilot Device Preparation (AVP2)
After deploying this PowerShell script, the Out-of-Box Experience (OOBE) becomes significantly streamlined. When a user starts up a device with AVP2, they won’t encounter the usual privacy settings prompts or Microsoft Software License Terms, allowing them to get to the login screen faster without extra interruptions.
The device setup experience is smoother and more efficient, reducing the initial configuration time and minimizing user interaction.
By automatically applying these registry changes, you’re ensuring that the device is pre-configured to skip these settings, making the setup process feel almost seamless. This approach bridges the gap in AVP2’s limitations, allowing for a clean, distraction-free OOBE that mirrors many of the conveniences of full Autopilot functionality.
Settings Catalog
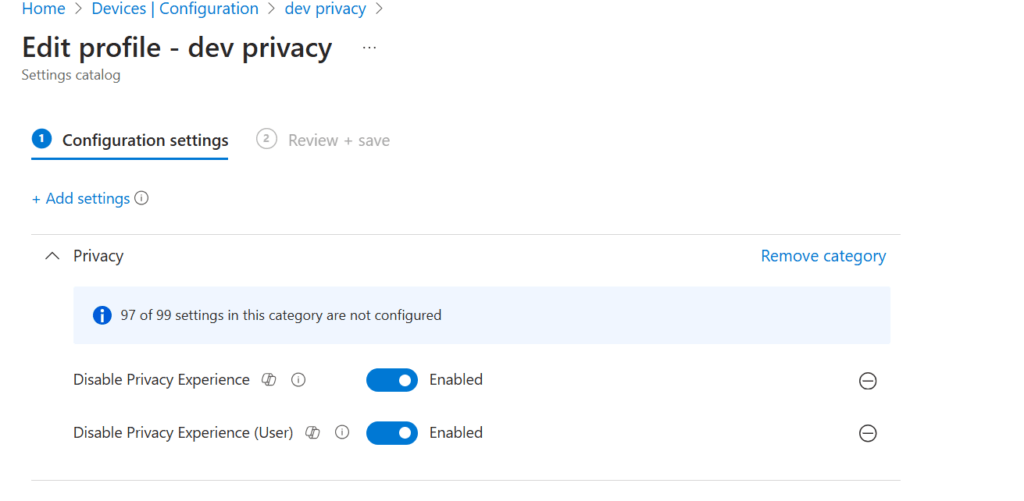
Could we also achieve the same effect using Intune’s Settings Catalog? Well, to find out I configured the relevant settings under the Privacy category, as shown in your screenshot. Here’s a step-by-step guide:
- Navigate to Intune: Go to Devices > Configuration profiles > Create profile.
- Choose Platform and Profile Type: Select Windows 10 or later and pick Settings Catalog.
- Add Settings: Search for “Privacy” and configure:
- Disable Privacy Experience: Set to Enabled.
- Disable Privacy Experience (User): Set to Enabled.
- Save and Assign: Complete the profile setup and assign it to relevant groups.

This approach configures privacy settings similar to the PowerShell script but directly through Intune, making it easier to deploy across managed devices. But instead of hiding the whole privacy setting, it showed me this window, which allowed me to accept them instead.

Conclusion
While Autopilot Device Preparation may not offer the full range of Autopilot OOBE customizations, this PowerShell workaround gives you control over the setup flow. By implementing these registry modifications, you can streamline the OOBE experience, minimize user prompts, and ensure users start off with standard accounts. You can achieve a similar smooth onboarding experience with a few extra steps—even with Autopilot Device Preparation.


You saved my day! Thanks
Hi and thanks for this!
Is it also possible to auto rename the computer within this script? I noticed that AVP2 does not have a built in setting for this. We usually rename computers to XXX-%SERIAL% in AVP1
Seems to be that this workaround is not working. I have an device Prep where the polcies are set, but question also comming up
Its still working for me.. 🙂 which windows build are you using? can you confirm that at that point those registry keys are set which are defined in the powershell script?
Sorry for the error information, seems to be that Scripts during the OOBE not working. I set it now manually and it working. Windows Version is 26100.1742 (24H2)
Sorry for the error information, seems to be that Scripts during the OOBE not working.
Apps and Scripts will be showed as skipped, managed installer is not active but was deployed in the past.
Ahhh well that explains it.. how is the local administrator settings configured in entra? as that one also breaks the apps/scripts deployment : https://call4cloud.nl/standard-user-autopilot-device-preparation/
Global administrator role is added as local administrator on the device during Microsoft Entra join is No
and
Registering user is added as local administrator on the device during Microsoft Entra join (Preview) is All
Policy Profile is following:
User account type: Standard User
Scripts : W11-DevicePreparationSettings
All so the script is targeted to the DevicePrep-Device Group. ALso this group has the
Intune Provisioning Client as owner with the ID 48eee770-8c4e-44b2-8c19-460a2af8fa7c
Currently i have also the issue that computer restarts from Policy (that need restart) and then the DevicePreperation hangs until there is an timeout. The Procent counter goes higher and higher but semms nothing working in the background.
If i added not scripts and apps so device Prep Profile the installation is done successfully in 5-8 min.