

This blog is the fourth part of the Endpoint Security Series, and today, we’re diving into Microsoft Defender Application Guard (MDAG). A security feature so good, it’s had more names than a secret agent! Formerly known as Windows Defender Application Control (WDAC), aka Device Guard, aka App Control for Business, MDAG has been through more rebrands than a pop star. But no matter what you call it, it’s still an excellent tool for locking down your environment.”
1. MDAG/ WDAC/Device Guard explained
Microsoft Defender Application Guard (MDAG) formerly known as Device Guard or WDAC, has the power to control if an application may or may not be executed on a Windows device. WDAC will prevent the execution, running, and loading of unwanted or malicious code, drivers, and scripts. WDAC does not trust any software it does not know of.
If the application is allowed and trusted, it can run; otherwise, a feature called configurable Code Integrity (CI) will block it.
CI guarantees only trusted code may be executed from the boot loader onwards. CI will make sure you are protected before any OS code can run.
Securing your environment by creating and maintaining WDAC policies will take some time. The policies you have created at the beginning can be outdated within a few weeks. Implementing WDAC is not a set-and-forget solution, you will need to spend time on it to maintain it.
When you want to deploy WDAC, there is, of course, a requirement. Luckily it’s a simple one, you will only need to make sure the device has Windows 10 installed and nothing more. Luckily, there are no restrictions about which Windows 10 version is required, but it’s best practice to use 1903+
When you want to know the WDAC differences between each Windows 10 build, go check out this file. It is the WDAC code integrity policy schema.
%windir%\schemas\CodeIntegrity\cipolicy.xsd
Looking at this file… could anyone tell me what this policy does?

I can’t find it in Microsoft Docs?
2. Choosing between MDAG and Applocker
Of course, Microsoft recommends using MDAG/WDAC rather than Applocker when you need to implement application Control. The main reason could be the continual improvements and support you could get. When looking at Applocker, there is no feature update.
But in my opinion…. just start with Applocker to ensure your devices are protected 99% from malware and ransomware (In a matter of speaking). The only thing missing in Applocker is the possibility to block driver files.

When you know how it all works, start testing with WDAC. The idea is almost the same but with one big difference:
Applocker policies can be targeted to users and groups.
WDAC policies are targeted at devices.
A common misconception is that WDAC is the replacement of Applocker. Applocker also controls the execution of applications and files, but it does not offer the security you will get with WDAC. WDAC offers a chain of trust from when the device boots up to the kernel. But again it’s NOT the replacement of Applocker.
To resume, when you deny the execution of an application, it will also be blocked when running it as the local admin. So, the best practice would be to configure WDAC and combine it with Applocker to perform some finetuning.
3. How to configure MDAG/WDAC
There are multiple methods of deploying Windows Defender Application Control to your devices.

However, as Intune is the way to go, I will only show you how to configure WDAC and deploy it with Intune. However, a lot of the information in this blog can also be used when you deploy it with PowerShell or Group policies.
4. Automatically with an Endpoint Protection Profile?
When we want to enable WDAC without any additional configuration, you can do so by creating a new device configuration profile and choosing an Endpoint Protection Profile and Windows Defender Application Control

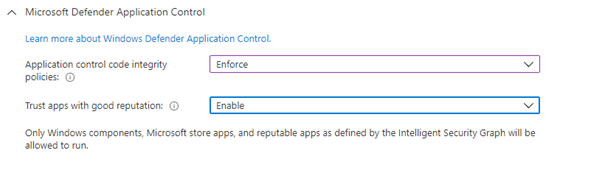
That’s cool? We only need to configure the “Application Control Code Integrity policy” and the “Trust apps with good reputation” options. When configuring the first option, Windows Components, and Microsoft Store Apps (more on this later) will be allowed.
But what does “trust apps with good reputation” mean?
The Microsoft Intelligent Security Graph (ISG) is the “data plane” that collects all the information /telemetry from every Microsoft application. When application files are executed and there are no specific rules to allow or deny for this application, the data from the ISG is used by WDAC to determine if the file reputation is known to be good /known to be bad or unknown. Microsoft Defender Antivirus and Microsoft Defender SmartScreen also use this mechanism. Please note, that when you are not using MDM and you want to enable ISG, you also will need to enable the service by launching this command:
appidtel start
It will make sure the Appid ManagedInstaller and Smartscreen Telemetry file service is started. Now we have deployed the Endpoint Security Policy to our devices you will notice something bad because when we have configured WDAC with an Endpoint Security Policy, Windows will be forced to reboot!
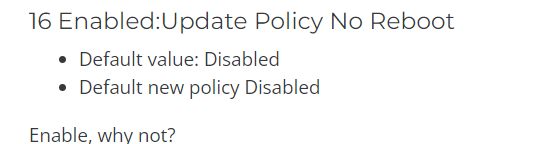
*A reboot will be forced when using the Endpoint Protection Profile option! An option to use in the future would be to use a CSP and configure the “-Option 16” to make sure the device will not be forced to reboot after applying FUTURE WDAC policy updates
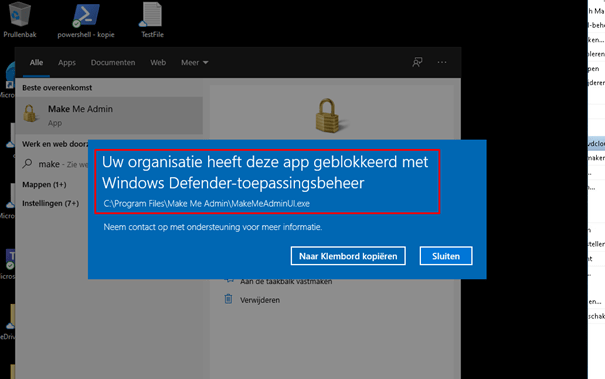
But let’s see what happens after our device has rebooted. Of course, all the trusted Microsoft Apps such as Onedrive/Teams will work… but what about the rest? I guess a lot will be blocked when it tries to execute.
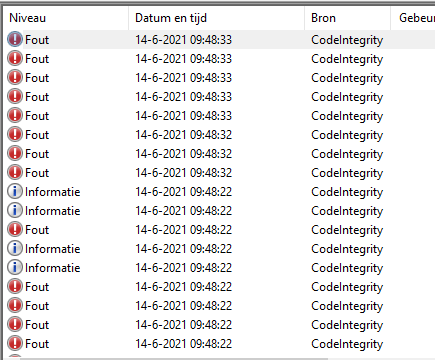
Also, the event log is a little bit filled up with a lot of CodeIntegrity Errors!
For me… this is not the way to go!

When you want to configure additional settings, you must define another separate CSP, so why not put it all in the CSP?

5. Manually with a CSP
We could create a Device Configuration Profile when we don’t want our devices to be forced to reboot or when we want to specify additional settings to ensure some applications are allowed.
We need an XML to specify some settings but how do we create it? Could we use a template? Looking at the c:\windows\schemas\codeintegrity\examlepolicies folder, we notice these Templates:
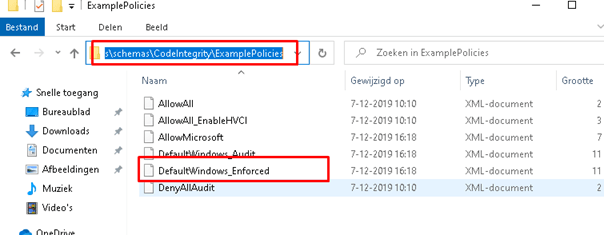
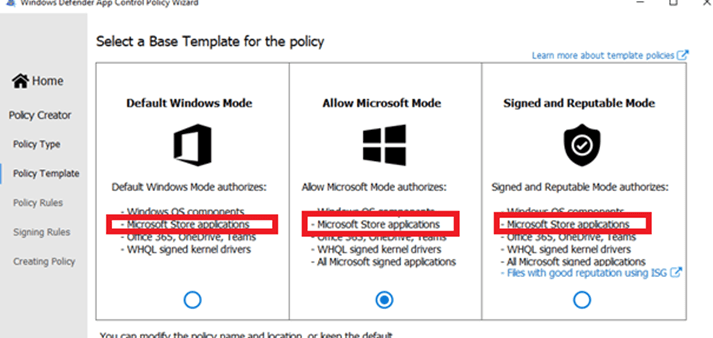
Before we continue, we need some more information about which template we could use and why. Each template policy has its own set of policies. I will show you each policy in increasing order, from only allowing the basics to allowing a lot more. For instance, the Default Windows mode policy allows fewer application signers and publishers than the Signed and Reputable mode policy.
Default Windows Mode:
Default Windows mode will authorize the following components:
- Windows operating components – any binary installed by a fresh install of Windows
- Apps installed from the Microsoft Store
- Microsoft Office365 apps, OneDrive, and Microsoft Teams
- Third-party Windows Hardware compatible drivers
Allow Microsoft Mode
Allow mode will authorize the following components:
- Windows operating components – any binary installed by a fresh install of Windows
- Apps installed from the Microsoft Store
- Microsoft Office365 apps, OneDrive, and Microsoft Teams
- Third-party Windows Hardware compatible drivers
- All Microsoft-signed software
Signed and Reputable Mode
Signed and Reputable mode will authorize the following components:
- Windows operating components – any binary installed by a fresh install of Windows
- Apps installed from the Microsoft Store
- Microsoft Office365 apps, OneDrive, and Microsoft Teams
- Third-party Windows Hardware compatible drivers
- All Microsoft-signed software
- Files with a good reputation ISG
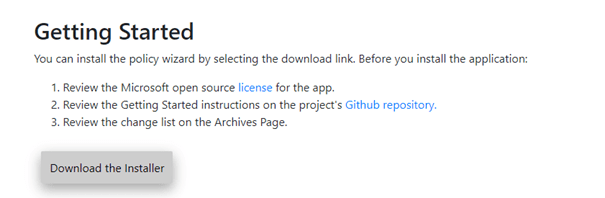
Now we know what templates we could use, we need to know how we are going to configure them. We can do so by using Microsoft PowerShell or a nice WDAC tool. In this blog I chose to configure the XML with the tool, so let’s download it first.
Microsoft WDAC Wizard (webapp-wdac-wizard.azurewebsites.net)
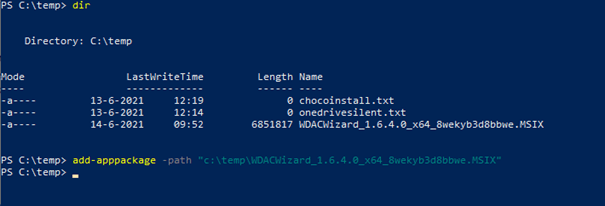
After the package is installed we can start creating our first WDAC policy.
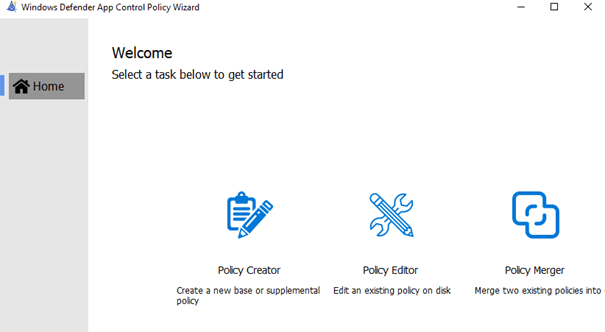
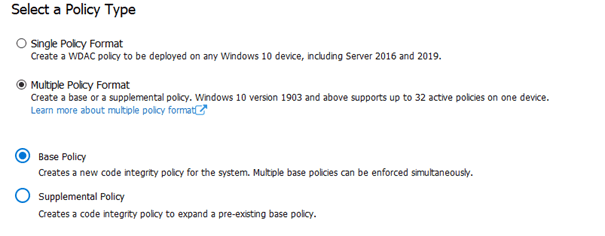
As this is the first policy we are going to create we are going to choose: Multiple Policy Format and a Base Policy
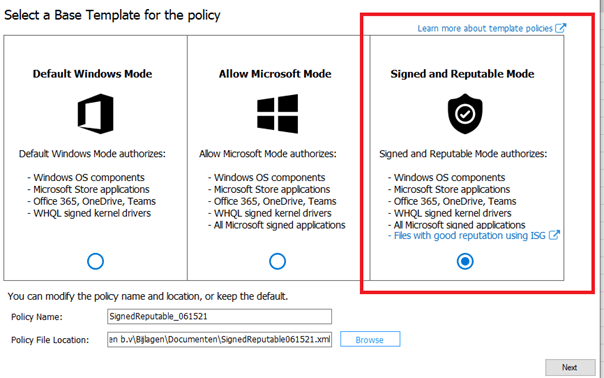
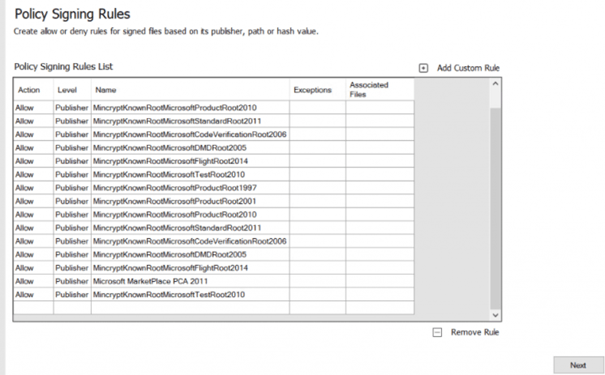
Next, we can choose the template which we discussed earlier. You have got 3 options here: Default Windows Mode, Allow Microsoft Mode, and Signed and Reputable Mode.
I will choose the “Allow Signed and Reputable mode” because I really do trust Microsoft… otherwise, it would be a mad mad world and I also have Applocker in place.
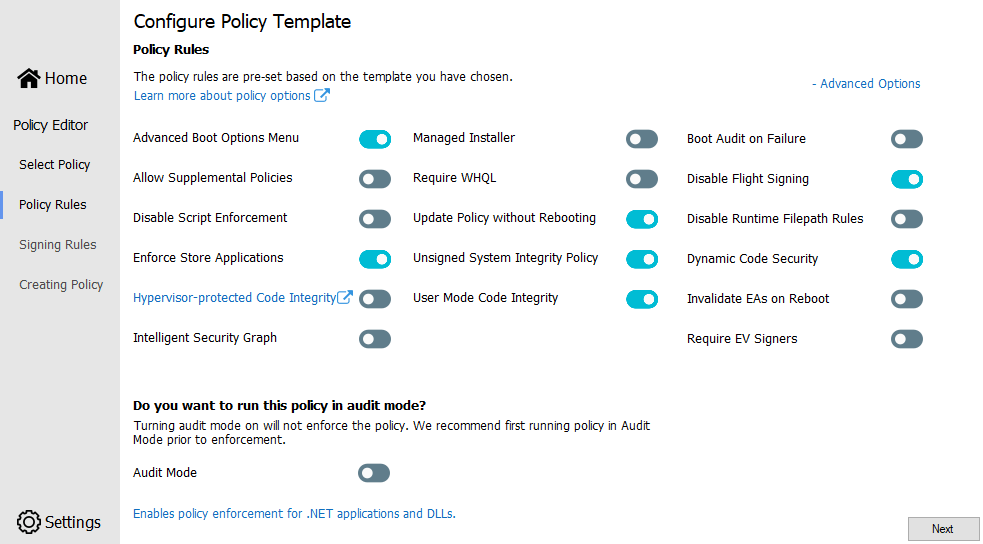
Please ensure you have enabled the Advanced option because we need to ensure we configure everything!

*Unsigned System Integrity Policy (option 6) –> When you disable this option, you must protect the WDAC policy by digitally signing the policy. When it’s signed even the local administrator can’t tamper with it!
*Update Policy without Rebooting (option 16) –> Please make sure you enable this fantastic option to allow future WDAC policy updates to apply without requiring a system reboot
*Managed installer (option 13) –> Use this option to automatically allow applications installed by a Managed Installer / Intune Management Extension, that has been defined as a managed installer. Please Enable this “Managed Installer” option
Please Note: To make sure this rule will work you will need to create and deploy an additional AppLocker policy. This Applocker policy will define your managed installer rules and will enable enforcement for executables and DLLs.
If you don’t want to go through all the trouble, you could do 2 things to enable the managed installer. The first one, would be just to enable the managed installer option in Intune.
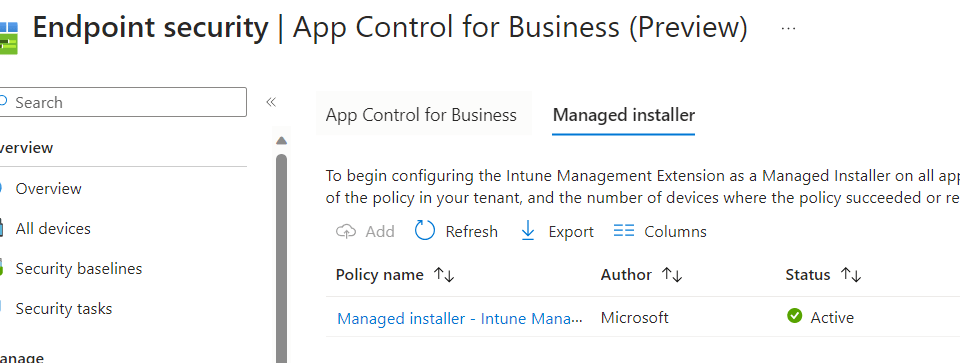
When you configure this option above, the managed installer will be enabled on all of your devices. Yeah, you read it correctly on all of your devices. A way better option would be to fetch the PowerShell remediation script below, which would be pushed down to your devices when enabling this option
https://call4cloud.nl/wp-content/uploads/2023/12/wdac.zip
You can scope it down to some of your test devices first! Isn’t that lovely?
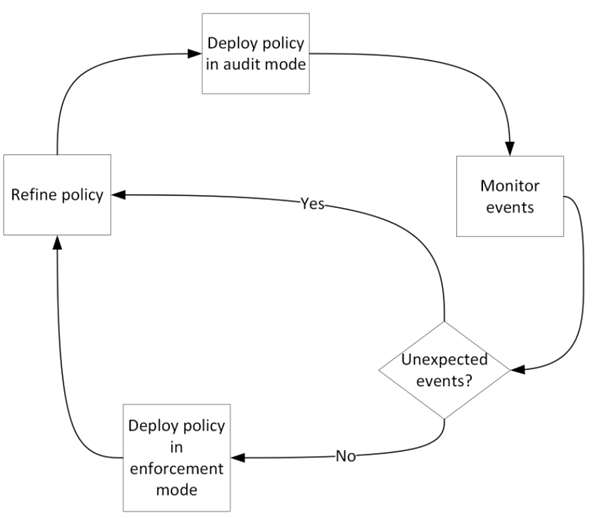
*Audit Mode (Option 3)
I guess you need to audit it first! Before enabling it. You just can’t enable it without testing! You will need to define a circle of trust and start auditing. Monitor each block event edit the allow or deny rules when necessary and start over again until you are satisfied with the outcome.
*Intelligent Security Graph (Option 14)
Earlier in this blog, I explained what is feature is about and how it works.
Please click on next when you configured everything necessary.

Now we have the possibility to add additional policies as shown above… Please beware if you don’t specify anything, a lot of third-party tools could still be blocked even when you turn on ISG. Of course, it will only be blocked if you don’t have enabled Audit Mode.
And a kind reminder… when you block a process, it will be blocked for everyone!! Not only the normal user but also the local admin! We will skip this part for now and continue to deploy the WDAC policy.

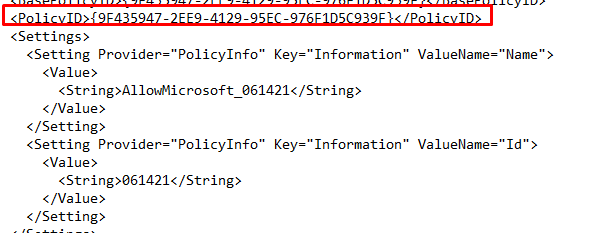
Open the XML and note the ID, because we need it later on.
But having an XML is not enough we need to convert it to a bin file, otherwise, we can’t use it in Intune. Even when they say it’s a Base64 you still need to have the bin file.

We have got 2 options to convert it to a BIN file: PowerShell or using the WDAC tool itself.
Powershell:

WDAC tool:
Or maybe a better option is that we are doing everything with the tool itself. Select the “convert policy to binary after XML creation” option in the WDAC Tool settings menu.

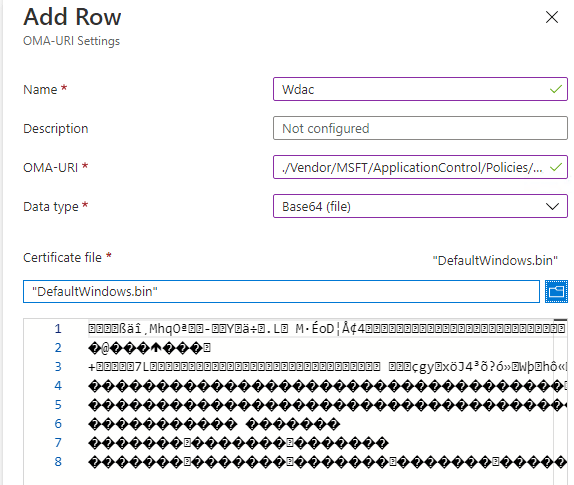
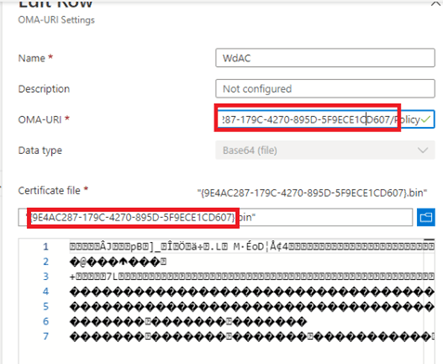
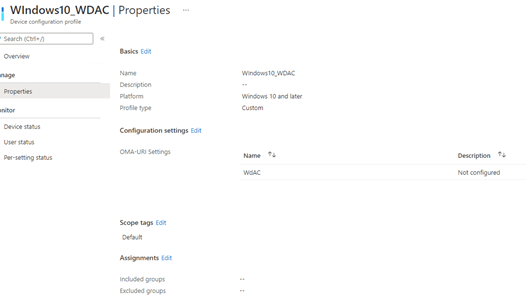
Now we have everything we need we need to create a CSP. Go open Intune and start configuring a CSP with these values:
OMA-URI:
./Vendor/MSFT/ApplicationControl/Policies/[ID without brackets]/Policy
And select the filename.bin file you just created.
6.Monitoring / Testing / Troubleshooting
I am going to divide this part into multiple subparts
6.1.Monitoring
We are going to start with some monitoring to make sure, WDAC is applied and if it’s enforced or only configured to Audit.
How to determine if WDAC is active? We have multiple methods to check if it’s working
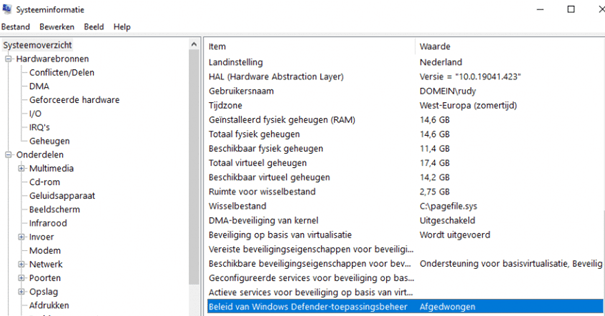
6.1.1. MSINFO
You only need to open MSINFO32.exe and start looking for the Windows Defender Application Control status. As shown below, it’s enforced.
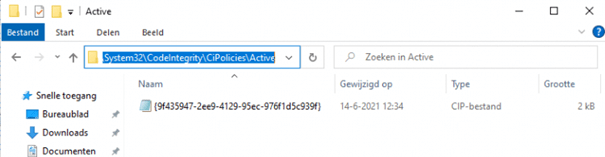
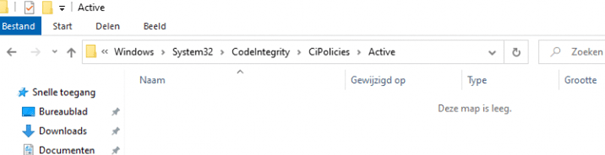
6.1.2. Code integrity Folder
Just like with Applocker, the device guard has its own folder with the active policy in it.
Before we continue, we need to take a look at this folder C:\Windows\System32\CodeIntegrity\ to understand when which file is created.

If you have a SiPolicy file in this folder, you have selected the single policy format in the WDAC tool instead of the multiple policy format. If you have selected the multiple policy format, the policy is going to be created inside the cipolicies\active folder.
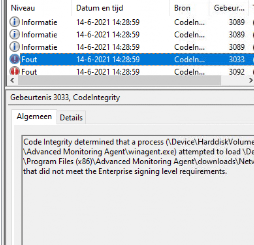
6.1.3. Event log
Please note that only using the default template and rules are going to produce a lot of errors on the device. First, we need to know which kind of events can be triggered. As shown below we could notice event 3076 (Audit), 3077 (Enforced), or 3089 events!
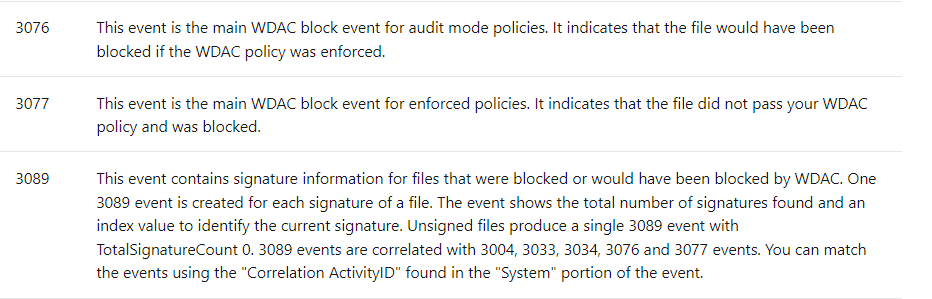
As shown earlier, those WDAC events can be found in the Microsoft-Windows-CodeIntegrity/Operational event log
Please Note: You can notice these kinds of warnings below!
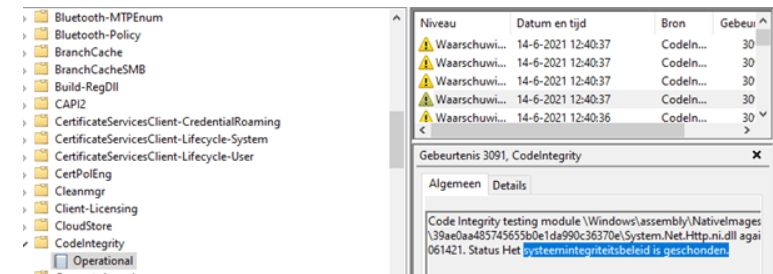
Don’t be mistaken by these kinds of warnings, because it’s a known problem.

6.1.4. Powershell
Open a new PowerShell session as admin and copy-paste this command
Get-CimInstance -ClassName Win32_DeviceGuard -Namespace root\Microsoft\Windows\DeviceGuard | FL *codeintegrity*

If WDAC is enforced the “UserModeCodeIntegrityPolicyEnforcementStatus” needs to have a value of “2”
6.2. Testing it
After some tests, I noticed a lot of apps that were trying to install from the company app portal just failed! So we have got 2 options here.
- Allowing
- Scanning
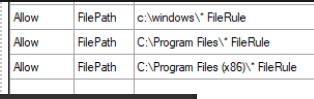
6.2.1. Allowing
If you don’t want to go into the hassle of scanning all folders on a golden device. (The same physical device with all the software installed which is necessary) you could just allow the folders needed. It’s just like Applocker where everything launched from the program files is allowed!
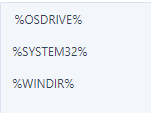
Please note, that you can only use these 3 system variables when you are going to allow some folders.
6.2.2. Scanning
Just like with the allowing part, when you have selected one of the Microsoft Baseline Examples, you still need to scan the program files! Otherwise, a lot of apps will be blocked even when you have enabled ISG
New-CIPolicy -FilePath .\ProgramFiles.xml -ScanPath $env:ProgramFiles -Level Publisher –UserPEs -fallback hash
New-CIPolicy -FilePath .\ProgramFiles86.xml -ScanPath ${env:ProgramFiles(x86)} -Level Publisher –UserPEs -fallback hash
Please beware: Many files can’t be added by a filepublisher rule. So you need to specify the—fallback “hash” parameter. This will ensure that files that can’t meet the FilePubisher trust level are trusted based on the Hash rule level.

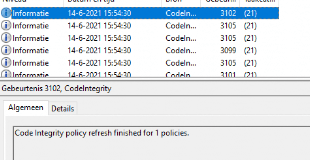
When you have uploaded the new policy to Intune, you can check out the Code Integrity event log to determine if the new policy has arrived.
6.2.3. Troubleshooting
While testing it, I experienced some weird behavior. A sort of delay in policy arrival. Normally you push the new bin file to Intune and press the sync button to make sure the devices are being synced but this time it wasn’t working. After waiting almost an hour, I decided to delete the CI file in the C:\Windows\System32\CodeIntegrity\CIPolicies\Active folder. After again syncing the device, within a couple of minutes the new policy applied.
But beware: When WDAC is deployed and enforced, you should make sure you sign your WDAC policy. If the policy is not signed, you can just delete (or overwrite) it, as I did above when my policy was not updating!
7. Creating a Golden Image?
In the fifth part of this blog, we chose to start with a Microsoft Baseline Example and added some additional publisher rules or allowed the program files folder. But what if you don’t want to use the Microsoft Baseline and create your own golden image?
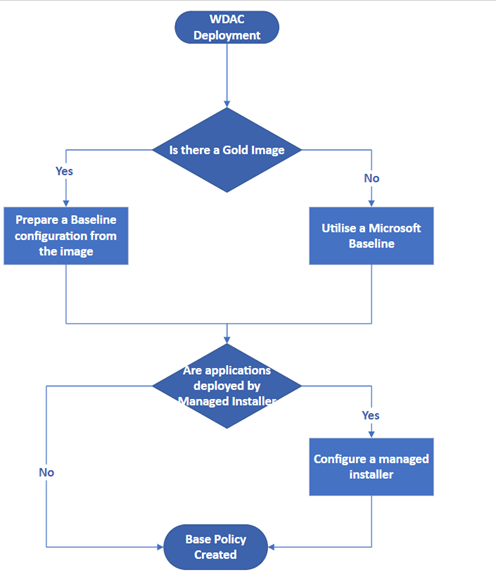
Let’s start with creating a baseline from the same physical device your other users are going to work on.
Open Powershell and launch this command
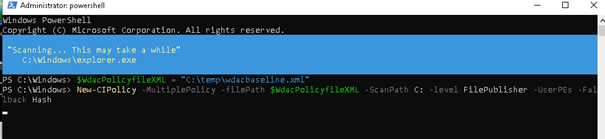
$wdacPolicyfileXML = “C:\temp\wdacpolicybaseline.xml”
New-CIPolicy -MultiplePolicy -filePath $wdacPolicyfileXML -ScanPath C: -level FilePublisher -UserPEs -Fallback Hash
And now we wait… a long time


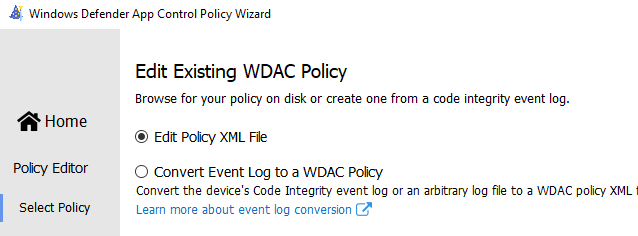
After it was finally done creating the XML, I started the WDAC tool again and chose to edit the file

In the next screen, change the settings you need and press Next. As said before, please enable the “Update Policy without Rebooting option”!
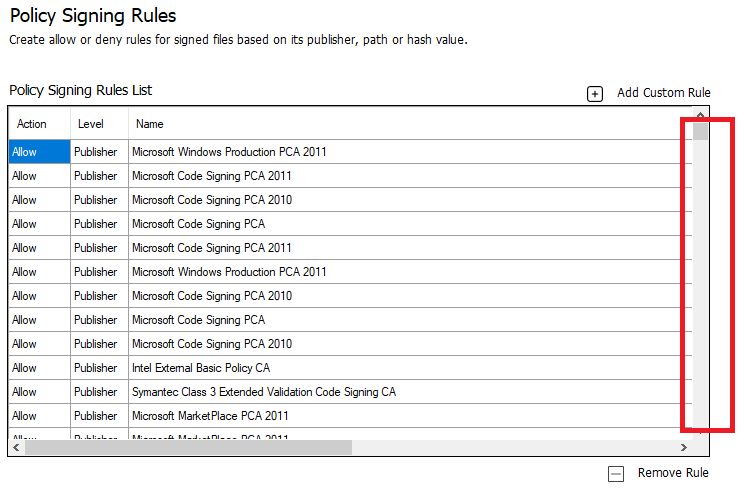
What a large list of allowed publishers and a lot of duplicate items! I tried to remove all the duplicates
Let’s start building our WDAC policy…. Shall I add another Coffee gif?
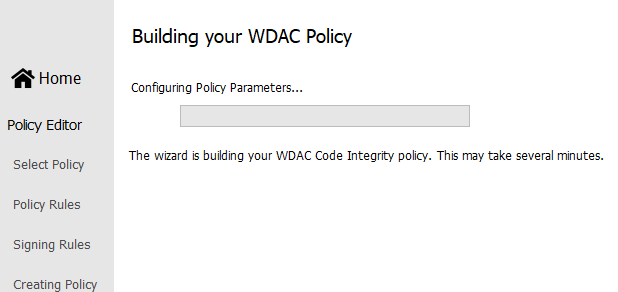
After waiting a long time it was finally done. You could upload it to Intune and start testing with it… but In my opinion, choosing a Microsoft baseline to start with is way better and cleaner.
8. Add an allow rule or merge two XML Files!
Best practice! Make sure you have an additional VM enrolled in the company you want to allow an additional application. When you make changes, please save each XML in its own folder with revisions and what you have changed!
8.1. Adding a rule
Again, we need to open the WDAC tool, but this time we are going to choose to edit a policy.

It’s very easy, just select the correct XML, add some allow or deny rules in it and save the policy. After you have made some changes and converted it again to a bin file, we need to open the CSP you have created earlier and select the new bin file. After you have selected the bin file, you also need to rename the OMA-URI to match the ID from the XML. When you are done, don’t forget to save the CSP.
8.2 Merging rules
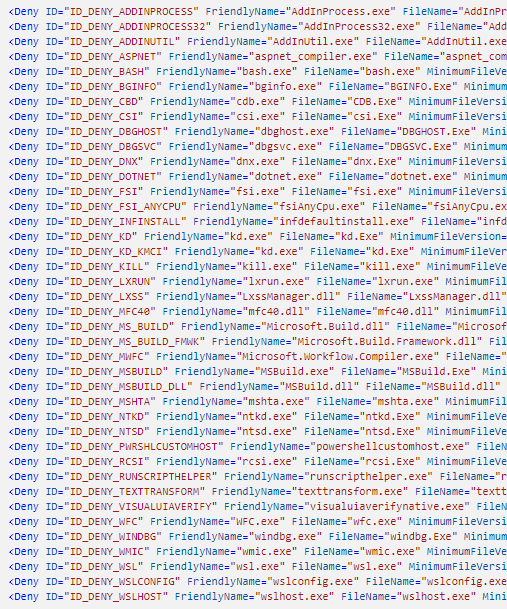
Now we know how to add some rules, we are going to take a look at how we could possibly merge two rules. First, we are going to download, a Microsoft list of recommended block rules and save the XML.
Microsoft recommended block rules (Windows 10) – Windows security | Microsoft Docs
It blocks some processes that could do harm.
Open the WDAC tool, select the policy merger, and select both of the 2 policies.

It will combine the 2 XML in one new XML and cip/bin file you could upload.
9. The Microsoft Store / Blocking Apps
As mentioned earlier, when looking at Microsoft their WDAC baseline examples you will notice on each of them the Microsoft Store Applications are allowed.
The first thing that would probably come to mind is to Enforce store applications.

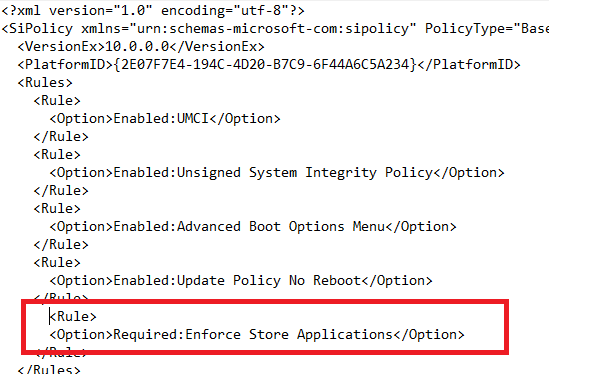
| If this rule option is enabled, WDAC policies will also apply to Universal Windows applications. |
Yeahhh!!! you might think….But what happens when we just try to download Spotify!
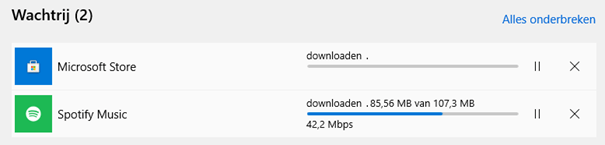
It just downloads the App and you can launch with no issues! So, do we need to block specific Universal Store Apps when we have chosen the Microsoft Example baseline?
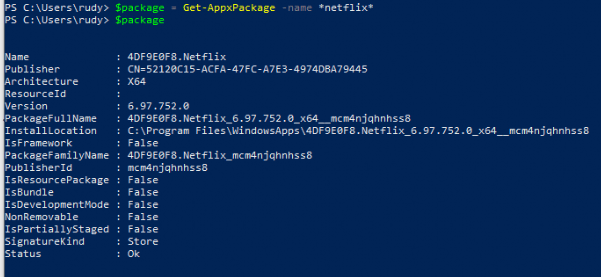
Blocking Packaged Apps
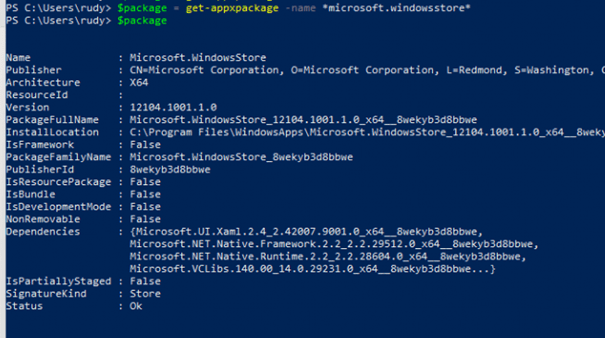
We could use New-CIPolicyRule -Package $Package -Deny to block packaged apps. Here is an example to block Netflix

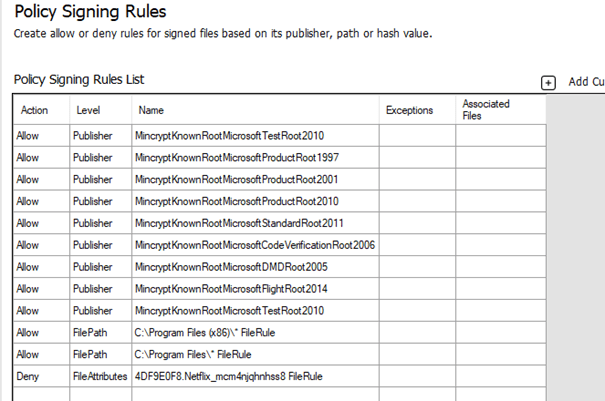
After we have merged the rules, let’s take a look at what happens when we want to launch the Netflix App
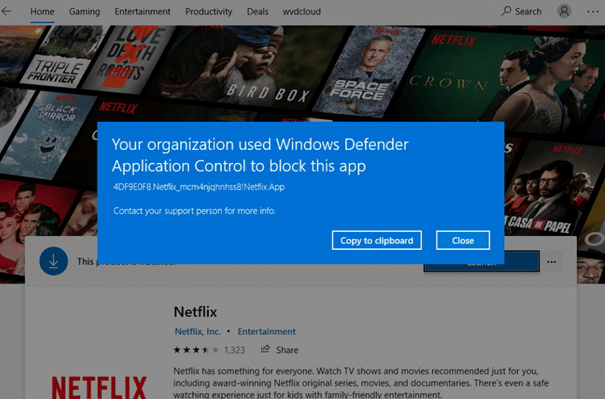
But beware, this only disables the Netflix App and all the other apps are still available!
So what happens when we block the Windows Store just like I did with Netflix, I did the same with the Windows Store app
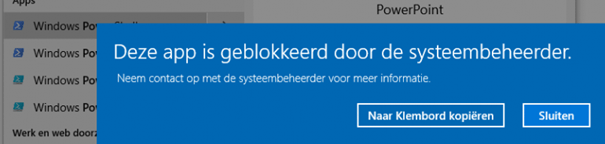
And the Results! As shown below… when you are trying to launch the Windows Store…. It’s not going to open.

But this is definitely not what you want! You still want to have the Microsoft Store on your devices as it’s needed if you want to make sure the Company App is installed on your devices (If you don’t have a Win32 app with the offline version in it). It even still doesn’t prevent manual installations of App Packages!
Also removing this Publisher rule as shown below from the Microsoft example baseline… won’t help!

So what’s next? I tried to remove some more Publisher rules, but it instantly broke my virtual machine and it ended up in a non-bootable VM.
I guess as I said before… you could do some finetuning with Applocker or just use Applocker……..
https://call4cloud.nl/2020/06/managing-apps-in-the-microsoft-store
10. Disable WDAC
First, we will examine what Microsoft tells us to do when we want to remove the policy.
If you are done testing or using WDAC, please beware that when you need to disable WDAC enforcement you will need to make sure you have replaced the existing policy with a new version of the %windir%\schemas\CodeIntegrity\ExamplePolicies\AllowAll.xml policy.
When you are certain the policy has been replaced, you can delete it from the Intune portal. This ensures that all applications are allowed, and the WDAC policy is removed on the next reboot.
To be sure, I just removed the assignment from the device configuration policy to see if it is still tattooed on the device.
After the policy has been applied, watch the code integrity folder. It’s empty, but still, the process is blocked.
But after a reboot, it worked… even without specifying the allowall.xml first. I guess safety comes first, and just push out the AllowALL.xml first… you can’t break anything by doing so.
I guess when you were still deploying WDAC with the Applocker CSP, you needed to make sure everything was allowed before you removed the policy.
Conclusion
It’s cool you could combine WDAC with Applocker to block PowerShell only for the normal user.
So, WDAC is not a replacement for Applocker but a compliment. In my opinion, I still prefer to use only Applocker for the SMB. Applocker is much easier to setup/maintain and deploy!
Of course, everything can be more secure but it could also mean you can end up with a lot of people rebelling because nothing is working and you will end up questioning yourself if it was a good idea just to turn it on.

If you want to read more parts of the Endpoint Security Series:
Endpoint Security Series – Call4Cloud
*The fifth part about Exploit Protection
https://call4cloud.nl/2021/06/the-exploit-protection-between-us
Hi there,
Awesome article. I was looking for something like this to get a better overview of WDAC.
Am I wrong or it’s impossible to define Intune as “Managed Installer” via a CSP policy?
I follow the Microsoft docs that you linked in step 5 and I only find ways to set Intune as managed installer via Script or GPO. There are really some odd stuff with Intune sometimes.
They say in the documentation that you need to define your Managed Installer via an AppLocker policy, but when you go over to see the AppLocker CSP there is no way to define your Managed Installer via CSP.
https://docs.microsoft.com/en-us/windows/client-management/mdm/applocker-csp
You should try with ./Vendor/MSFT/AppLocker/AppLocker/ApplicationLaunchRestrictions/apps/EXE/Policy
as Only EXE file types can be designated as managed installers.
Hi
It’ s a very interesting article, since I’m starting with WDAC. I’ve followed the step and I’m running in Audit mode, but I see several DLLs (what seems to Microsoft DLLs: netsetupengine.dll, winnsi.dll etc) with a warning: “was allowed to run but would have been prevented from running if the AppLocker policy were enforced.”? Do I need to do a scan (topic 6.2.2) on the system32 folder as well?
Hi,
I have the same problem. Anyone know how applocker disable for good whitout reinstall system?
did you find a solution?
Hi Rudyooms,
Is there a way to have a policy that allow’s everything except only what you specifically deny?
Hi Rudyooms,
Thank you for the great explanation. Is there a way to have a policy that allow’s everything except only what you specifically deny and how is update to the existing policy managed, Should a new policy be created and or merge new changes to the existing policy.
Just need clarification on this point – Instead of enabling the managed Installer in Endpoint Security, instead, you recommend to deploy a detection and remediation script targeting specific devices for test and don’t enable the managed installer via Endpoint Security\App Control for Business\Managed Installer?
“A way better option would be to fetch the PowerShell remediation script below, which would be pushed down to your devices when enabling this option”
Hi.
yes as enabling hte managed installer feature in intune, would enable it for all devices on the fly… thats something you want to prevent as you want to scope it?