
I guess it’s time for the sixth part of the Endpoint Security Series. This time, I will walk you through Microsoft Defender Device Control, how to configure it in Intune, and how it works.
1. Some Information about Device control
Microsoft Defender for Endpoints has a cool feature protecting devices against data loss. This feature provides a layered approach to secure removable hardware like external hard drives. Of course, this feature couldn’t have any other name than Windows Defender Device Control.
When using Device Control, you could prevent users from installing specific hardware on the devices or prevent removable storage from being used!
The only prerequisite? It would be best to ensure that Microsoft Defender for Endpoints is enabled and active. If you have configured another AV, Microsoft Defender will be running in passive mode, and Device Control will probably not work

2. How to Configure Device Control in Intune
Like always, open Intune and Click on Endpoint Security –> Attack Surface Reduction to create a new policy.


I am going to split this first one up. Because the first part is sometimes difficult to understand and configure. The second part about allowing removable storage speaks for itself.
Allowing / Blocking Hardware

These settings allow you to create allow lists or deny lists based on hardware IDs or specific device GUID allows lists (and deny lists). This allows us to secure the environment based on the specific hardware allowed to connect. Configuring a block policy will apply to the device, so even if your end-users are configured as local administrators, it will be blocked.
Block / Allow Hardware Device installation by device identifiers
Specific Hardware IDs you configure in this policy are forbidden and blocked from being installed.
PLEASE NOTE: The device ID isn’t the PnP ID but the Hardware ID
*How to find the Device/Hardware Id with the device manager

*How to find the Device/Hardware Id with PowerShell?
Get-WmiObject Win32_PNPEntity | select name,hardwareid | sort-object hardwareid | Get-Unique -asstring |fl

Block/ Allow Hardware device installation by setup classes:
Device GUIDs entered here are prohibited from being installed. Prevent policies have higher priority over allowed policies. If a device class GUID is configured for both allow and disallow policies, the devices will not be allowed to install.
*How to find the Class GUID with the device manager

While looking at the device Class GUIDES, I realized I had also written a blog on this topic some time ago. The blog will show you how to allow normal users to install printer drivers independently.
*How to find the Class GUID with PowerShell?
Get-WmiObject Win32_PNPEntity | select name,classguid | sort-object classguid | Get-Unique -asstring |fl

Block/ Allow Hardware device installation by device instance identifiers:
A device instance ID is a system-supplied device identification string that uniquely identifies a device in the system. The Plug and Play manager assigns a device instance ID to each device node in a system’s device tree
*How to find the Device instance ID with the Device Manager

*How to find the Device instance ID with PowerShell?
Get-WmiObject Win32_PNPEntity | select name,deviceid | sort-object deviceeid | Get-Unique -asstring |fl

Configuring USB storage media and Bluetooth
This one is more clear than blocking or allowing the installation of hardware. Let’s take a look at some of the policies.

All of the settings above allow us to control what devices can connect to our computers. In the sample above, I am making sure people can still use Removable Storage, but I am preventing write access. Setting up a policy like this will ensure that your Company data can’t be copied to a USB stick.
I am also allowing Bluetooth, but like the removable storage, I am restricting its use.
3. Results of Blocking specific hardware!
When configuring an Endpoint Security device control policy to block hardware device installation by device identifier, we need to know what happens to the client.
First, let’s open the device manager, we will notice the hardware couldn’t be installed.

Error Code 1: The installation of this device is blocked by a system policy

You will also get a nice toast message with the same message above.

And of course, the removable storage device in this example is not accessible!
4. Results of preventing Write Access Removable Storage
Now that we have seen what happens when you totally block all access to removable storage, let’s see what happens when you block the possibility of writing data to removable storage.

The only way to test it is to attach a USB removable storage device and try to create a folder or copy some data to it. You will be prompted with this error: ACCESS DENIED!

5. Deploy printer protection on Windows
Today a new method for printer protection was released. When discussing Device Control, controlling which printer may be used for printing is great!
Please make sure you have applied for the correct license!
- Microsoft 365 E3 for functionality/policy deployment
- Microsoft 365 E5 for reporting
The new printer protection feature allows you to block users from printing via a non-corporate network printer or non-approved USB printer. This adds an additional layer of security and data protection for work-from-home and remote work scenarios.
So, how do we configure this?
Before we start we need to make some hard choices, are you going to deploy it to the machine or user context? Now we made a choice: create two CSPs and configure the values as I show below
MACHINE CONTEXT
*Block printing from non-approved printers
OMA-URI: ./Vendor/MSFT/Policy/Config/Printers/EnableDeviceControl
Value:<enabled/>
*Define the approved USB printers
OMA-URI: ./Vendor/MSFT/Policy/Config/Printers/ApprovedUsbPrintDevices
Value: <enabled/><data id=”ApprovedUsbPrintDevices_List” value=”03F0/8117,03F0/8217″/>
USER CONTEXT
*Block printing from non approved printers
OMA-URI: ./Vendor/MSFT/Policy/Config/Printers/EnableDeviceControlUser
Value:<enabled/>
*Define the approved USB printers
OMA-URI: ./Vendor/MSFT/Policy/Config/Printers/ApprovedUsbPrintDevicesUser
Value: <enabled/><data id=”ApprovedUsbPrintDevices_List” value=”03F0/8117,03F0/8217″/>
Wondering what the 03f0/8117 stands for? The VID/PID. Could you open the device manager to get them?

When you don’t want to take a look in the device manager to find them, please visit this Device Hunt website
USB\VID_03F0 – HP, Inc | Device Hunt
Of course, the results when you plug in your private USB printing device and want to print something. You will notice the print job is sent to the spooler but also immediately removed!
Open the event log and open the Print Service event log

When looking and translating the nice dutch text: It will be blocked because of some printer restrictions. The USB printer is not on the list of allowed devices!

6. Digger deeper
When you want to monitor if the restrictions are configured on the device itself, its best to open the local registry and open this key
You will notice all the settings you configured in Intune are deployed to these registry keys
HKEY_LOCAL_MACHINE\SOFTWARE\Policies\Microsoft\Windows\DeviceInstall
When looking at this key, you will notice that there is a difference between blocking Hardware ID’s

And when you are blocking Device Instance ID’s

But how do these keys end up in here? Just like all settings in Intune, A CSP is responsible for it. SO let’s take a look at which one. Open this registry key to start digging.
HKEY_LOCAL_MACHINE\SOFTWARE\Microsoft\PolicyManager\current\device\

Do you notice the ADMXInstanceData key? Let’s open that one now.

It has the same JSON content in it configured which you would do with a CSP.
OMA-URI:./Device/Vendor/MSFT/Policy/Config/DeviceInstallation/PreventInstallationOfMatchingDeviceInstanceIDs
DataType: String

7. Logging
Here comes the discussion…. Are we going to block removable storage, limit its use, or just allow it?
For each choice you make, you must ensure you don’t set and forget. You really need to know when someone is trying to attach a new removable storage device. So you need to monitor it, so go open your event log and go take a look at the Kernel-PnP event log
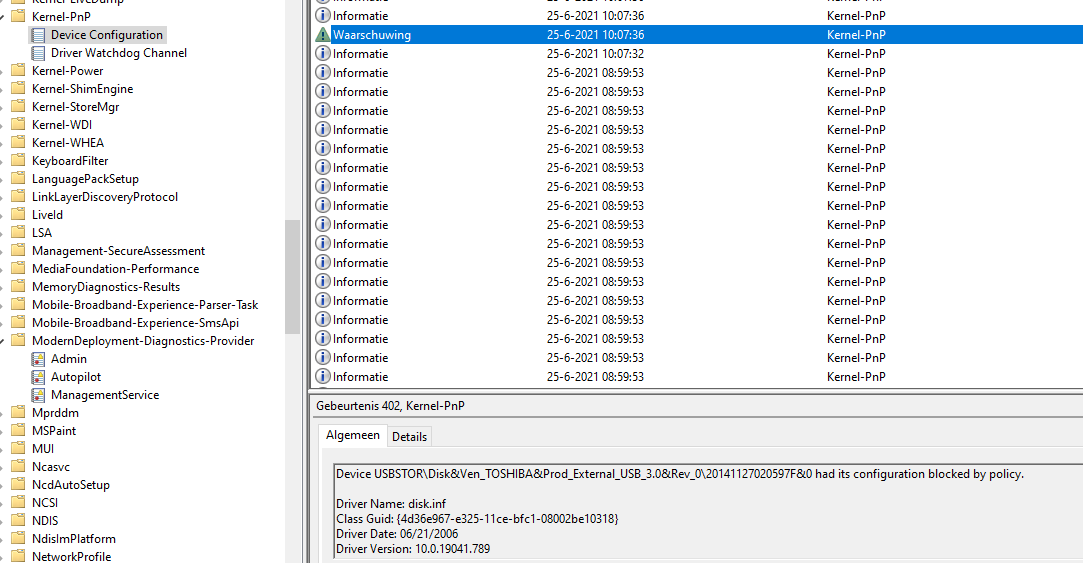
But what to do, when you are not blocking removable storage? Of course, you want to ensure you are logging all those events. How will we ensure we are notified when someone successfully copies a file? MCAS! This is the way!


Like always, I have done a blog about this subject some time ago. Go out and read it if you are interested!
8. Removing/ Changing the policy
Removing the whole policy or removing the assignment in Intune will also ensure the settings are removed from the device!
But beware, if you are changing an existing policy and you only remove the Hardware IDs like the ones below, it will not remove the settings from the client.

You will need to change the: Block hardware device installation by device identifiers to: not configured

And within a few minutes after syncing the device in Intune the whole register DenyDevicesIDS key is deleted

Conclusion
It really depends on the organization you work for if you need to limit, block, or allow and log these types of actions. It’s a good thing Microsoft has all the options available for us to start dancing and do our jobs!
If you want to read the previous Endpoint Security blogs:
Endpoint Security Series – Call4Cloud
And if you are not interested in the endpoint security blogs I still got some other blogs for you!
- Autopilot Error 0x80280009: TPM Attestation. What is going on?
- Local Administrator Protection vs. EPM: The Differences Explained!
- Strengthening Local Admin Security in Windows 11 with Local Administrator Protection
- Troubleshooting Intune Enrollment: Solving the 0x80180031 MDM Not Configured Error
- SecureChannelFailure Errors, and the Curious Case of the Failing IME
I made a Device Control policy with the option “Block Removable Storage” on Yes with a Exclude group, but if I put the devices in the Exclude group the lock still stays on there. Have any experience with this?
Maybe add to the blog about this setting “Apply layered order of evaluation for Allow and Prevent device installation policies across all device match criteria”.
Also, wildcards are not currently supported for Device and Instance ID’s (confirmed with case logged to Microsoft).
We are blocking GenCdRom, Teams phones and banking usb dongels are identified as “USBSTOR\CdRomGEMALTO_P” and “USBSTOR\CDROM&VEN_YEALINK&PROD_YUC&REV_0409” and another device “USBSTOR\CdRomHUAWEI__”. One issue where we need wildcards is that some devices append an additional value to the InstanceID that is unique to each computer which makes it near impossible to allow a unique key for all devices “USBSTOR\CDROM&VEN_YEALINK&PROD_YUC&REV_0409\8&315081E8&0&301110E020007770&0” the additional part is “\8&315081E8&0&301110E020007770&0”.
Hi, was reading this article but to me, it does not seem so fit my usecase.
We want to block all USB storage devices except a view trusted types.
Do you have any idea on how to do that with Intune ?
We have a customer migrated from another endpoint solution (ESET) to Intune with Defender for business (i..g Plan 1) (The MS Business Premium Package). They are really annoyed that you cannot temporarily allow a USB device for a user for instance for 10 minutes. Previously an admin could just remote it and allow a VIP to access their USB drive for a few mins.
What would be the quickest way to do this with Intune? Remote to their workstations, plug in the USB drive (that will be blocked), find the ID, create new policy, apply new policy to the user, wait for them to finish and then remove the policy? Wouldn’t the block policy override the allow policy anyway?
Thank you, Ruby. We also noticed that on multi-user computers, if a device control policy is applied to a specific user, it behaves inconsistently. For example, if User1 has a block policy, it gets applied. However, if User2 (who is not part of the assignment) logs in, the block policy from User1 remains until Intune syncs, which might take up to 8 hours. Is this expected behavior? Unfortunately, we have reverted to applying GPOs, which perform the task perfectly.