

This blog shows how to deploy printer drivers to Entra joined devices using Intune and PowerShell.
Whether you’re dealing with legacy print servers or standalone printers, this guide gives you full control over driver deployment, scripted, automated, and reliable.
1. Introduction
Of course, transforming to a modern workplace will also mean you need to do something with your existing Print solution. One of the best solutions would probably be to start using the Microsoft Universal Print solution. In one of my first blogs, I told you how you could configure this and what my wishes were for this fantastic product:
https://call4cloud.nl/2020/04/microsoft-universal-print
But what if you don’t have the possibility to migrate your printers to this solution right away? I know how it works! A customer calls and suddenly wants to deploy a new printer to all of their devices, and they don’t want to hear they need to move their printers to cloud-based solutions first. So what can you do? Tell the customer: No, no.
The best option would be to install the printer first and then arrange a meeting with the customer to urge them to move their printers to a cloud-based solution.
So, for now, the printer has to be installed. Are we letting the customer do this manually as I showed you in this blog? P.S. I am also showing you how to solve the Printer Nightmare issue in this blog
https://call4cloud.nl/2020/10/birds-of-printer-drivers
Or will we make sure the Printer and drivers are installed without any user interaction?
2. Installing Printers and Drivers with PnpUtil
In this option, we will use the PnPutil tool to “Stage” the Printer Driver to the Windows Driver Store. The driver needs to be “staged” (Copied to the Driver Store AKA /Add-driver) before we can make use of it to install the printer driver (Add-PrinterDriver). After we have staged and installed the required drivers, we can install the printer itself!
Let’s start by downloading the driver so we can begin!
Step 1: Download the driver
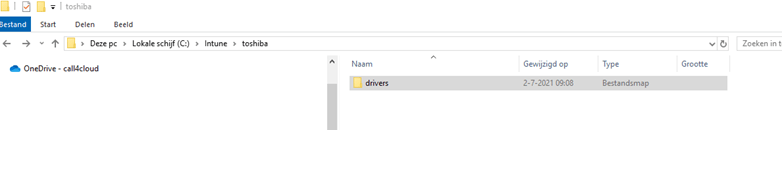
In this example, I want to deploy a Toshiba printer, so I downloaded the Universal printer drivers from Toshiba first and placed them inside the folder c:\intune\toshiba

After the zip file finished downloading, I extracted the whole zip file to start searching for the inf file (installation file) After I found the correct folder with the inf file in it, I copied it to the whole folder to c:\intune\toshiba\

To be 100% sure I had all the files needed, I moved this whole folder, including all the content, to the c:\intune\toshiba root folder. When you don’t want to copy all of the content, you could check out the inf file and search for: “SourceDisksNames“
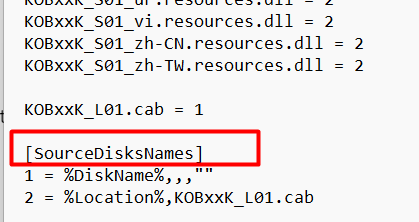
As shown above, it will tell you which additional files you need.
Please note, that you always need to have the *.Inf file (installation file with driver information) and the *.cat file (security catalog to determine if it’s a valid signed driver). So next to the inf and cat file, you will need that *.cab file
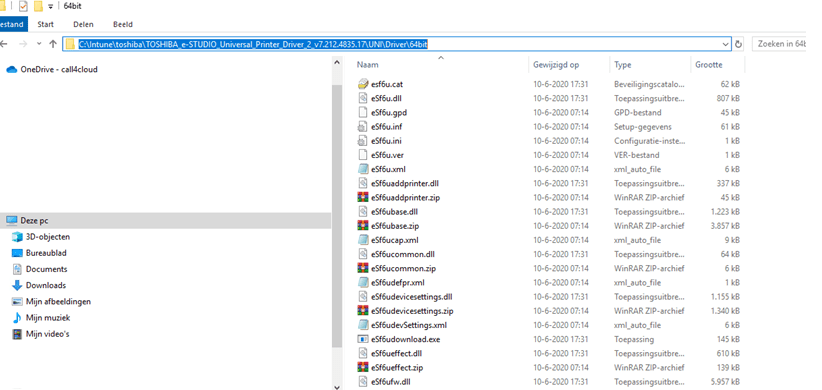
I renamed the folder that I copied earlier to one with some fewer characters. I decided to just rename the folder to drivers. I guess that name says it all and it’s way shorter.
Step 2: Creating the Install script
Before we can create the installation script we need to have some additional information. So again, open the *.inf file in the folder you extracted earlier.

We need to have the exact Printer Driver’s Name. As shown above, it was an easy find! So let’s build the install.ps1 PowerShell script. Before I continue, I need to add an additional Note:
Please Note: do not change the Sysnative folder to System32! I am explaining that part below the script
Install.ps1
###############################
#TOSHIBA Universal Printer 2  #
################################
$PSScriptRoot = Split-Path -Parent -Path $MyInvocation.MyCommand.Definition
$drivername = "TOSHIBA Universal Printer 2"
$portName = "IP_192.168.40.251"
$PortAddress = "192.168.40.251"

###################
#Staging Drivers   #
###################
C:\Windows\SysNative\pnputil.exe /add-driver "$psscriptroot\Drivers\eSf6u.inf" /install

#######################
#Installing Drivers   #
#######################

Add-PrinterDriver -Name $drivername

##########################################################
#Install Printerport | check if the port already exist   #
##########################################################
$checkPortExists = Get-Printerport -Name $portname -ErrorAction SilentlyContinue
if (-not $checkPortExists)
{
Add-PrinterPort -name $portName -PrinterHostAddress $PortAddress
}

####################################
#Check if PrinterDriver Exists     #
####################################
$printDriverExists = Get-PrinterDriver -name $DriverName -ErrorAction SilentlyContinue


##################
#Install Printer #
##################
if ($printDriverExists)
{
Add-Printer -Name "Toshiba HoofdKantoor" -PortName $portName -DriverName $DriverName
}
else
{
Write-Warning "Printer Driver not installed"
}

SLEEP 360
Did you notice the part where I am mentioning Sysnative instead of System32? If you want to read all about this, please read this blog:
https://call4cloud.nl/2021/05/the-sysnative-witch-project
And, of course, we need to specify a nice uninstall.ps1, that’s going to be a lot easier!
Uninstall.ps1
remove-printer "Toshiba Hoofdkantoor"
SLEEP 360
remove-printerPort -Name "192.168.40.251"
Step 3. Creating the Intunewinapp
Now that we have everything we need, we need to create the intunewinapp, so download the tool and zip it as shown below:

When we have created the intunewinapp we still need to publish it. To do so, open Intune and start creating a new Win32 app with the settings I show below.
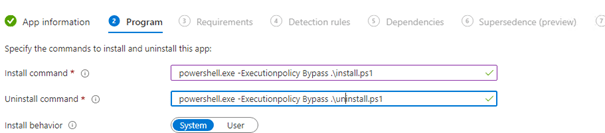
Please make sure you add the “-Executionpolicy Bypass” switch. I will tell you more about the execution policy in part 6!
Detection Rules
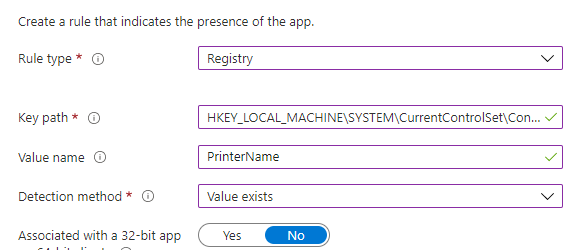
Of course, we need to specify detection rules. We need to make sure when the printer is not installed it will be installed. The best method would be to choose a registry detection rule. But how do we know what key we must use? That’s easy… just open the registry and browse to this registry key to find your printer:
“HKEY_LOCAL_MACHINE\SYSTEM\CurrentControlSet\Control\Print\Printers\“
You will notice all printers are listed here. We can use the same value as we configured in the install.ps1 as the printer name. In this example, I am using: Toshiba Hoofdkantoor
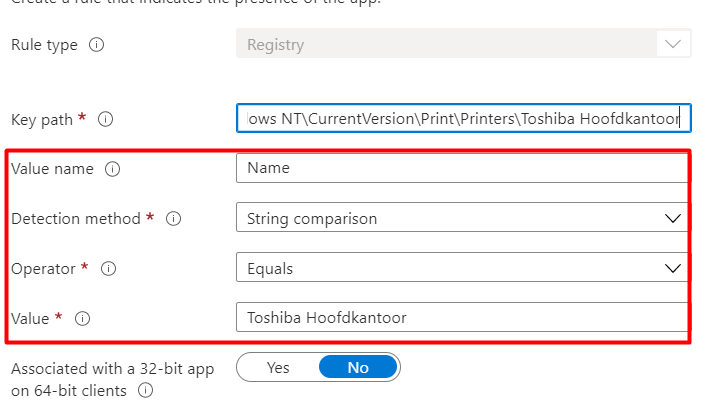
As shown above, I am making use of the “detection method“: String Comparision to find the Registry Value: “Name” and detect if it is the same as “Toshiba Hoofdkantoor”. You can check out the registry value “Name” in the registry key I mentioned above to be 100% you get it right.
Assign the win32app to the correct users/groups/devices as required (or available if you want the let the end-user install the printer themselves when they really need it )
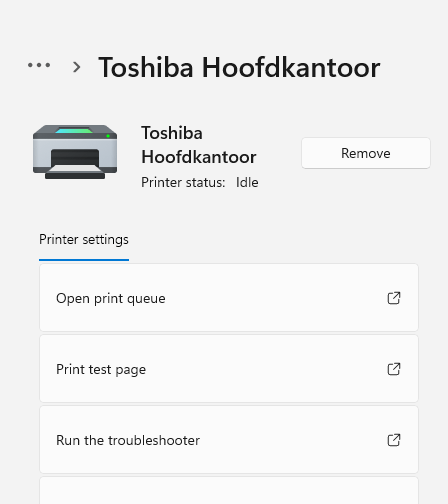
Results:
After the Win32 App finished installing, we notice a new printer has been installed. Let’s check it out!
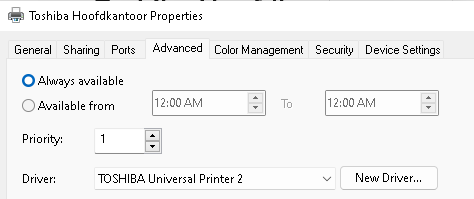
Looking at the printer port, it has the proper TCP/IP port attached to it

And of course, it has exactly the same printer driver which we specified to be installed!
Step 4. Finetuning
Of course, we don’t want every page to be printed in color, so change the color setting to $false to ensure you save some money.
I will also disable the duplex option and specify the paper size in this example. You can add this part to the end of the install.ps1 script to make sure the printer settings are changed when the printer is installed.
Set-PrintConfiguration -PrinterName “Toshiba hoofdkantoor” -PaperSize A4 -color $false -duplexingmode onesided

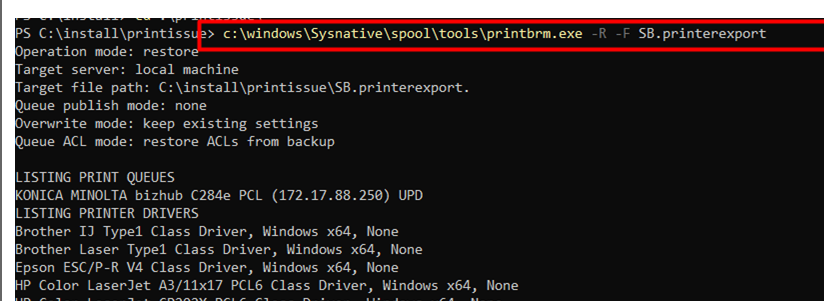
3. Installing Printers and Drivers with Printbrm.exe
Just like PnPutil, it’s a nice built-in utility… so why not use it? A big difference with the PnPutil.exe is that with this nice tool, you can export ALL Printers and their corresponding drivers to one big Printerexport file.
printbrm.exe -B -F c:\test.printerexport

Please beware: PrintBRM is not included in the Windows PATH but will be found at c:\windows\System32\spool\tools\printbrm.exe
So when creating your PowerShell script and converting to an Intunewin App with the Printerexport, please define the full path to the PrintBRM tool! But!!!! Just like we noticed with the pnputil, we need to define the Sysnative folder
c:\windows\Sysnative\spool\tools\printbrm.exe -R -F SB.printerexport
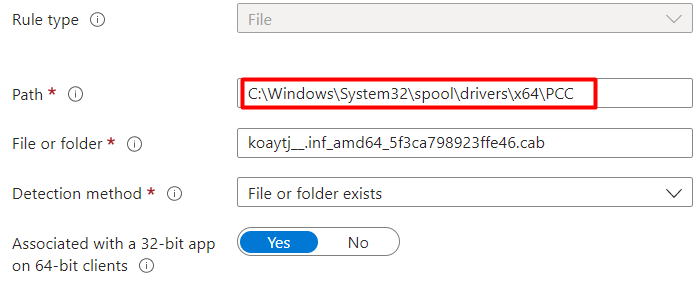
Now the only thing left for you to do is to create the IntuneWinApp and upload it to Intune! When using a Win32App we also need to make sure we define some detection rules. This time we are going to use a file detection rule and define the driver folder inside the Printer Spooler Folder on the device!
4. Install HP printers with the Universal Printer Driver
Someone mentioned in the comments that it’s also possible to use the HP universal printer driver (install.exe) to ensure the Printer and drivers are installed correctly.
First, you will need to download the Universal Printer Driver from the Hp website or this link.
Make sure you extract the files to a folder named HP. Now create a PowerShell script and name that one install.ps1
$PortName = "PortName"
$PortAddress = "xxx.xxx.xxx.xxx"
$NewPrinter = "PrinterName"
$checkPortExists = Get-Printerport -Name $portname -ErrorAction SilentlyContinue
if (-not $checkPortExists) {Add-PrinterPort -name $portName -PrinterHostAddress $PortAddress}

.\hp\install.exe /n "$NewPrinter" /sm "$PortName" /h /q /nd /u

Sleep -Seconds 30
The install switches are: /h = hide installer /q = Quiet no user interaction /nd = Not default /u = Don’t install driver if already present.
Convert that whole folder to an Intunewinfile (the .\hp\ folder is also included). Upload this file to Intune and make sure you configure the install command like this:
powershell.exe -executionpolicy Bypass -file .\install.ps1
Of course, with every Win32App you will need to have a detection rule…. You could set up one by using the registry to detect if the printer already exists by specifying this key:
HKEY_LOCAL_MACHINE\SYSTEM\CurrentControlSet\Control\Print\Printers\PrinterName (change the printer name to match the one from the script)
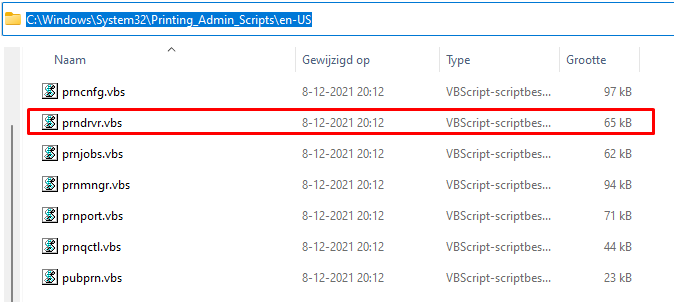
5. Install Printer Drivers with PrnDrvr.vbs
Another cool possibility is just to use the old PrnDrvr.vbs file and combine it with Cscript. This Prndrvr.vbs can be used to install or delete a driver. This file can be found in your Printing_Admin_Scripts folder as shown below
Of course, like always before we can add the Driver, we need to add the Printer Port first, just like we did with the HP universal driver.
$PortName = "PortName"
$PortAddress = "xxx.xxx.xxx.xxx"
$NewPrinter = "PrinterName"
$checkPortExists = Get-Printerport -Name $portname -ErrorAction SilentlyContinue
if (-not $checkPortExists) {Add-PrinterPort -name $portName -PrinterHostAddress $PortAddress}
And now we can use Cscript to call upon the visual basic script file to install the driver.
cscript "C:\Windows\System32\Printing_Admin_Scripts\en-US\prndrvr.vbs" -a -m "Canon Generic Plus PCL6" -i ".\GPlus_PCL6_Driver_V250_32_64_00\x64\Driver\CNP60MA64.INF" -h ".\GPlus_PCL6_Driver_V250_32_64_00\x64\Driver" -v 3

Add-Printer -Name $newprinters -PortName $portname  -DriverName "Canon Generic Plus PCL6"
When you combine both of these scripts to one PowerShell script and add the Driver to the folder you can convert it to a nice Win32app and deploy it with Intune to your devices
6. PowerShell Execution Policy
Because I have been getting some questions about the PowerShell Execution Policy, I will try to get some stuff clarified in the PowerShell Execution policy
6.1. IntuneWinapp/Win32 App
When you have configured a new Intunewinapp/Win32App Package, and you want to make sure your PowerShell script is going to be executed successfully. You need to make sure this PowerShell Script is executed with the proper policy to bypass the execution policy. You can do so by simply executing Powershell.exe -ExecutionPolicy ByPass -File “.\full-script-path\script.ps1”
When using this option Microsoft tells us this: “Nothing is blocked and there will be no warnings or prompts”
6.2. PowerShell Scripts
When you have deployed a new PowerShell Script to Intune the Intune Management Extension (IME) will make sure this PowerShell script is executed on the device.
The IME doesn’t require any change whatsoever to the PowerShell Execution policy on the device. The IME will take care of the correct execution of your PowerShell scripts.
6.3. Set-ExecutionPolicy at the Top!
When you have the bright idea to push a PowerShell script with a set-executionpolicy at the top of it to change the execution policy, that isn’t going to work! Because the PowerShell execution policy is checked before the script is run so changing it within the script has no value or meaning. It really sounds like the chicken and egg situation.
6.4. Changing the MachinePolicy
Also changing the execution MachinePolicy on devices with the use of a PowerShell script deployed by the IME and using Set-ExecutionPolicy is not going to work

As shown above, the PowerShell command is not able to modify the MachinePolicy. Changing the MachinePolicy for Execution Policy is only allowed with the use of a Group Policy only. (by default)
Why I am mentioning the by default? As you “could” change it with the use of Regedit as the Group Policy just equals some registry values
Computer\HKEY_LOCAL_MACHINE\SOFTWARE\Microsoft\PowerShell\1\ShellIds\Microsoft.PowerShell

6.5. Beware of Applocker
Also, I need to point out, that when running a PowerShell script in the user context, please beware of the fact when you have configured Applocker, all of your PowerShell scripts will be run in. Constrained Language mode.

When trying to execute a script, you will get a nice error: “Cannot invoke method. Method invocation is supported only on core types in this language mode.”
7. What About the Printer Configs?
That’s indeed a very good question! Until now, I only showed you how you could solve the missing Drivers, but now we still need to look at how we could export and import the Printer Configurations.
To do so, we need to use Printui.exe. This wonderful tool and its corresponding Dll are inside the system32 folder.

To get a good understanding of all the options we have let’s open it
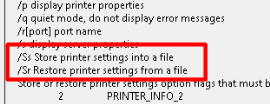
As shown above, this tool can easily store and restore its printer settings. Now let’s try it out. In this example, I exported my Lexmark Printer Configuration with the command Printui.exe /Ss /n “Lexmark XC4140 CVB” /a “c:\temp\config.dat”
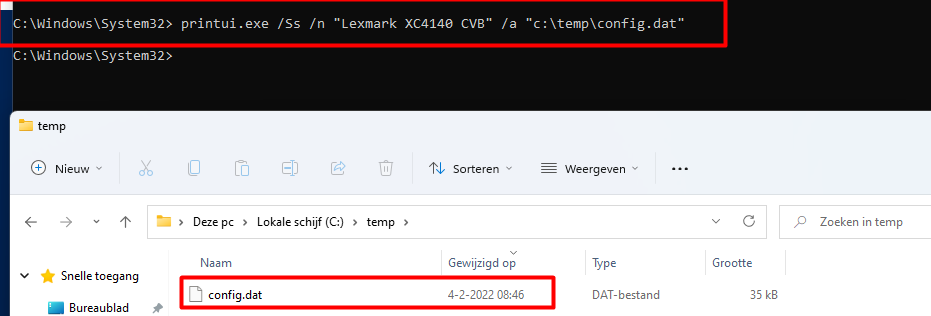
Now we have the DAT file, we could add this file to the same folder we used while Installing Printers and Drivers with PnpUtil.
With the config file in place, we could add a Driver Configuration Restore command to the PowerShell script we created to install those drivers. To restore drivers we only need to change 1 letter!
Printui.exe /Sr /n “Printer Name” /a “.\config.dat”
If you don’t want to use the Printui.exe you could also just use the corresponding Printui.DLL as shown below
rundll32 printui.dll,PrintUIEntry /Sr /n $PrinterName /a “.\config.dat” d g r
Conclusion
When migrating to a full-based cloud solution you will need to migrate your printer solutions also. Microsoft Universal Print should be your end goal but in the meantime, you could take a few baby steps and make sure some printers are still installed when necessary.

Thank you for posting this. I’m trying to do exactly what you described. For some reason my app is still failing. Not sure what is causing the failure. I’m having a hard time finding the exact logs I should look at to troubleshoot the problem.
WHen the app is failed installing, the intune management log would be the first place to start. There are a millions reasons why, the app failed to install..
If you post/send me the script etc I could test if for you to see what happens
Correct me if im wrong but this relies upon copying the drivers inf to c:\drivers on each machine?
In the post PrintNightmare world most of the ability to install drivers using powershell commands have fail. I have resorted using PowerShell to create the Port. Because most of our printers are HP and Universal Print Driver compatable I was able to use the Install.exe from the Basic Driver with Install from HP.
My IntuneWin package consisted of the Driver files and the Install and Uninstall PS Scripts. I ran this Install Powers shell scrip with the Install command of: powershell -executionPolicy bypass -Command “Start-Process PowerShell -Verb RunAs” .\install.ps1
___________
Script:
$PortName = “West_Local”
$PortAddress = “xxx.xxx.xxx.xxx”
$NewPrinter = “West_Local”
$checkPortExists = Get-Printerport -Name $portname -ErrorAction SilentlyContinue
if (-not $checkPortExists) {Add-PrinterPort -name $portName -PrinterHostAddress $PortAddress}
.\install.exe /n”$NewPrinter” /sm”$PortName” /h /q /nd /u
Sleep -Seconds 30
_____________________________________
The install switches are /h = hide installer /q = Quiet no user interaction /nd = Not default /u = Don’t install driver if already present.
I did Sleep for 30 seconds because with out it the detection fails because it tries to detect before the install is complete.
Detection is the presence in the registry = HKEY_LOCAL_MACHINE\SYSTEM\CurrentControlSet\Control\Print\Printers\West_Local
This works everytime.
There are multiple methods to push printer drivers to the devices indeed… I will add your solution to the blog… so people can choose which option they prefer (of don’t have hp printers 🙂 )
Can you post the link to the proper install.exe file?
Thanks for this but I couldn’t get it to work, perhaps HP or a PrintNightmare patch has changed something. The first part works to create the port but I cannot get install.exe to use this port, it always adds another. I was able to get it working using a one liner in my install.ps1 script:
Start-Process ‘.\install.exe’ -argument ‘/n”HP Printer” /sm192.168.1.200 /h /q /nd /u’ -wait
Install command: powershell.exe -ExecutionPolicy Bypass -File install.ps1
My next issue is I need to disable SNMP after the printer is installed, I have that in my script but it doesn’t process. When installing from the company portal, it just sticks at installing even though the reg key listed in the detection section exists in the reg.
there is no SysNative folder in any of our Windows 10 Installations, so i suspect this maybe the cause
Hi,
What os version are you using x64 or x86?…
This doesn’t work in powershell: C:\Windows\SysNative\pnputil.exe /add-driver “$psscriptroot\Drivers\eSf6u.inf” /install
I get that C:\Windows is not a recognized cmdlet
When testing this command, did you also started the 32 bits version of powershell first?
The script needs to use 32bit version of PowerShell? But in Intune you have “no” selected for 32bit apps in Intune
I’m doing exactly the same thing as you discribe in your blog but the install script woun’t start at devices with execution policy set do “restricted”.
As soon as I set the execution policy on the machine to “unrestricted” the install works perfect.
But the default value for the execution policy is “restricted” so the install woun’t run on any unmodified machine.
Have you any ideas to this?
Hi,
Hopefully I have the time tomorrow to take a good look at it. I will get back to you asap
I got the same problem.
How do you set the execution policy on your devices? Can this be done using intune?
Hi,
How did you configured the Intune install cmd? did you add the -executionpolicy bypass to it? Like I am describing in part 6 of the blog?
Hi I am having trouble installing and getting it to work tried two methods from the blog and both failed :(.
Is this correct what I have done
$PortName = “10.240.45.145”
$PortAddress = “10.240.45.145”
$NewPrinter = “WPA Printer”
$checkPortExists = Get-Printerport -Name $portname -ErrorAction SilentlyContinue
if (-not $checkPortExists) {Add-PrinterPort -name $portName -PrinterHostAddress $PortAddress}
.\hp\install.exe /n “$NewPrinter” /sm “$PortName” /h /q /nd /u
Sleep -Seconds 30
if anyone can guide me I will be gratefuly
With the latest release i was not able to get this working properly…
#Install HP Universal Printing PCL 6
pnputil.exe /add-driver “$psscriptroot\hpcu255u.inf” /install
Add-PrinterDriver -Name “HP Universal Printing PCL 6”
#Install Printerport with check if the port already exist
$portName = “IP_192.168.111.84”
$PortAddress = “192.168.111.84”
$checkPortExists = Get-Printerport -Name $portname -ErrorAction SilentlyContinue
if (-not $checkPortExists) {
Add-PrinterPort -name $portName -PrinterHostAddress $PortAddress
}
#Install Printer
Add-Printer -Name “HP LaserJet MFP M130fn” -DriverName “HP Universal Printing PCL 6” -PortName $portName
SLEEP 360
This worked for me!
Was perfect! Thank you for this!
I had to tweak the uninstall as it failed. This worked for me:
remove-printer “(Printer Name)”
SLEEP 360
remove-printerPort -Name “IP_(IP of your Printer)”
I followed your how to.
But the printer is not installed.
In the event log (powershell) I can see:
The file “C:Windows\IMECache\….\install.ps1” cannot be loaded because the execution of scripts is disabled on this system. Please see “about_Execution_Policies” for more details.
full quallified error-id = UnauthorizedAccess
I definitely used
powershell.exe -Executionpolicy -Bypass .\install.ps1
as installation command.
Do I have to change the script execution settings somewhere else as well? Where?
Thanks in advance
Hi, could you change the
powershell.exe -Executionpolicy -Bypass .\install.ps1
To
Powershell.exe -ExecutionPolicy ByPass -File “.\full-script-path\script.ps1”
What do you mean with full-script-path? the local path you used to create the intunewin?
All these Solution worked for me for Personal Devices.
Self Service Devices do always get a Error (Error installing) on the same Package that work on Personal Devices.
Hi Rudy. This is great, thank you! Very helpful insight in to how to get this done. I’m looking to deploy a printer shared from a print server with Intune. We will need to pre-stage the drivers no matter what since PNightmare I think because they’re universal for HP and Canon, and our users are non-admin. I can use use InTune to deploy the drivers and maybe run pnputil to stage, but can the print be deployed as well if it’s a shared queue on a print server? Direct to IP will bypass software we run for cost accounting that monitors the queues at the server.
Everything works well except for the additional setting for A4 and non color printing didn’t work. When printer installed it is set to Auto not Black & white. May I know how you make it works?
Hi,
Thanx for your reply. What happens when you try to run it like -color:$false
Or maybe changing the papersize with an object ?
$PrintConfiguration = Get-PrintConfiguration -PrinterName $printername
$PrintConfiguration.paperSize = A4
Set-PrintConfiguration -InputObject $PrintConfiguration
Just a detail but I think there is a little mistake in the uninstall.ps1:
remove-printerPort -Name “192.168.40.251”
SLEEP 360
remove-printer “Toshiba Hoofdkantoor”
The command “remove-printers” is not recognized on my device. I use remove-printer instead.
Hi, Thanx … a small typo indeed.. i changed it
Hi,
Your script actually refers to “TOSHIBA Universal Printer” when it should refer to “TOSHIBA Universal Printer 2”, just thought I’d let you know.
Can you clarify what this does please?
$PSScriptRoot = Split-Path -Parent -Path $MyInvocation.MyCommand.Definition
Thanks for this but I am curious about the printer configs. I have tried to use Printui.exe /Sr /N “Printer Name” /a “.\config.dat” and rundll32 printui.dll,PrintUIEntry /Sr /n “Printer Name” /a “.\config.dat” u r but neither work when run as a system user with Intune. I can get both working when run as a user. Is there something else that I am missing?
Thank you for this great writeup. A few problems I had to fix:
$PortAddress should be “192.168.40.251” without “IP_”
At least in Windows 11 printui needs the following changes
Quotes around parameters must be straight ” not fancy ”
Printui.exe should not be used, the manual says to use rundll32
Parameter for printer name is /n not /N
Not all parameters are allowed to be set inside script so must be limited at the end of the command for example “d g r” works.
I added a parameter for $PrinterName
Finalprintui command:
rundll32 printui.dll,PrintUIEntry /Sr /n $PrinterName /a “.\config.dat” d g r
In Uninstall.ps1 the commands are mixed up. remove-printer must be run first before SLEEP and remove-printerPort otherwise you get error “port in use”
If you want to test the script locally run as admin c:\Windows\SysWOW64\cmd.exe then type cd c:\temp\folder and then powershell.exe -ExecutionPolicy Bypass c:\temp\folder\Install.ps1
Yep you are totally right… I guess there were some flaws in it. Updated them as you pointed out
Hi,
I’m curious what this line does:
$PSScriptRoot = Split-Path -Parent -Path $MyInvocation.MyCommand.Definition
Thanks
Great script! I’m new to PS but I’ve managed to make it work for one printer. I need to deploy 5 printers with the same driver. How to achieve it using single Intune package? I want to create one intune item which will be assigned to group of users and will result installing all of the 5 printers.
Could you help?
What you could do is create 5 powershell install scripts for all the printers. And just create one main install script which lets run all the 5 install scripts.
Also this main script should be your source file for the installation if you package it. 🙂
can you show a sample scripts how to disable color printing
Hi man great script for me it works but for some reason intune says that applications failed to install the printer is added correctly tho any idea
Great script! thank you for your work man but out of curiosity the script it manages to assign the printer but in intune i get applications failed any idea why ?
Able to get the driver to the driver store with the Printui.exe command.
After that, even though i can see the oemsetup folder in the driver store, the add printer continues to fail stating that there is no driver. I’ve been stuck on this for hours/days. Have read this site as well as another similar and have tried different variations of scripts I’ve found with no success. I see it failing in Intune so trying to run the install commands locally and that is where I am seeing the actual install failing stating no driver.
Anyone else see this and have a fix or way to get it working? I’m currently using a Rioch PCL6 univeral driver. One frustrating thing is that it does not call out a driver name in the .inf file. So I pulled the current driver from the server. When that didn’t work either, I’ve tried Canon (I think on this blog) and a Toshiba (another site with same instructions. Each and every one of them seem to put the driver in the Driver Store, but fail to install the printer.
Hello together,
I suggest to add the following code at the top of the script to check, where pnputil.exe is located. I had problems with that in our windows client environment. Maybe it will help someone.
#####################
#Check PNPUTIL.exe Systempath #
#####################
if (Test-Path “$env:SystemRoot\System32\pnputil.exe”)
{
$SystemPath = “$env:SystemRoot\System32”
}
elseif (Test-Path “$env:SystemRoot\Sysnative\pnputil.exe”)
{
$SystemPath = “$env:SystemRoot\Sysnative”
}
else
{
Write-Host “ERROR: Cannot find pnputil.exe to install the driver.”
Write-Host “”
Pause
exit
}
& for the staging
############
#Staging Drivers #
############
& “$SystemPath\pnputil.exe” /add-driver “$psscriptroot\drivers\*.inf” /install
Best regards
In Step 3. Creating the Intunewinapp do you mean to zip the file containing the drivers and scripts, then use that zipped folder to create the intunewin app?
Hi, I find out the WIndows 24H2 seems like have issue to get the sysnative path, cannot get install from our company portal, but for 23H2 devices are working well.
Hi… that should be weird.. maybe something else is breaking apart.. as i could access the systnative folder with a cmd started from the syswow64 folder.. Do you happen to have some more information / error messages?
Hi Rudy, the error messages from Intune are The application was not detected after installation completed successfully (0x87D1041C). from the CM Trace log show:
Adding new state transition – From:Not Started To: Queued With Event: Enqueued. IntuneManagementExtension 12/6/2024 12:21:59 AM 37 (0x0025)
Adding new state transition – From:Queued To: Install In Progress With Event: Install Started. IntuneManagementExtension 12/6/2024 12:21:59 AM 37 (0x0025)
Adding new state transition – From:Install In Progress To: Install Error With Event: Install Error. IntuneManagementExtension 12/6/2024 12:21:59 AM 37 (0x0025)
Adding new state transition – From:Install In Progress To: Download In Progress With Event: Download Started. IntuneManagementExtension 12/6/2024 12:21:59 AM 37 (0x0025)
Adding new state transition – From:Download In Progress To: Download Error With Event: Download Error. IntuneManagementExtension 12/6/2024 12:21:59 AM 37 (0x0025)
Adding new state transition – From:Download In Progress To: Download Complete With Event: Download Finished. IntuneManagementExtension 12/6/2024 12:21:59 AM 37 (0x0025)
Adding new state transition – From:Download Complete To: Install In Progress Download Complete With Event: Continue Install. IntuneManagementExtension 12/6/2024 12:21:59 AM 37 (0x0025)
Adding new state transition – From:Install In Progress Download Complete To: Install Error With Event: Install Error. IntuneManagementExtension 12/6/2024 12:21:59 AM 37 (0x0025)
Adding new state transition – From:Install In Progress Download Complete To: Install Success With Event: Install Finished. IntuneManagementExtension 12/6/2024 12:21:59 AM 37 (0x0025)
[AgentCommon] [AnonymousPipeServer`1] Ensure that user, SYSTEM, can read and write to the pipe. IntuneManagementExtension 12/6/2024 12:21:59 AM 37 (0x0025)
[AgentCommon] [Microsoft.Management.Services.IntuneWindowsAgent.AgentCommon.IPC.AnonymousPipeServer`1[Microsoft.Management.Clients.IntuneManagementExtension.WinGetLibrary.WinGetInterProcessCommunicationMessage]] Starting listener thread. IntuneManagementExtension 12/6/2024 12:21:59 AM 37 (0x0025)
[AgentCommon] [AnonymousPipeServer`1] Listener thread, Enter. IntuneManagementExtension 12/6/2024 12:21:59 AM 81 (0x0051)
[AgentCommon] [Message`1] Creating new Message`1 instance from stringData. IntuneManagementExtension 12/6/2024 12:22:00 AM 81 (0x0051)
[AgentCommon] [AnonymousPipeServer`1] Message received, sending for processing IntuneManagementExtension 12/6/2024 12:22:00 AM 81 (0x0051)
here the error code, when I try run with powershell C:\Windows\SysNative\pnputil.exe : The term ‘C:\Windows\SysNative\pnputil.exe’ is not recognized as the name of a
cmdlet, function, script file, or operable program. Check the spelling of the name, or if a path was included, verify
that the path is correct and try again.
At C:\Intune\Konica C361i BW\Install.ps1:1 char:1
+ C:\Windows\SysNative\pnputil.exe /add-driver “$psscriptroot\Drivers\K …
+ ~~~~~~~~~~~~~~~~~~~~~~~~~~~~~~~~
+ CategoryInfo : ObjectNotFound: (C:\Windows\SysNative\pnputil.exe:String) [], CommandNotFoundException
+ FullyQualifiedErrorId : CommandNotFoundException
I also founded the printer are get installed, but no idea why registry show incorrect registry name for example printer name on ps1 are set as Printer BW, but it deployed registry there show Printer BW,21
Ah.. okay after I tried deploy with the latest Konica Universal driver it finally worked for Windows 24H2
I am getting error 0x00004005 the printer is installed but “The operation could not be completed (Error 0x00004005)