

This blog will contain information about MSAL, ADAL, OAuth, and some tokens. I will also show you how you could use MSAL authentication with PowerShell to change the Device Category in Intune
1.Differences between ADAL and MSAL?
MSAL? ADAL? What do they mean?
MSAL = Microsoft Authentication Library
ADAL = Azure Active Directory Authentication Library
I guess the name just says it all: both of them are methods of authenticating to Graph. When we are authenticating against Graph we need to show some kind of proof we are allowed to access the graph data in our Microsoft 365 Tenant.
We can do this by:
*Interactive / Delegated Authentication Username/Password Prompt
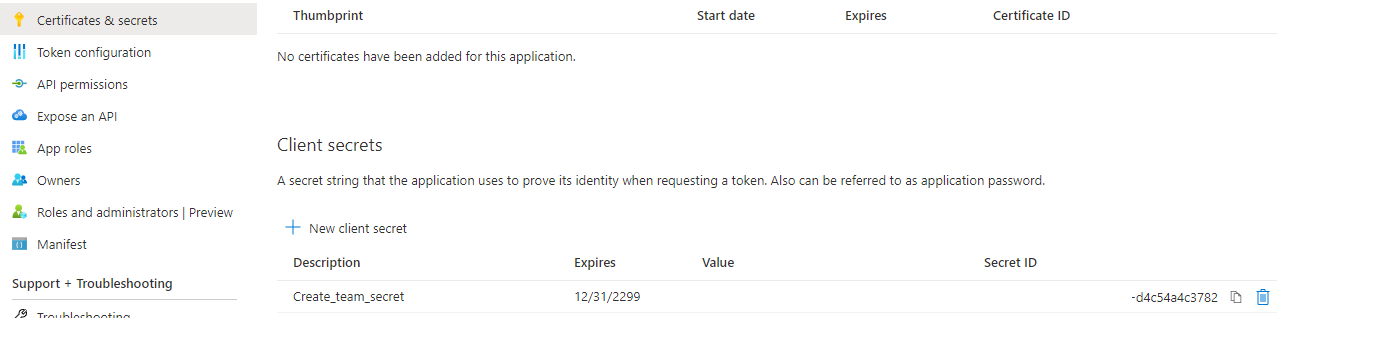
* Non-Interactive / Programmatic / Application Authentication –> like an example: Authentication by providing a secret from an app registration
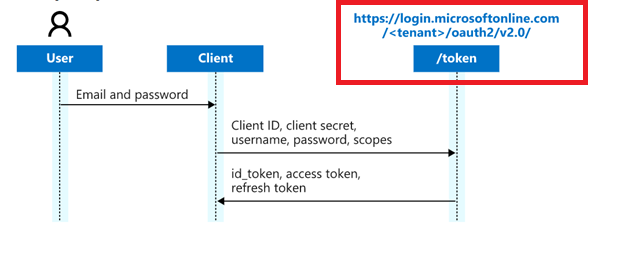
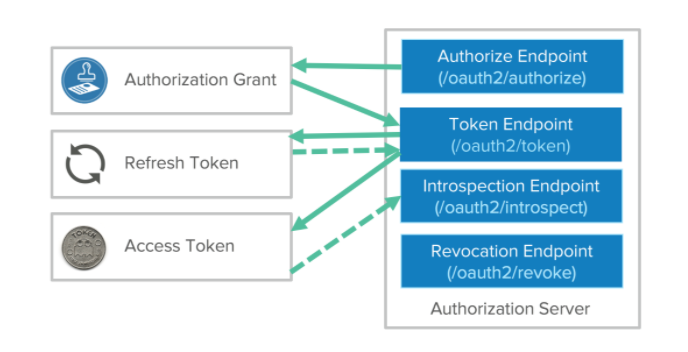
As mentioned before, you can authenticate to Graph with both of them. There are a few differences between these two authentication flows because both of them send an HTTP request to the OAuth Endpoint.

OAuth (Open Authorization) 2.0 is not a protocol, but it defines a delegation protocol. It’s the open standard for authorization and specifies how tokens are transferred. This framework is used as a way to grant a user limited access to its protected resources. Designed to work specifically with Hypertext Transfer Protocol (HTTP)
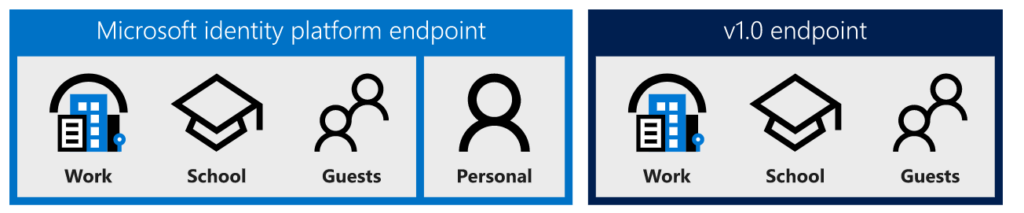
One important difference between ADAL and MSAL is that ADAL integrates with the Azure AD for developers (V1.0) endpoint. In contrast, MSAL integrates with the Microsoft Identity Platform V2 Endpoint.

Not to forget, the V2 endpoint gives you a converged experience. It allows you to enter your Office 365 (Azure AD) accounts or your personal Microsoft Accounts (outlook.com). The V1 Adal Endpoint only allows you to authenticate with your Azure Ad account.
2. Deprecated and ending Support
But I guess we are done talking about ADAL because, Starting June 30th, 2022, support will end for ADAL and Azure AD Graph, and technical support and security updates will no longer be provided. So please don’t use ADAL anymore for your authentication!
And update your Powershell Scripts to start using the new Microsoft Graph endpoint instead of the old Windows Graph Endpoint. Most of the time, you can simply change the endpoint in your PowerShell Script from Graph.Windows.Net to Graph.Microsoft.Com. But beware there are a few differences!
UPDATE 17-08-2021
I thought only the support would end, but reading this tweet again and talking to Jef Kazimer… I realized the Azure Ad Module will also be deprecated.
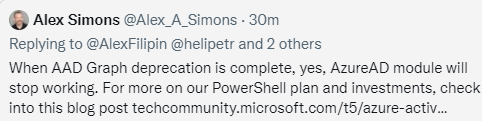
Azure AD Graph will be deprecated. To avoid loss of functionality, migrate your applications to Microsoft Graph before *June 30, 2022, when Azure AD Graph API endpoints will stop responding to requests.
*UPDATE 05-03-2022: Lucikly! ADAL end of life is extended from June 30th to December 2022.
Azure AD: Change Management Simplified – Microsoft Tech Community
And you could take a guess what the Azure Ad Module is! AzureAD PowerShell is a client app that calls the AADgraph API
App migration planning checklist – Microsoft Graph | Microsoft Docs
Even the new Azure Ad Connect version 2.0.3.0 is going to use MSAL instead of ADAL, so the only thing left to talk about is MSAL. MSAL enables users to acquire tokens from the Microsoft identity platform in order to authenticate and access secured web APIs, like Microsoft Graph.
3 Differences between access, refresh, and Identity tokens
As I showed you earlier, tokens are needed to communicate with Graph. Tokens are a random string generated by the authorization server and are issued when the client requests them.
It’s important to be aware of the fact that there are three types of tokens
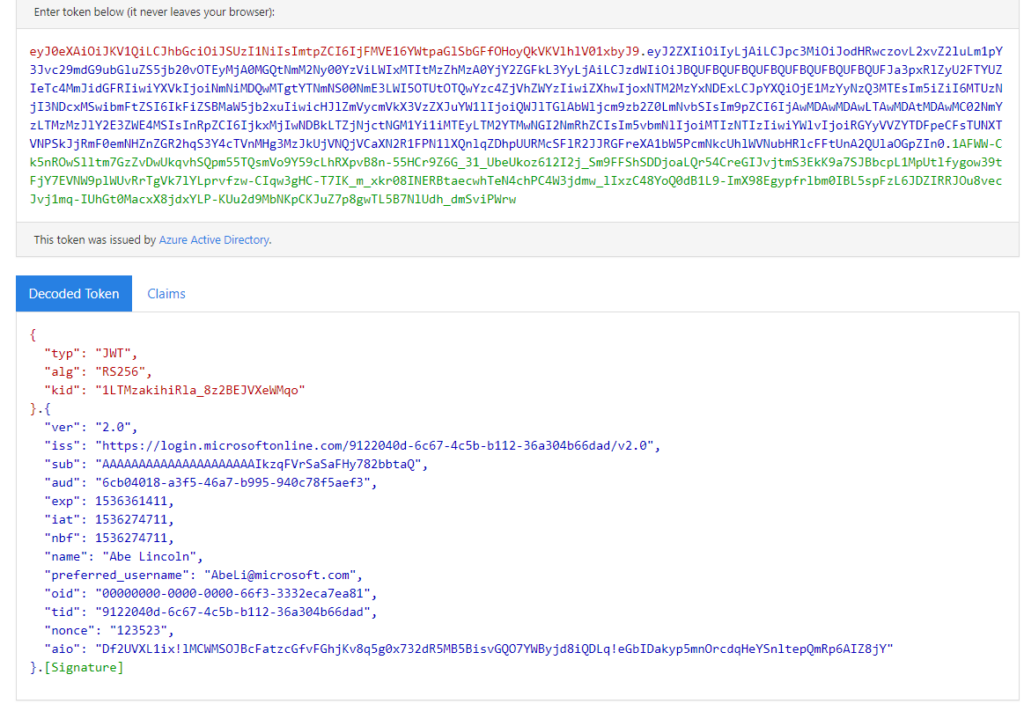
*Identity (ID) Token =
I am who I say I am. Authentication
Information in ID Tokens allows the client to verify that a user is, who he/she claims to be. ID tokens are intended to be understood by third-party applications. ID tokens should not be used for authorization purposes.

Here is a good example, of what an ID Token looks like
*Access Token =
I have the proper permissions to do what I need to do!
This token is the most important one because this token will allow the data to be accessed by a third-party application. Luckily it has a limited lifetime, this is defined by the authorization server.
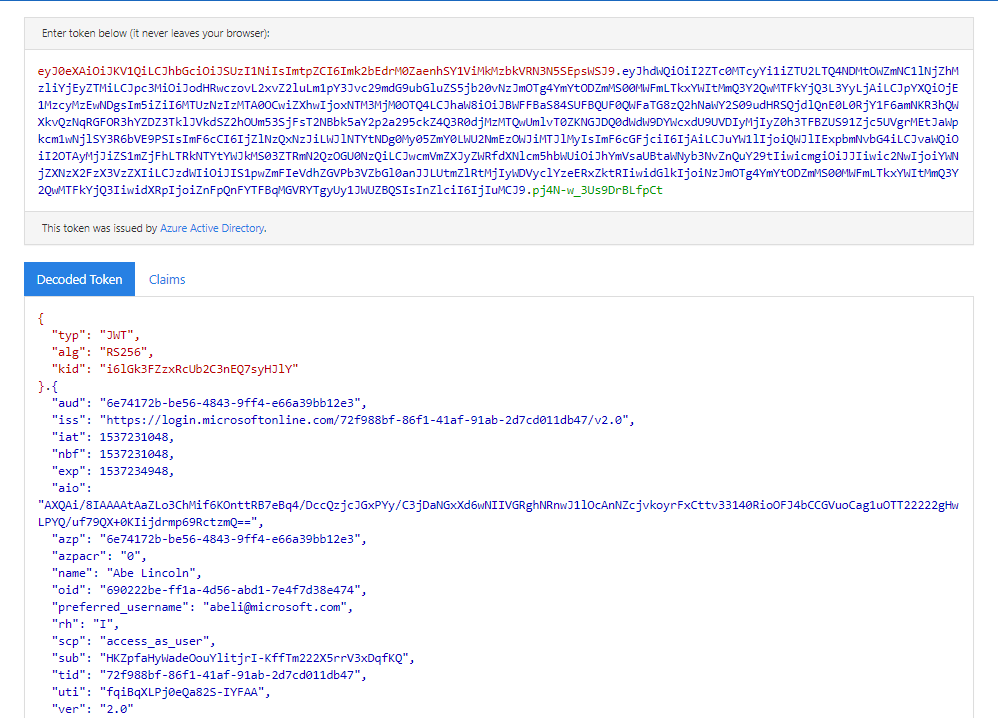
And, of course, just like with the ID token, here is a good example, of what an Access Token looks like
*Refresh Tokens
You can think of it as the old-school ticket-granting ticket (TGT) in an on-premise environment. This token is used to acquire new access tokens. This refresh token is only valid for the same user (Identity) who requested it and for the same application it wants to open (Authorization)
A big difference with an access token is that refresh tokens are long-lived while access tokens are short-lived.
A quick Token Summary
–ID tokens are carrying identity information that is encoded in the JWT token itself
–Access tokens are used to get access to specific resources by using them as bearer tokens
–Refresh tokens only exist to retrieve more access tokens
4. The Access token
As mentioned earlier, when we want to use the Microsoft Graph API, we need to show it our access token. An access token has two important roles:
1: It will prove authentication (proof of identity)
2:It will prove authorization (permissions).
Please beware that each request created must submit a request header containing the access token.
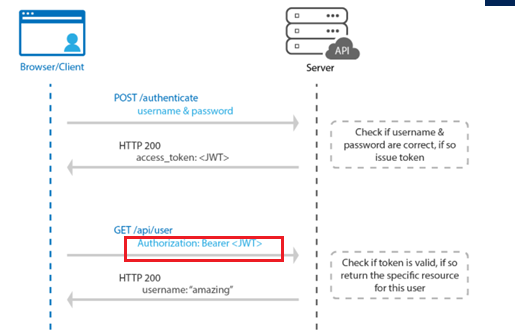
I guess you probably noticed the name: “Bearer” in the picture above or maybe because I marked it?
The Bearer (JSON WEB) Token is created for you by the Authentication server. When a user is authenticating with the client/application, the authentication server generates a Token. Bearer Tokens are the main type of access token used with OAuth 2.0.
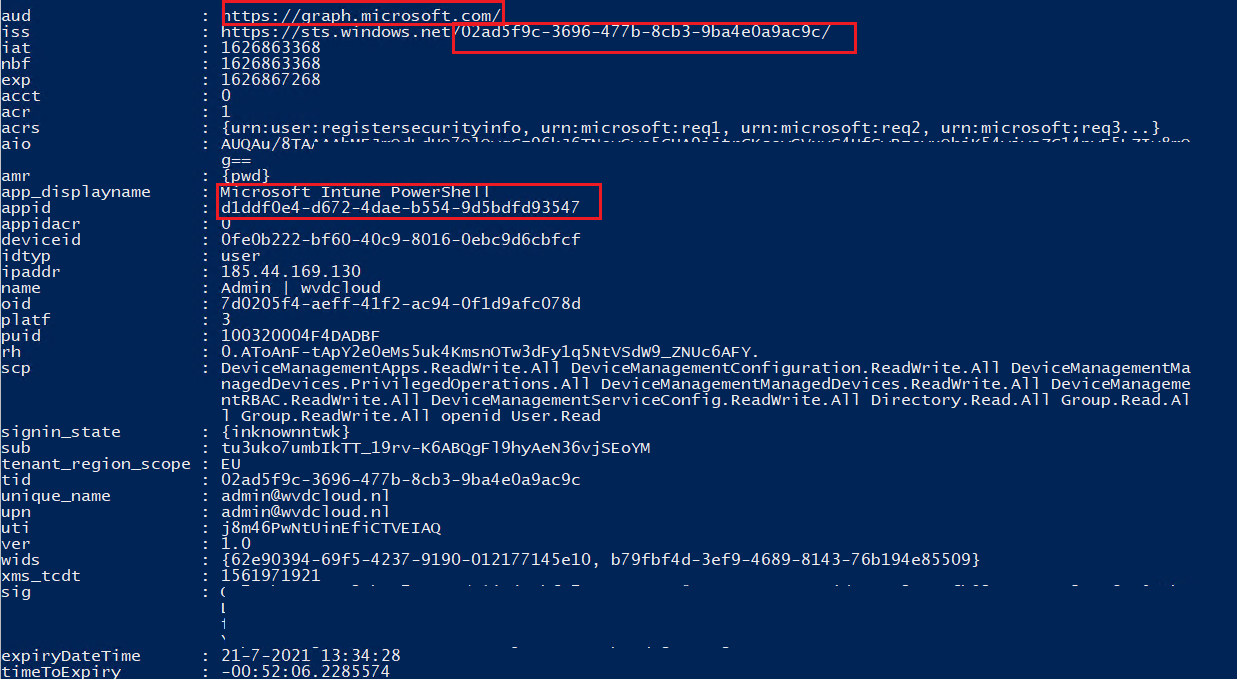
A Bearer token basically says “Give the bearer of this token access without further identification“. Let’s take a look at what’s inside this bearer access token.
In the example below I used the module jwt-details (install-module -name jwtdetails) to get some details
5. Comparing the ADAL and MSAL methods
I told you I was done speaking about ADAL, but I guess I still need to show the difference between the old school ADAL script to acquire the access token and the new modern and supported method
ADAL
$clientId = "d1ddf0e4-d672-4dae-b554-9d5bdfd93547"
$redirectUri = "urn:ietf:wg:oauth:2.0:oob"
$resourceURI = "https://graph.microsoft.com/"
$authority = "https://login.microsoftonline.com/common"
$AadModule = Import-Module -Name AzureAD -ErrorAction Stop -PassThru

$adal = Join-Path $AadModule.ModuleBase "Microsoft.IdentityModel.Clients.ActiveDirectory.dll"
$adalforms = Join-Path $AadModule.ModuleBase "Microsoft.IdentityModel.Clients.ActiveDirectory.Platform.dll"

[System.Reflection.Assembly]::LoadFrom($adal) | Out-Null
[System.Reflection.Assembly]::LoadFrom($adalforms) | Out-Null


$authContext = New-Object "Microsoft.IdentityModel.Clients.ActiveDirectory.AuthenticationContext" -ArgumentList $authority
$platformParameters = New-Object "Microsoft.IdentityModel.Clients.ActiveDirectory.PlatformParameters" -ArgumentList "Always"
$authResult = $authContext.AcquireTokenAsync($resourceURI, $ClientID, $RedirectUri, $platformParameters)
$accessToken = $authResult.result.AccessToken
MSAL
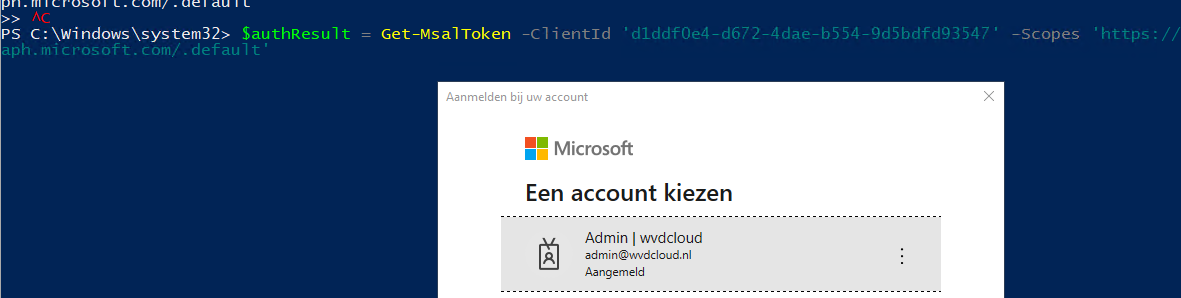
#Install-Module -Name MSAL.PS -force
$authResult = Get-MsalToken -ClientId ‘d1ddf0e4-d672-4dae-b554-9d5bdfd93547’ -Scopes ‘https://graph.microsoft.com/.default’
$accesstoken = $authresult.accesstoken
I guess I don’t have to tell you which method I prefer? Just with 2 simple lines of text, you can get your access token!
6.Using MSAL to change the device category in Intune
Now let’s see MSAL in action. We are going to change the device category in Intune with PowerShell.
First, we need to fetch the right id corresponding to the right device. So let’s fire up a PowerShell session and connect to Graph.
Connect-msgraph
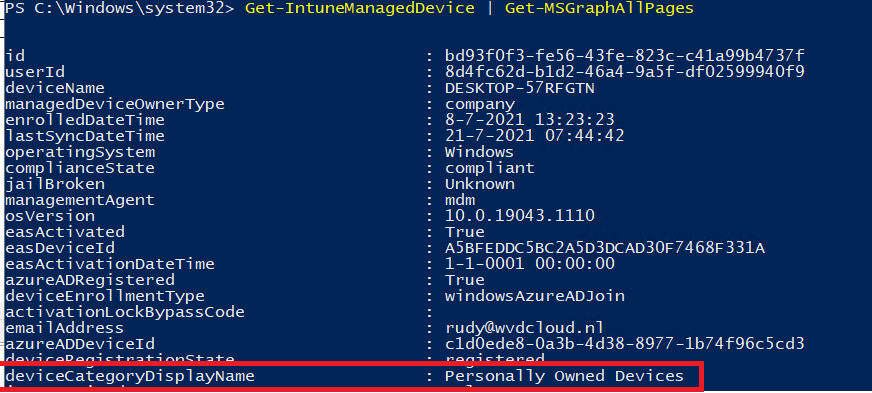
Before we begin I will show you how the existing category is configured in Intune and with PowerShell
Intune

Powershell
Get-IntuneManagedDevice | Get-MSGraphAllPages
If you want to export all devices, you can export them to a CSV
Get-IntuneManagedDevice | Get-MSGraphAllPages | Select ID, DeviceName |Export-Csv -Path “c:\export\devices.csv”
Let’s take a look at the CSV and retrieve the device id we need. In my example, I’m going to use the id corresponding to desktop-57rfgtn

Now we have the device id, we still need the device categories. You can retrieve them by entering this command: Get-DeviceManagement_DeviceCategories

So let’s remember these Device Categories
2b259feb-0bca-48ed-9dbb-1b87c627521b = personal owned devices
377fdc15-6f3c-4165-b5b3-98261a8243da = company-owned devices
Let’s create the variables before we continue
$DeviceID = "('bd93f0f3-fe56-43fe-823c-c41a99b4737f')”
$DeviceCategory = '3deae90a-1692-446a-97e0-46ee2ce673ab'
$authResult = Get-MsalToken -ClientId ‘d1ddf0e4-d672-4dae-b554-9d5bdfd93547’ -Scopes 'https://graph.microsoft.com/.default'
$accesstoken = $authresult.accesstoken

$body = @"
{"@odata.id":"https://graph.microsoft.com/beta/deviceManagement/deviceCategories/$devicecategory"}
"@

$apiurl = "https://graph.microsoft.com/beta/deviceManagement/managedDevices$deviceid/deviceCategory/`$ref"
$Data = Invoke-RestMethod -Headers @{Authorization = "Bearer $($accesstoken)"} -Uri $apiUrl -Body $body -Method Put -ContentType 'application/json'
Looking at the script above, I guess after reading this blog we understand why we need the specify the authorization by specifying the bearer access token
Conclusions
I hope this blog showed you why you need to use MSAL and what and how you can use the tokens!
Update your applications to use Microsoft Authentication Library and Microsoft Graph API as ADAL will no longer be supported after December 2022 and the Azure Ad Module will stop working!

But beware, be very aware! If you have existing apps that rely on SAML or WS-Federation and you need to update/migrate them you can’t use the Microsoft identity platform! The Microsoft platform only supports OpenID Connect and OAuth 2.0. It’s nice to see Microsoft has a nice FAQ about this topic!
Azure AD Graph to Microsoft Graph migration FAQ – Microsoft Graph | Microsoft Docs
But if you are building a new application and you need to support personal Microsoft Accounts please use the Microsoft Identity Platform
“But beware, be very aware! If you have existing apps that rely on SAML or WS-Federation and you need to update/migrate them you can’t use the Microsoft identity platform! The Microsoft platform only supports OpenID Connect and OAuth 2.0.”
So, whats the solution for SAML or WS-Fed? What should they be using?
Hi, If I am not mistaken those checklists and migration guides should be on the MS-DOcs right now even while the end date has been postponed
Hi!
https://support.citrix.com/article/CTX267071/password-field-not-displayed-when-publishing-any-office-365-application-such-as-excel-or-word-on-server-2019-or-windows-10
Due to passwordpopus on RDS 2019 servers disabling WAM is suggested as a workaround. So to me it looks like authentication is reverted to ADAL. But the deprecation of ADAL is near, would this ‘workaround to disable WAM wreack havoc when ADAL stops working?
:)… We are also migrating all of our remote desktop to support modern authentication and by doing so we need make sure enableadal is configured to 1 .. so 🙂
Ok, went on digging furher, Sever 2016 does not have ‘WAM’ and I think even with the deprecation of ADAL maybe another authentication method will be used on 2015 server. Maybe MSAL? .. well time to hit Google… thanks anyway for the blog 🙂