

This blog will show you the nice wonderful addition to Intune, called the Custom Compliance Policy. This blog will be updated along the way as it’s new and this blog is just describing my own first attempts with these custom compliance policies and my opinions!
With the custom compliance policy, it’s (should be?) way easier to measure compliance.
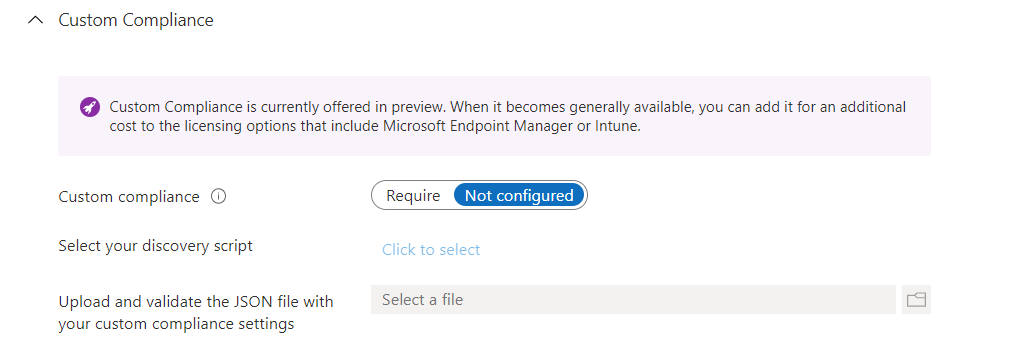
1. The Custom Compliance Policy
I guess everybody read my blog about Device Health Attestation (DHA) and how BitLocker is measured. I will also show you how to solve this issue reboot issue.
But now with the new custom compliance policy options, we have another solution at our disposal. With the use of Custom Compliance Policies (for Windows) we now have the option to write a simple PowerShell detection script to detect any setting we want to detect.
For example, if services are running, if specific files exist, or if Bitlocker is enabled and configured the way we want it to be.
The Powershell Detection Script will “return” the output of the PowerShell script in a JSON format to Intune/Microsoft Endpoint Manager. In the Custom compliance policy, we also need to define a JSON file. This JSON file will be used by Intune and will be compared with the PowerShell script output it got.
This JSON file will also be used to provide the end-user with a message on how they could “remediate” those messages. Mmm… Detection… Remediation… That sounds familiar, doesn’t it?
So to set it up we need a PowerShell Script and a JSON file
2. The PowerShell Detection/Discovery script
Okay, let’s start with the PowerShell Discovery (in my opinion just the detection script). In the first part, I showed you some examples you can use with Custom Compliance Policies. In this blog, I will show you a simple script to monitor Bitlocker Compliance.
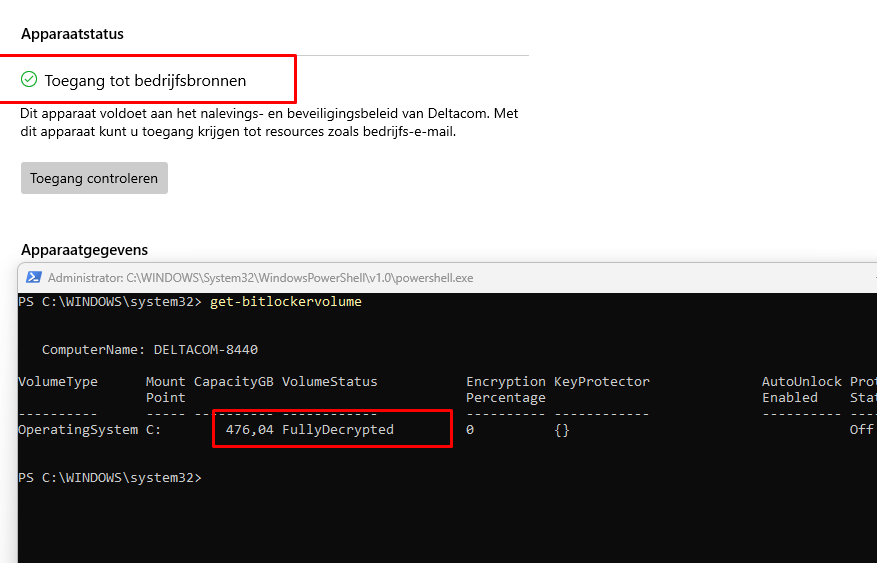
What settings do we need, when we want to Monitor our BitLocker compliance? Let’s check out what kind of settings we have. We can check out the BitLocker settings with this command: Get-Bitlockervolume
So looking at the picture, I guess the EncryptionPercentage and ProtectionStatus will be fine (for now)

So how do we know what Setting Name we are going to monitor and use? For example, I am monitoring the Percentage and Protectionstatus for compliance

When you need to know which values you need, just export the good values on a working device first. For example, I am going to export all the BitLocker information on an already BitLocker working and enabled device.
As I showed you at the beginning of the blog, you will need to return the PowerShell its output in JSON format. To do so we only need to return the variable ($) and convert it to JSON (Convertto-JSON). Please make sure you are also using the -compress option to make sure the output results are returned in one line.
Let’s take a good view of all the settings first with the knowledge we have now.

I assume we don’t want to monitor everything for compliance only a select few values. So I am adjusting the get-bitlockervolume to only show us the encryption percentage and protectionstatus.
If you want to define your own SettingName you can do it this way
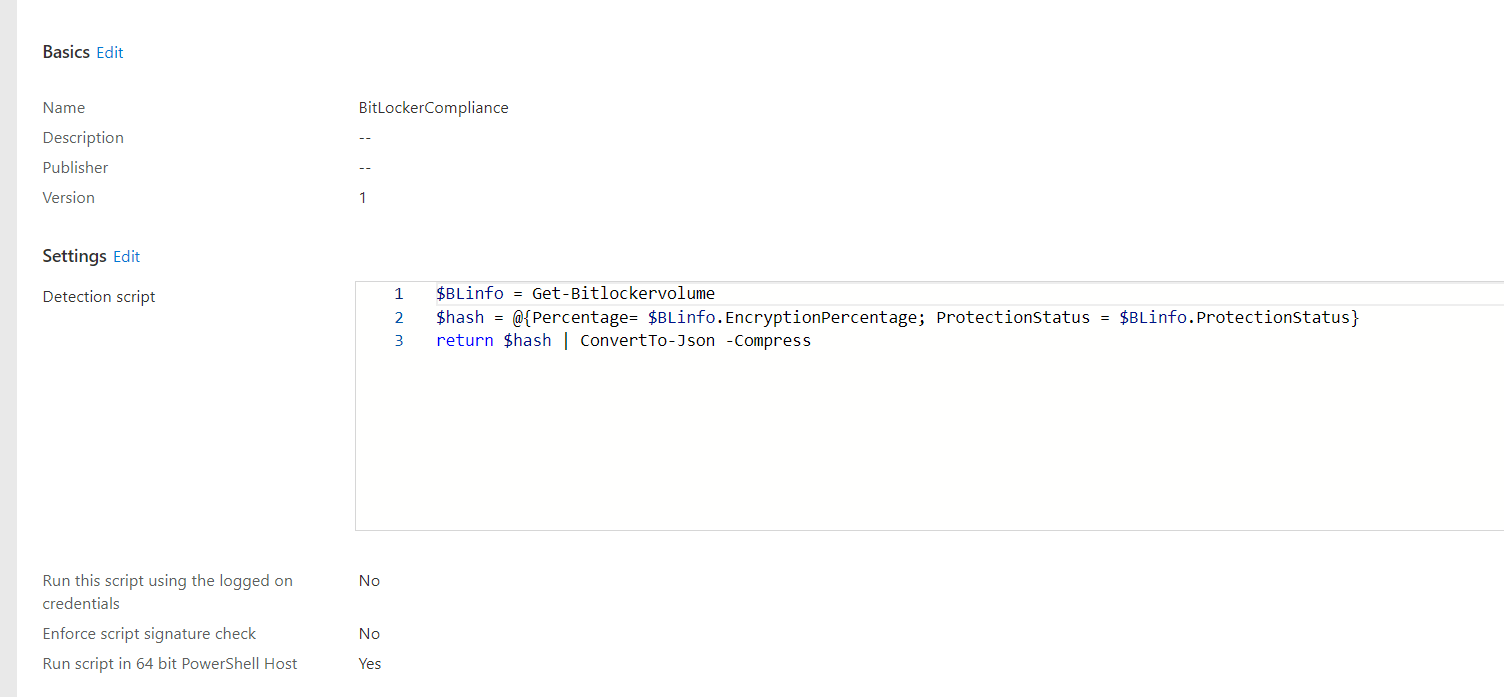
$BLinfo = Get-Bitlockervolume
$hash = @{Percentage= $BLinfo.EncryptionPercentage; ProtectionStatus = $BLinfo.ProtectionStatus}
return $hash | ConvertTo-Json -Compress

If you want to “just” use the SettingName from the Bitlocker output itself, you could do it this way. But remember you will need to make sure your JSON SettingName fits the Settingname from the Bitlocker output!
$BLinfo = Get-Bitlockervolume | select Encryptionpercentage, protectionstatus
return $blinfo  | ConvertTo-Json -Compress
Looking at the picture above… that is way better to read! Of course, you could also add the “encryptionmethod” if you want to make sure your devices are compliant to match the XtsAes.
As an example, you want to use XtsAes256 and get your device NOT compliant if they are encrypted with XtsAes128

So let’s create the required PowerShell script first
We can now simply create a new PowerShell script and copy-paste the contents in the detection script part.
When saving the PowerShell script you will notice (with the use of fiddler) that the PowerShell script will be saved as a Base64 value Compliance Script in Graph
URI: “https://graph.microsoft.com/beta/deviceManagement/deviceComplianceScripts”

3. The JSON
Now we have the PowerShell script ready, we also need to configure the JSON file itself before we could import it into Intune. Otherwise, Intune only has the returned values but nothing to compare it with…Let’s take a look at the JSON File first
{
"Rules":[
{
"SettingName":"Percentage",
"Operator":"IsEquals",
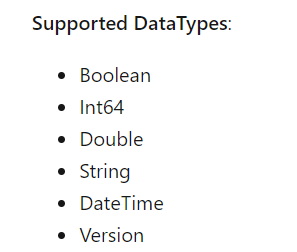
"DataType":"Int64",
"Operand":"100",
"MoreInfoUrl":"https://bing.com",
"RemediationStrings":[
{
"Language":"en_US",
"Title":"Bitlocker Hard Drive must be fully encrypted",
"Description": " Bitlocker Hard Drive must be fully encrypted "
}
]
},
{
"SettingName":"ProtectionStatus",
"Operator":"IsEquals",
"DataType":"Int64",
"Operand":1,
"MoreInfoUrl":"https://bing.com",
"RemediationStrings":[
{
"Language": "en_US",
"Title": "Bitlocker protection must be enabled.",
"Description": " Bitlocker protection must be enabled.","
}
]
},
]
}
You will notice some important “fields” in the JSON file:
SettingsName: The setting we noticed in the PowerShell output
Operand: the value we noticed in the PowerShell output after the setting name
Operator:
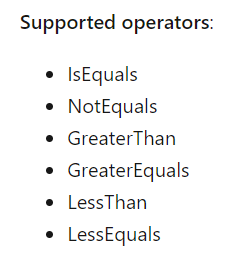
Datatype:
Create a JSON file for custom compliance settings in Microsoft Intune | Microsoft Docs
So when creating the PowerShell script and getting the returned values, you will need to take a good look at which datatype you are using and how you are comparing it. For example, I guess the Bitlocker Encryption Percentage needs to be equal (IsEquals) to 100 (Int64)
You could also configure some nice remediation messages to make sure your employee knows what broke and how to fix it (even when they probably don’t have permission to do so..)
“Title”: “Bitlocker Hard Drive must be fully encrypted”,
“Description”: ” Bitlocker Hard Drive must be fully encrypted “
When you have selected the right JSON file you will notice (with the use of fiddler) that the JSON file will also be saved as a Base64 device compliance policy script in Graph
URI: “https://graph.microsoft.com/beta/deviceManagement/deviceCompliancePolicies/validateComplianceScript”

4. The Results
I will divide this part up into 2 subparts
- The Results When it IS compliant
- The results when it IS not-compliant
4.1 The Results when it’s compliant
The first time, I deployed the Compliance Policies.. all the devices were showing as “Not Applicable”

The assignments were good, normally the “not applicable” error could also be due to Licensing issues. If you were following my tweets you know that there is a sort of warning when deploying these Custom Compliance policies

But for now, that is something you don’t have to think about….yet. The only thing you need to do is, reboot your device and after a while, they will become applicable.

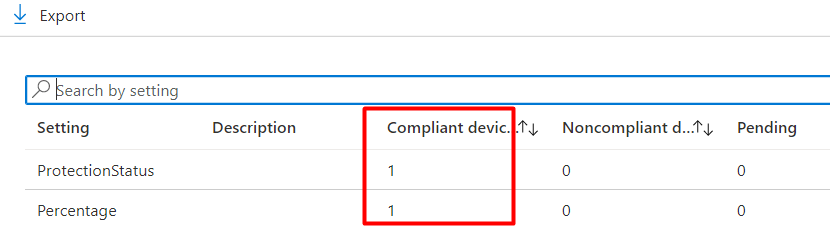
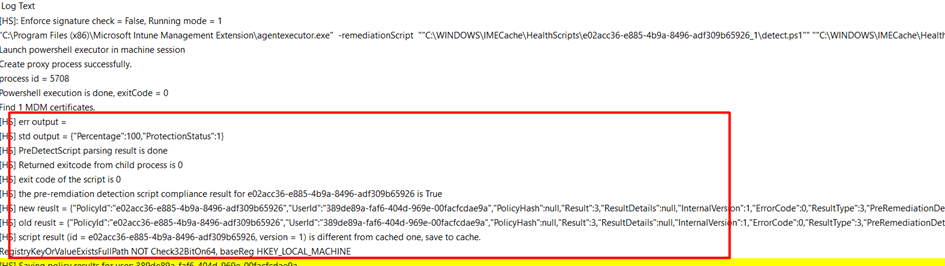
Like always you will also find this information in the IntuneManagementExtension Log. As shown below, you will notice the Bitlocker Percentage and the Protectectionstatus

4.2 The Results when it’s not compliant
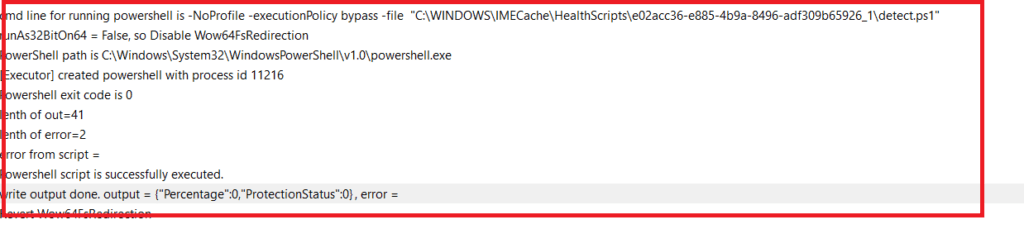
But what happens when your device isn’t compliant anymore? Let’s find out for ourselves by disabling Bitlocker (I know.. I am running this as admin as a normal user isn’t allowed to do this)

That’s weird… It is still compliant, even the agentexecutor log is telling us the last check was 07:47 (when I booted my device today)

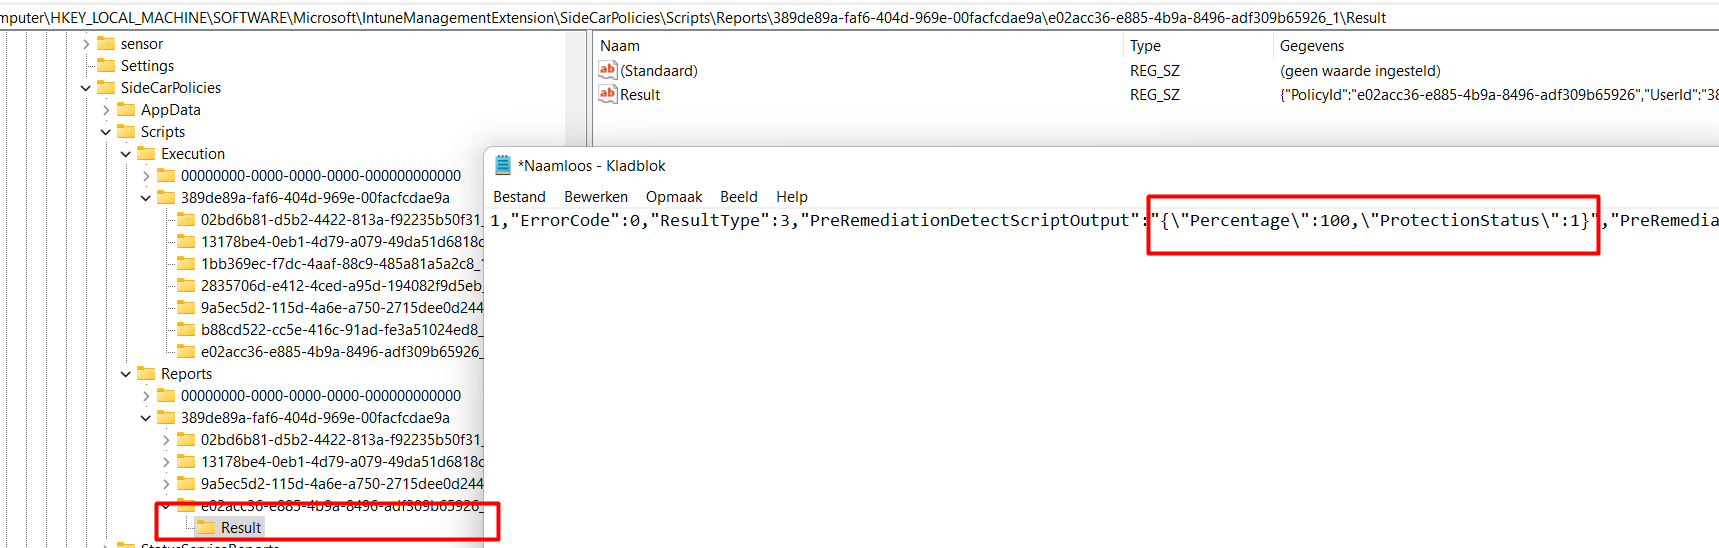
Also, the results are also placed in the report section of the SideCarPolicies Scripts
Computer\HKEY_LOCAL_MACHINE\SOFTWARE\Microsoft\IntuneManagementExtension\SideCarPolicies\Scripts\Reports
The results are telling us it is still good to go and it is showing us no weird error codes. I was expecting the protectionstatus to be set to zero!
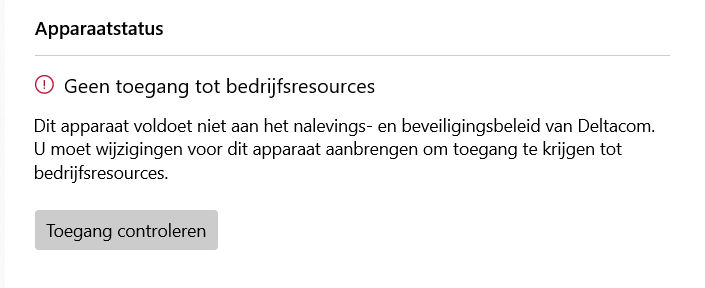
Of course, rebooting your device or manually checking if your device is compliant, will mark your device as noncompliant.
5. Enforcing a Custom Compliance Check Option 1
When you want to run a compliance check to determine if your device is still compliant with the custom compliance policies, you can manually trigger this preocess by clicking on “check for compliance”
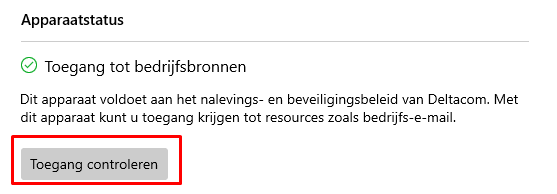
When clicking on the check access button, it will rerun the detection script and will detect if the device is not compliant or compliant again. As shown below after running the command line, it detects the bitlocker’s protection status is again configured to one instead of zero
But that is only the “making my device compliant again” part. We still need to deal with the other important 50% because we also want to make sure the device is NOT compliant after Bitlocker gets disabled for some reason
To make sure the device isn’t compliant you could ask the user to manually check for compliance every 15 minutes or so but you could also automate it.
As I told you in the previous part, the custom compliance scripts are based on Pro-Active remediations. So why not speed up the Proactive Remediations results?! Because you want to make sure your device is not-compliant after a change occurred
https://call4cloud.nl/2021/05/the-laps-reloaded/#third-part
To resume:
When you want to speed things up instead of manually checking your device for compliance every 15 minutes, you will need to remove the corresponding reg keys from the Compliance Policy from this registry key:
Computer\HKEY_LOCAL_MACHINE\SOFTWARE\Microsoft\IntuneManagementExtension\SideCarPolicies\Scripts
After deleting the key and stopping/starting the Intune Management Extension, the compliance detection script will be re-run. When looking at the Intune Management Extension log, you will notice the Protectionstatus is now set to zero!
As shown below, I broke my Bitlocker and because of that, my device isn’t compliant!!
6. Scheduling the Custom Compliance Check
As I described in part 6, you can manually check for compliance when your device is not-compliant or needs to become not compliant! Or…. manually remove those registry keys!
We can clean up that proactive remediation Script from the registry … uhh sorry Compliance Policy Script from the registry manually but why not do it automatically?
I am not telling you it’s a good idea to be used in production, but I just wanted to make sure my test device is compliant or not compliant when it needs to be
This is the script I used to clean up the Custom Compliance Script from the registry to speed things up. In this example, I am searching for the SettingName: EncryptionPercentage and will fetch the proper Registry key we are going to delete
#String to search for
$searchstring = "EncryptionPercentage"

#Get registry Location of the PowerShell Detection script
$location = Get-ChildItem "C:\Windows\IMECache\HealthScripts" -Recurse | Select-String $searchstring -List | Select Path
$parent = Split-Path $location
$parentfolder = Split-Path $parent -Leaf
$reglocationexecution = "HKLM:\SOFTWARE\Microsoft\IntuneManagementExtension\SideCarPolicies\Scripts\execution\*\$parentfolder\"
$reglocationreports ="HKLM:\SOFTWARE\Microsoft\IntuneManagementExtension\SideCarPolicies\Scripts\Reports\*\$parentfolder\"

#Remove registry values
Remove-Item -Path $reglocationreports -Recurse -force
Remove-Item -path $reglocationexecution -Recurse -force

#stop start service
Get-Service -DisplayName "Microsoft Intune Management Extension" | Stop-Service
Get-Service -DisplayName "Microsoft Intune Management Extension" | Start-Service
But how are we going to make sure this script is going to be run every 15 minutes? That’s simple, create a PowerShell script to schedule the script above in an encoded command and deploy this PowerShell script in the Endpoint Manager.
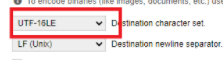
Just copy-paste the above script on this website https://www.base64encode.org/ and encode it to the UTF-16LE character set!
Now we have the encoded command we can create a new PowerShell script as I have shown below. Of course, change the -encodedcommand to your own script
#schedule
$repeat = (New-TimeSpan -Minutes 15)
$trigger = New-JobTrigger -Once -At (Get-Date).Date -RepeatIndefinitely -RepetitionInterval $repeat

$User = "SYSTEM"
$Action = New-ScheduledTaskAction -Execute "powershell.exe" -Argument "-ex bypass -encodedcommand IwBTAHQAcgBpAG4AZwAgAHQAbwAgAHMAZQBhAHIAYwBoACAAZgBvAHIACgAkAHMAZQBhAHIAYwBoAHMAdAByAGkAbgBnACAAPQAgACIARQBuAGMAcgB5AHAAdABpAG8AbgBQAGUAcgBjAGUAbgB0AGEAZwBlACIACgAKACMARwBlAHQAIAByAGUAZwBpAHMAdAByAHkAIABMAG8AYwBhAHQAaQBvAG4AIABvAGYAIAB0AGgAZQAgAFAAbwB3AGUAcgBTAGgAZQBsAGwAIABEAGUAdABlAGMAdABpAG8AbgAgAHMAYwByAGkAcAB0AAoAJABsAG8AYwBhAHQAaQBvAG4AIAA9ACAARwBlAHQALQBDAGgAaQBsAGQASQB0AGUAbQAgACIAQwA6AFwAVwBpAG4AZABvAHcAcwBcAEkATQBFAEMAYQBjAGgAZQBcAEgAZQBhAGwAdABoAFMAYwByAGkAcAB0AHMAIgAgAC0AUgBlAGMAdQByAHMAZQAgAHwAIABTAGUAbABlAGMAdAAtAFMAdAByAGkAbgBnACAAJABzAGUAYQByAGMAaABzAHQAcgBpAG4AZwAgAC0ATABpAHMAdAAgAHwAIABTAGUAbABlAGMAdAAgAFAAYQB0AGgACgAkAHAAYQByAGUAbgB0ACAAPQAgAFMAcABsAGkAdAAtAFAAYQB0AGgAIAAkAGwAbwBjAGEAdABpAG8AbgAKACQAcABhAHIAZQBuAHQAZgBvAGwAZABlAHIAIAA9ACAAUwBwAGwAaQB0AC0AUABhAHQAaAAgACQAcABhAHIAZQBuAHQAIAAtAEwAZQBhAGYACgAkAHIAZQBnAGwAbwBjAGEAdABpAG8AbgBlAHgAZQBjAHUAdABpAG8AbgAgAD0AIAAiAEgASwBMAE0AOgBcAFMATwBGAFQAVwBBAFIARQBcAE0AaQBjAHIAbwBzAG8AZgB0AFwASQBuAHQAdQBuAGUATQBhAG4AYQBnAGUAbQBlAG4AdABFAHgAdABlAG4AcwBpAG8AbgBcAFMAaQBkAGUAQwBhAHIAUABvAGwAaQBjAGkAZQBzAFwAUwBjAHIAaQBwAHQAcwBcAGUAeABlAGMAdQB0AGkAbwBuAFwAKgBcACQAcABhAHIAZQBuAHQAZgBvAGwAZABlAHIAXAAiAAoAJAByAGUAZwBsAG8AYwBhAHQAaQBvAG4AcgBlAHAAbwByAHQAcwAgAD0AIgBIAEsATABNADoAXABTAE8ARgBUAFcAQQBSAEUAXABNAGkAYwByAG8AcwBvAGYAdABcAEkAbgB0AHUAbgBlAE0AYQBuAGEAZwBlAG0AZQBuAHQARQB4AHQAZQBuAHMAaQBvAG4AXABTAGkAZABlAEMAYQByAFAAbwBsAGkAYwBpAGUAcwBcAFMAYwByAGkAcAB0AHMAXABSAGUAcABvAHIAdABzAFwAKgBcACQAcABhAHIAZQBuAHQAZgBvAGwAZABlAHIAXAAiAAoACgAjAFIAZQBtAG8AdgBlACAAcgBlAGcAaQBzAHQAcgB5ACAAdgBhAGwAdQBlAHMAIAAgAAoAUgBlAG0AbwB2AGUALQBJAHQAZQBtACAALQBQAGEAdABoACAAJAByAGUAZwBsAG8AYwBhAHQAaQBvAG4AcgBlAHAAbwByAHQAcwAgAC0AUgBlAGMAdQByAHMAZQAgAC0AZgBvAHIAYwBlAAoAUgBlAG0AbwB2AGUALQBJAHQAZQBtACAALQBwAGEAdABoACAAJAByAGUAZwBsAG8AYwBhAHQAaQBvAG4AZQB4AGUAYwB1AHQAaQBvAG4AIAAtAFIAZQBjAHUAcgBzAGUAIAAtAGYAbwByAGMAZQAKAAoAIwBzAHQAbwBwACAAcwB0AGEAcgB0ACAAcwBlAHIAdgBpAGMAZQAgAAoARwBlAHQALQBTAGUAcgB2AGkAYwBlACAALQBEAGkAcwBwAGwAYQB5AE4AYQBtAGUAIAAiAE0AaQBjAHIAbwBzAG8AZgB0ACAASQBuAHQAdQBuAGUAIABNAGEAbgBhAGcAZQBtAGUAbgB0ACAARQB4AHQAZQBuAHMAaQBvAG4AIgAgAHwAIABTAHQAbwBwAC0AUwBlAHIAdgBpAGMAZQAgAAoARwBlAHQALQBTAGUAcgB2AGkAYwBlACAALQBEAGkAcwBwAGwAYQB5AE4AYQBtAGUAIAAiAE0AaQBjAHIAbwBzAG8AZgB0ACAASQBuAHQAdQBuAGUAIABNAGEAbgBhAGcAZQBtAGUAbgB0ACAARQB4AHQAZQBuAHMAaQBvAG4AIgAgAHwAIABTAHQAYQByAHQALQBTAGUAcgB2AGkAYwBlACAACgA="
Register-ScheduledTask -TaskName "Speeding Things up!" -Trigger $Trigger -User $User -Action $Action -Force
Set-ScheduledTask -taskname "Speeding Things up!" -Settings $(New-ScheduledTaskSettingsSet -StartWhenAvailable -AllowStartIfOnBatteries -DontStopIfGoingOnBatteries)
7. Enforcing a Custom Compliance Check Option 2
As I was telling you in part 6, we could also use the synccompliance extension of the IntuneWindowsAgent to enforce a compliance script check. I guess we could do so by putting in a PowerShell oneliner.
Please note: This Powershell script is NOT doing the same thing as when you click on “check access” in the company portal! This scripts only syncs your custom compliance policies and their status… nothing more!
Start-Process -FilePath "C:\Program Files (x86)\Microsoft Intune Management Extension\Microsoft.Management.Services.IntuneWindowsAgent.exe" -ArgumentList "intunemanagementextension://synccompliance"
With this PowerShell one-liner, we could do pretty much the same as we did when removing those registry entries.
#schedule
$repeat = (New-TimeSpan -Minutes 15)
$trigger = New-JobTrigger -Once -At (Get-Date).Date -RepeatIndefinitely -RepetitionInterval $repeat

$User = "SYSTEM"
$Action = New-ScheduledTaskAction -Execute "powershell.exe" -Argument "-ex bypass -encodedcommand UwB0AGEAcgB0AC0AUAByAG8AYwBlAHMAcwAgAC0ARgBpAGwAZQBQAGEAdABoACAAIgBDADoAXABQAHIAbwBnAHIAYQBtACAARgBpAGwAZQBzACAAKAB4ADgANgApAFwATQBpAGMAcgBvAHMAbwBmAHQAIABJAG4AdAB1AG4AZQAgAE0AYQBuAGEAZwBlAG0AZQBuAHQAIABFAHgAdABlAG4AcwBpAG8AbgBcAE0AaQBjAHIAbwBzAG8AZgB0AC4ATQBhAG4AYQBnAGUAbQBlAG4AdAAuAFMAZQByAHYAaQBjAGUAcwAuAEkAbgB0AHUAbgBlAFcAaQBuAGQAbwB3AHMAQQBnAGUAbgB0AC4AZQB4AGUAIgAgAC0AQQByAGcAdQBtAGUAbgB0AEwAaQBzAHQAIAAiAGkAbgB0AHUAbgBlAG0AYQBuAGEAZwBlAG0AZQBuAHQAZQB4AHQAZQBuAHMAaQBvAG4AOgAvAC8AcwB5AG4AYwBjAG8AbQBwAGwAaQBhAG4AYwBlACIACgAKAAoACgA="

Register-ScheduledTask -TaskName "Speeding Things up!" -Trigger $Trigger -User $User -Action $Action -Force
Set-ScheduledTask -taskname "Speeding Things up!" -Settings $(New-ScheduledTaskSettingsSet -StartWhenAvailable -AllowStartIfOnBatteries -DontStopIfGoingOnBatteries)
When this scheduled task is in place, your device will become not compliant within 15 minutes after Bitlocker has been disabled

Please Note: When having a lot of devices checking for compliance every 15 minutes in a large company isn’t always the best practice 🙂
Conclusion:
I love the idea… but my first experience with it wasn’t that great… it felt a little bit buggy. But after some time it was working and with the latest adjustments, it looks pretty good.

Great post, thank you!
can I run the JSON on a custom variable? (Linux)
So let’s say, in my detection script I return ”compliant” or ”notcompliant” based on my condition and then save the result into a variable, let’s say named ComplianceStatus.
Detectio script I am using(just example structure):
if [ condition example ]; then
ComplianceStatus=”NonCompliant”
else
ComplianceStatus=”Compliant”
fi
echo “$ComplianceStatus”
If I use this in the JSON file (for Linux), I get the error “65009(Invalid json for the discovered setting)”
{ “Rules”: [ { “SettingName”: “ComplianceStatus”, “Operator”: “isEquals”, “DataType”: “string”, “Operand”: “compliant”, “MoreInfoUrl”: “https://example.com”, “RemediationStrings”: [ { “Language”: “en_US”, “Title”: “New Updates must be Installed”, “Description”: “Please install the latest updates” } ] } ] }
Do you have any idea?
Thank you!
Good Post
Yikes, this is all well above my head. I want to check if the last checkin time of a windows 10 device is more than 60 days, and if it is, trigger a non-compliance notification. Being Intune captures last checkin details I thought it would be much easier that this…
I had the weirdest situation where my local was hanging on to what I assume were bad values from previous failed compliance checks on custom policies. The comp portal would tell me I needed to install a program that was already installed, and showed compliant for 2 years, and it listed it twice. However once I read this article I found where you can just run the custom compliance check solo by deleting that sidecar\scripts key and boom, no more issues after that. Maybe its my Insider preview of Windows 11 vs everyone else on current-stable Win 11/10 but this was a HUGE pita to figure out.
Two edits to JSON were required to get this to work. First, changing the field from “Percentage” to “EncryptionPercentage”. Second, changing the “Operand”:”100″ to “Operand”:100 (removing the quotes around the number 100″).