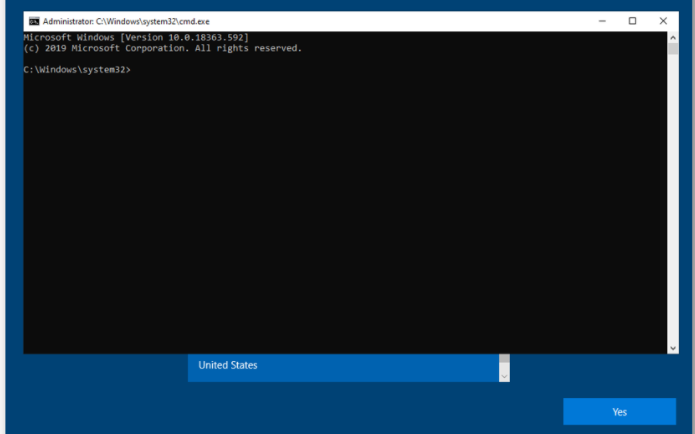
I guess the name just says it all… it has something to do with the OOBE and pressing Shift+F10 and how we can prevent the use of it during Windows Autopilot
1. The Shift F10 Issue
Before I am going to show you, how to fix it we still need to know what we need to fix. I guess everyone knows about the possibility to press shift + F10 to get a nice system shell/cmd during out-of-box experience (OOBE)
For me, this shift f10 could be even worse than the possibility to create a local account during Autopilot (even while it shouldn’t be possible to create a local admin account)
For It Pro’s who need to do some troubleshooting, the Shift F10 option is great! Nothing to complain about. But when we don’t need it, we must have the possibility (in my opinion) to disable it because a regular user doesn’t need it right?

Why do we want to disable it? That’s an easy one! You can do a lot of “nice” stuff with a cmd shell like this, like creating additional local admins. But that’s not what I am afraid of. I am afraid of the stuff we haven’t thought about and haven’t configured security barriers for.
2. Preventing Shift-F10
Of course, I can advise you to use Windows 10 S mode and I would be done with this blog but let’s just forget about Windows 10 S mode for now. It’s isn’t Christmas anymore but this one is definitely on my Christmas wish list for next year.
I would love to see the possibility of just having the option in the Autopilot profile to disable shift f10. Just like we have to change the default user account to “Standard”

But unfortunately, this nice option above isn’t available. So we need to fix it another way. Luckily it’s easy to block this. The only thing you will need to do is, to make sure you have created a file named: “DisableCMDRequest.tag” and have placed this file in the c:\windows\setup\scripts folder (scripts folder normally doesn’t exist)

And you are done, right?

But you will need to do this every time you perform a push-button reset. Waiting for that process to complete could take up some of your time before you can manually copy that file, and you will need to do it manually. And like everything you need to do manually, there comes a time when you just forget about it!
That’s not great at all. First, I wanted to see if we could fix this issue with a Provisioning Package, but we would still have the same issue when we perform a remote wipe from Intune.

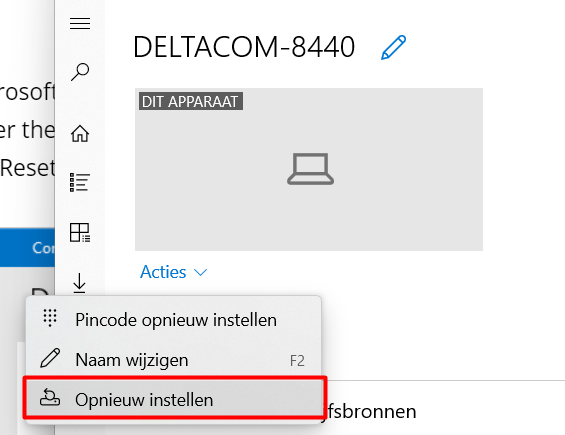
But what about when a user resets his own device? Luckily, all of our users don’t have local admin permissions, so when they want to perform a device reset from the settings menu, they will be prompted for Admin credentials, but like always, the company portal is to the rescue!
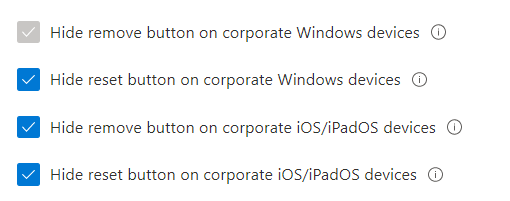
When you don’t configure the end-user experience customization and make sure you “Hide reset button on corporate Windows Devices” like shown below,

A standard user could open the Company Portal app and could decide to “reset” his device on his own and you will end up again with a device with the possibility to press Shift+ F10 to get a nice cmd.

Normally, when resetting the device, you will be asked to “remove everything” or “keep my files.” After you make your decision, your device will be reset.

3. Fixing it even after a remote wipe/local wipe
So, let’s examine how else we could raise some barriers to make it harder for the user to get a command when pressing Shift-F10.
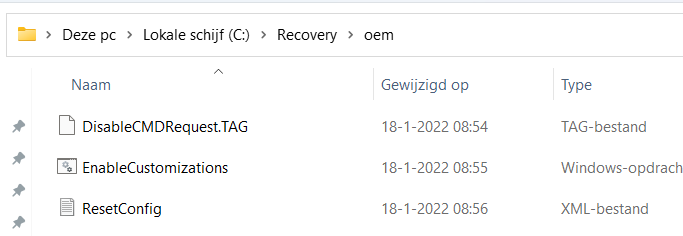
It’s a good thing we could customize the Push-Button reset options. To configure Windows Recovery Environment Push-button reset features, we need to place three files inside the c:\recovery\oem folder: ResetConfig.Xml, ResetConfig.Xml, and ResetConfig.Xml.

- ResetConfig.xml
- CommonCustomizations.cmd
- DisableCMDRequest.TAG
3.1: ResetConfig.Xml
The Resetconfig.xml will be used when we reset the device. There are four Extensibility points you could use during the reset process.
We will look at two extensibility points at the end of (after) the reset. Those 2 extensibility points can be used to point to a script that needs to be executed just after the old c:\windows files are moved to c:\windows.old. and the new Windows files are going to be moved to the famous c:\windows folder.
So, shall we take a better look at this resetconfig.xml? Looking at this file you will probably notice the “BasicReset_afterimageApply” and “FactoryReset_AfterImageApply” . Both of them will use the same Commoncustomizations.cmd
<Run Phase="BasicReset_AfterImageApply">
    <Path>CommonCustomizations.cmd</Path>
    <Duration>2</Duration>
  </Run>
  <Run Phase="FactoryReset_AfterImageApply">
    <Path>CommonCustomizations.cmd</Path>
    <Duration>2</Duration>
  </Run>
Please Note: This file needs to be UTF8 encoded!
So what do BasicReset and FactoryReset tell us? Luckily it’s just one simple difference between those two.
BasicReset_AfterimageApply AKA Keep My files
FactoryReset_AfterImageApply AKA Remove Everything
So, with this XML, we covered both of the reset options we saw earlier, that is pretty nice. With these 2 extensibility points, we can make sure a script is executed.
3.2: CommonCustomizations.cmd / DisableCMDRequest.TAG
Let’s go further and let’s take a look at the CommonCustomizations.cmd script it calls upon
for /F "tokens=1,2,3 delims= " %%A in ('reg query "HKEY_LOCAL_MACHINE\SOFTWARE\Microsoft\RecoveryEnvironment" /v TargetOS') DO SET TARGETOS=%%C
for /F "tokens=1 delims=\" %%A in ('Echo %TARGETOS%') DO SET TARGETOSDRIVE=%%A
if not exist "%TARGETOS%\Setup\Scripts\" mkdir "%TARGETOS%\Setup\Scripts"
copy "%TARGETOSDRIVE%\Recovery\OEM\DisableCMDRequest.TAG" "%TARGETOS%\Setup\Scripts\DisableCMDRequest.TAG" /y
So this script above pretty much queries the registry and sets some needed variables like “Targetosdrive” and “targetos” and if those variables are set it just creates the needed setup\scripts folder and copies the needed disablecmdrequest.tag file to this folder.
With these 2 files, I have explained the 3 needed files. Shall we take a look at the whole script?
4. The whole PowerShell Script
I have created this simple PowerShell script, converted it to a Win32 app, and uploaded it to Intune. To be sure this PowerShell script is executed during the pre-provisioning Autopilot process, I also added this App to the required apps in the ESP
###############################################################################
# Create disablecmdrequest in the c:\windows\setup\scripts                 #
##########################################################################
$path = "C:\Windows\Setup\Scripts"
If(!(test-path $path))
{
      New-Item -ItemType Directory -Force -Path $path
}

$path = "C:\Windows\Setup\Scripts\DisableCMDRequest.TAG"
If(!(test-path $path))
{
      New-Item -ItemType file -Force -Path $path
}


#######################################################
# Create disablecmdrequest in the oem recovery folder #
#######################################################

$path = "C:\recovery\oem"
If(!(test-path $path))
{
      New-Item -ItemType Directory -Force -Path $path
}

$path = "C:\recovery\oem\DisableCMDRequest.TAG"
If(!(test-path $path))
{
      New-Item -ItemType file -Force -Path $path
}

#######################################################
# create enablecustomizations.cmd in the oem folder   #
#######################################################


$content = @'
for /F "tokens=1,2,3 delims= " %%A in ('reg query "HKEY_LOCAL_MACHINE\SOFTWARE\Microsoft\RecoveryEnvironment" /v TargetOS') DO SET TARGETOS=%%C
for /F "tokens=1 delims=\" %%A in ('Echo %TARGETOS%') DO SET TARGETOSDRIVE=%%A
if not exist "%TARGETOS%\Setup\Scripts\" mkdir "%TARGETOS%\Setup\Scripts"
copy "%TARGETOSDRIVE%\Recovery\OEM\DisableCMDRequest.TAG" "%TARGETOS%\Setup\Scripts\DisableCMDRequest.TAG" /y

'@

Out-File -FilePath c:\recovery\oem\CommonCustomizations.cmd  -Encoding utf8 -Force -InputObject $content -Confirm:$false


$MyPath = "c:\recovery\oem\CommonCustomizations.cmd"
$utf8 = New-Object System.Text.UTF8Encoding $false
$MyFile = Get-Content $MyPath -Raw
Set-Content -Value $utf8.GetBytes($MyFile) -Encoding Byte -Path $MyPath


#######################################################
# create ResetConfig.xml in the oem folder   #
#######################################################


$content2 = @'
<?xml version="1.0" encoding="utf-8"?>
<!-- ResetConfig.xml -->
<Reset>
  <Run Phase="BasicReset_AfterImageApply">
    <Path>CommonCustomizations.cmd</Path>
    <Duration>2</Duration>
  </Run>
  <Run Phase="FactoryReset_AfterImageApply">
    <Path>CommonCustomizations.cmd</Path>
    <Duration>2</Duration>
  </Run>
  <!-- May be combined with Recovery Media Creator
       configurations – insert SystemDisk element here -->
</Reset>
'@

Out-File -FilePath c:\recovery\oem\ResetConfig.xml -Encoding utf8 -Force -InputObject $content2 -Confirm:$false

$MyPath = "c:\recovery\oem\ResetConfig.xml"
$utf8 = New-Object System.Text.UTF8Encoding $false
$MyFile = Get-Content $MyPath -Raw
Set-Content -Value $utf8.GetBytes($MyFile) -Encoding Byte -Path $MyPath
This script above just output’s the contents to the required files we discussed earlier. But the only thing I need to explain a little bit more is the UTF8 part. Normally when using the out-file option, the file created isn’t created with the needed UTF8 encoding. Even when specifying -Encoding utf8, it will not save the file as we want. So I made sure I encoded it the right way with these few additional lines
$MyPath = "c:\recovery\oem\CommonCustomizations.cmd"
$utf8 = New-Object System.Text.UTF8Encoding $false
$MyFile = Get-Content $MyPath -Raw
Set-Content -Value $utf8.GetBytes($MyFile) -Encoding Byte -Path $MyPath
5. Windows.OLD adjustment
Microsoft decided to use the same idea to fix the lingering.old folder, the same way I did, but by doing so, they will break this possibility to lock down the Shift+f10 functionality.
Please read this blog to fix it!
KB5011487 | KB5011493 | Windows.old fix breaks Shift+F10 Fix (call4cloud.nl)
6. Conclusion / Results
Normally, I could show the outcome, but this script removes the possibility of just pressing Shift + F10 after a wipe… it’s hard to show nothing?
Hopefully, Microsoft will give us the possibility to disable the Shift-f10 possibility when we need it to be disabled!. In the meantime, you could use the push-button reset script to fix it


Hi Rudy, just came across this old post, as I was wondering about this.
And either I am missing a very key point of your post, or it just fixes a very very tiny and specific case.
Nothing stops a user from pressing shift while rebooting. You can reset the device witout any administrator password. Or just boot from a recovery USB-stick you created.
oh, and btw: if you want to use this field in night mode, you can hardly ready the black letters on the dark grey background 😉
What happen if someone format the disk and install vanilla version of win11 to have the ability to use shift f10 to create local admin and do bad actions? How to mitigate?
I will say that you need to encrypt the disk 🙂