


In this blog, I will examine the Autopilot Hardware Mismatch Remediation Data thoroughly. Please note: I will make many assumptions and guesses about how it works by examining the AutoPilot.dll.
1. Introduction
After investigating the Autopilot profile issue caused by the Autopilot Marker, I decided to investigate the Hash Mismatch Remediation CSP. I will try to explain what happens behind the scenes and why the new Hardware Mismatch remediation relies on the Autopilot Marker mentioned in the blog I mentioned above.
Before showing you what happens, it could be smart to first know what I am talking about, so let me explain a bit. With the July 26 preview release, Microsoft added the HardwareMisMatchRemedation option
WindowsAutopilot CSP – Windows Client Management | Microsoft Learn
When looking at the little official Microsoft documentation available, Microsoft is telling us that this Windows Autopilot CSP collects hardware information about a device that is used when the device needs remediation if it underwent a hardware change
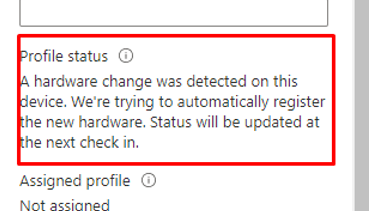
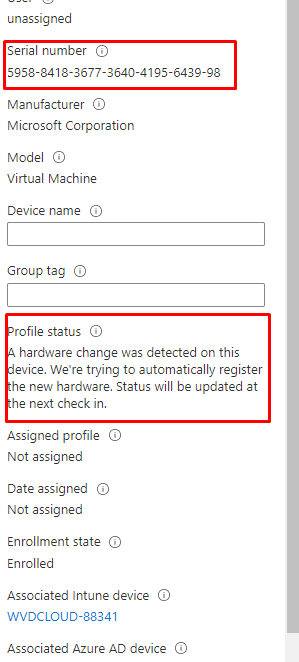
If an Autopilot device undergoes a hardware change, we will notice these 2 messages in the device’s profile status. The first one mentions the fact there is a “Fix Pending”

When we take a closer look at the Profile Status itself, it mentions that a hardware change was detected on this device.
Shall we take a closer look at what, I guess, happens when the device undergoes a hardware change?
2. What Happens
Before I did anything else, I manually run the DetectHardwareChange scheduled task even when there were no changes to make sure the HardwareInfo was available in the registry, so I can be sure the Autopilot service has something to compare.
Please note: I will try to explain more about this scheduled task in part 4 of this blog

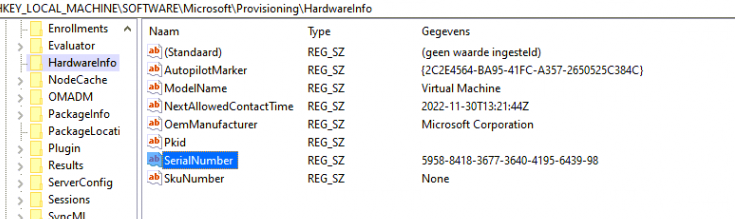
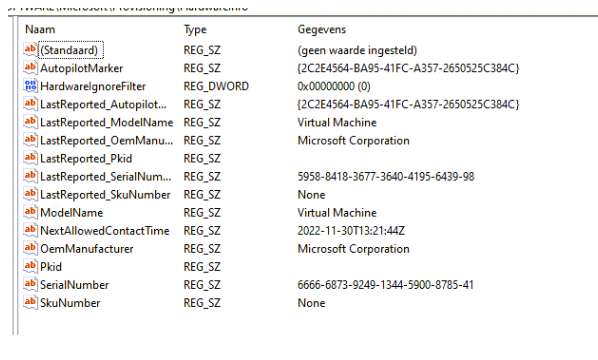
This DetectHardwareChange scheduled task creates a “snapshot” with the device’s hardware specifications. Some of this stuff is stored in the registry, and some is on the disk. Let’s start by looking at the registry. As shown below, the provisioninghardwareinfo registry key is the one to look at.
As shown below, this registry key stores some important information about the device itself. I guess the AutopilotMarker sounds familiar?
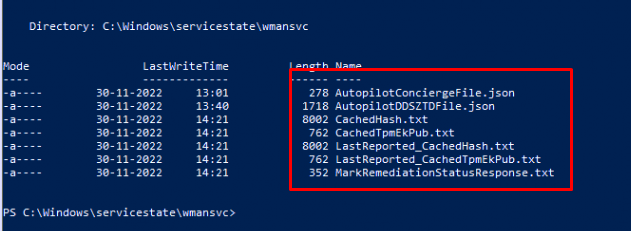
Besides the registry, we could also spot some disk activity using Procmon. We will notice that a cachedhash.txt and the cachedtpmekpub.txt will be placed on the disk


You could ask yourself the question: Why are those files stored in the wmansvc folder AKA Windows Management Service (Windows.Management.Service.Dll)…. it’s the same location as in which the Autopilot JSON is stored, so I guess it was a well-known place to store these TXT files

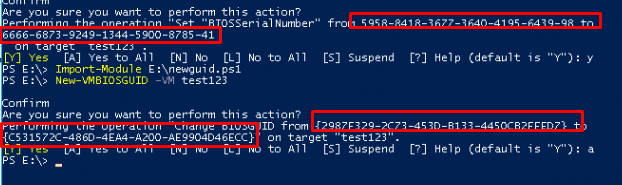
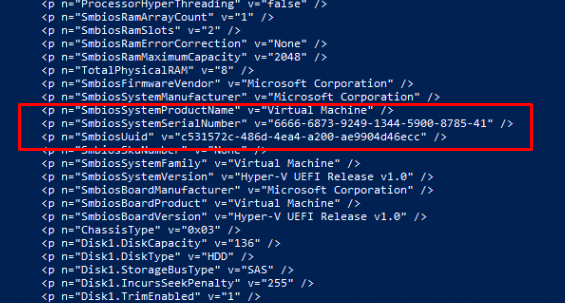
After making sure that the scheduled task was triggered once, I shutdown the VM and “changed” some important stuff like the UUID and the BIOSSerialNumber as shown below
Script: Change the BIOS GUID of a Hyper-V Virtual Machine (altaro.com)
After changing those Hardware Identifiers I booted the VM and determined if the serial was indeed changed
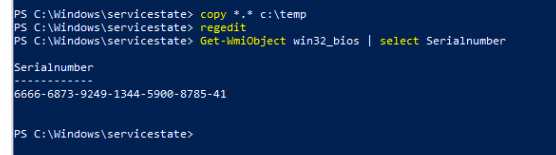
As shown above, the BiosSerialnumber was indeed changed. Now I am pretty sure the Hardware Identifiers changed I started Fiddler and opened the scheduled tasks again to launch the “DetectHardwareChange” scheduled task

After launching that task (which is normally automatically launched because of a “hardware event” detected by WNF), within a few seconds, some additional files with LastReported popped up in the wmansvc folder
We can also spot the same behavior in the HardwareInfo registry key I mentioned earlier
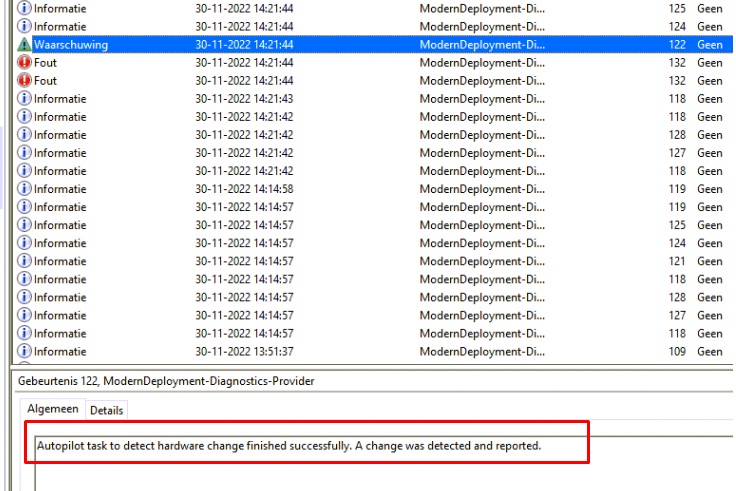
After those keys arrived at the registry it was time to open the event log. Look at what I got! A nice ModernDeployment-Diagnostics-Provider event 122 mentioning the “Autopilot task” to detect hardware change finished successfully: a change was detected and reported. So my guess is it compares the “Orginal/LastReported” registry keys and the new ones
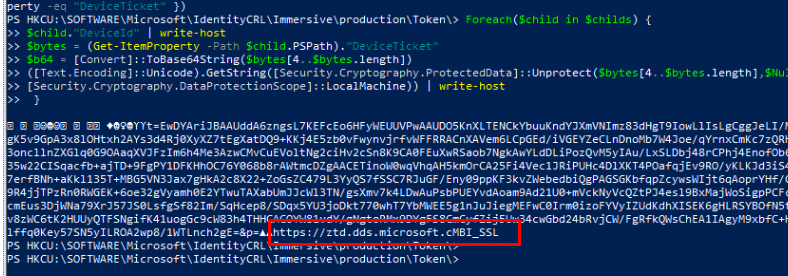
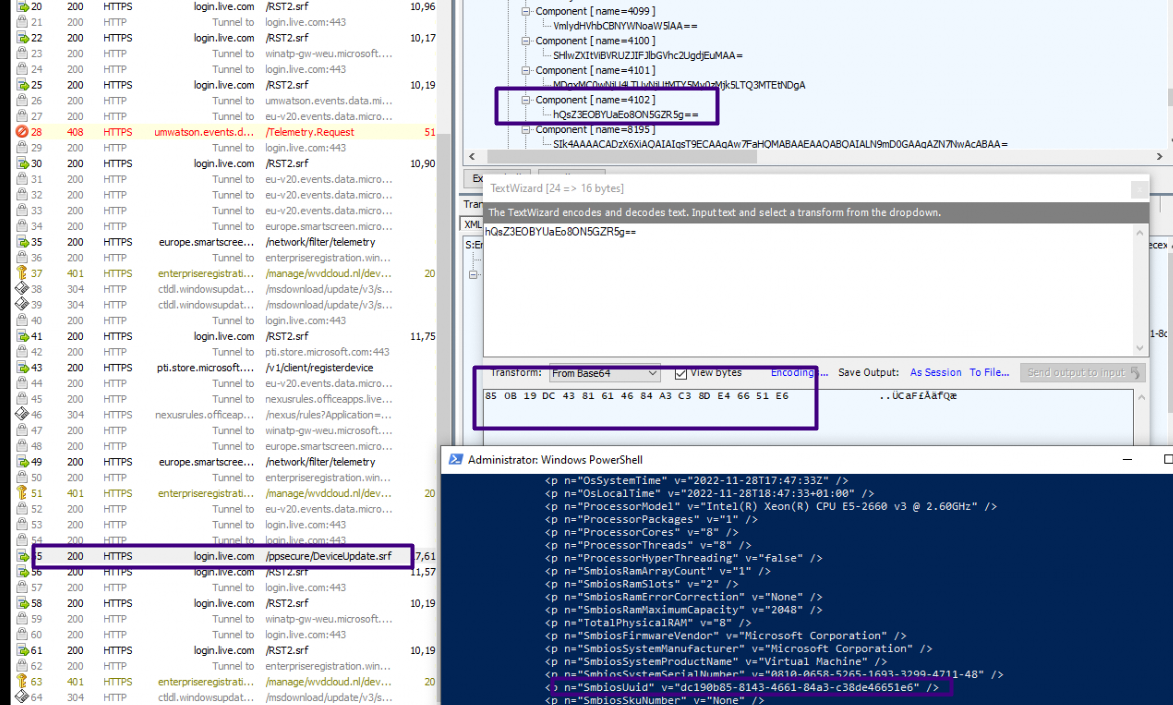
At the same time that event pops up, we notice that Windows is also trying to reach out to the Autopilot Service ztd.dds.microsoft.com to Patch the UpdateDeviceHardwareMismatchRemediationState

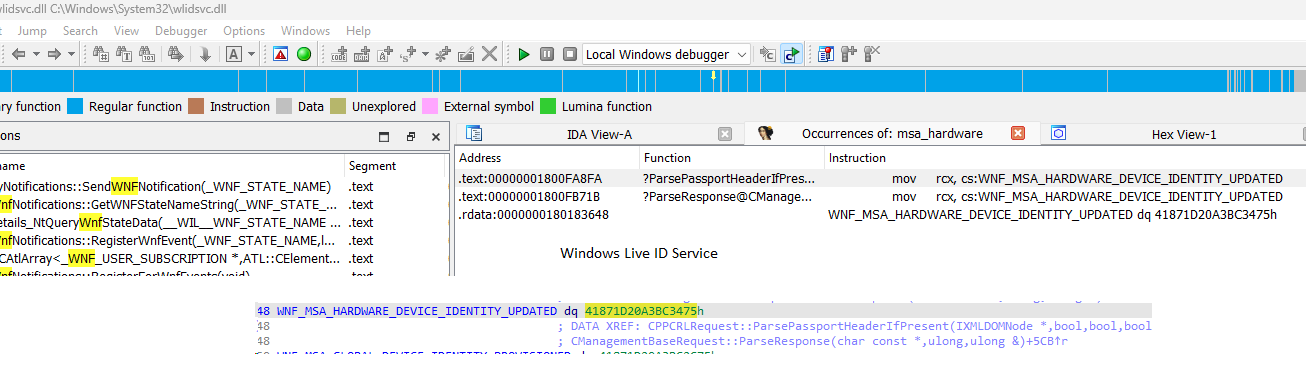
Please Note: This Autopilot URL could also be spotted when looking at the Autopilot.Dll file as shown below

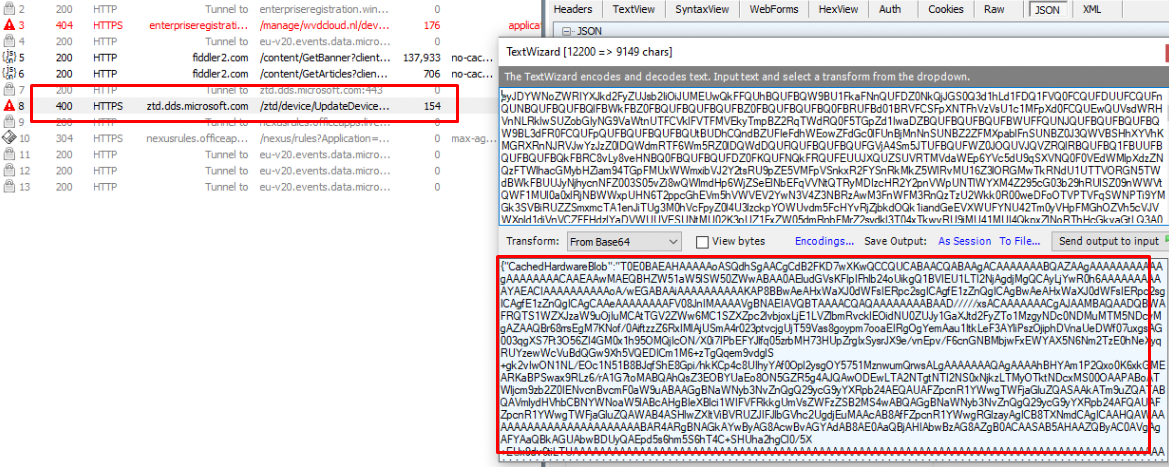
When looking at the headers in the PATCH request to ztd.microsoft.com we will notice that it will contain the “HardwareMismatchRemediationData”
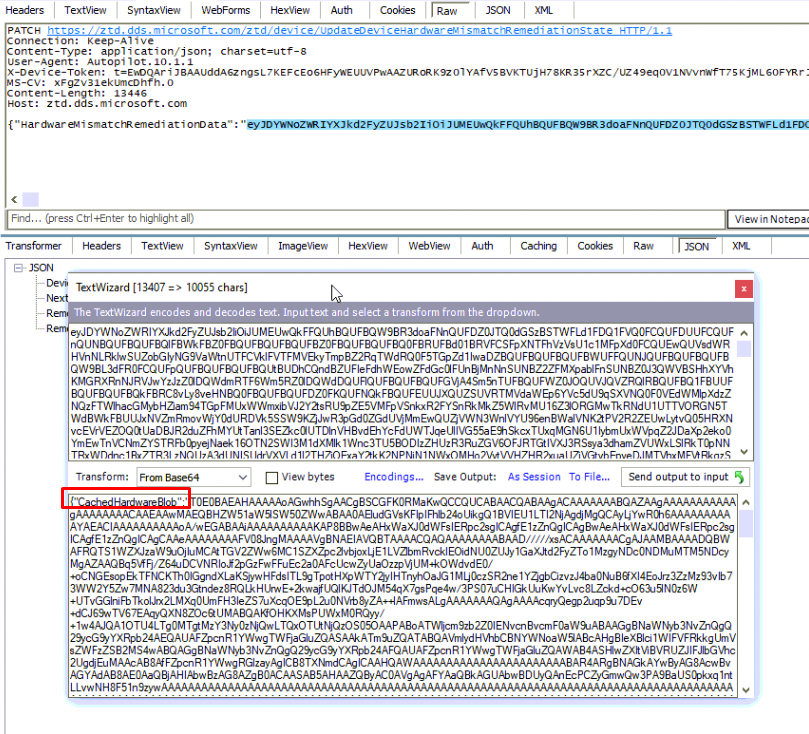
When decompiling the “HardwareMismatchRemediationData” we will notice that it contains the CachedHardwareBlob and the CurrentHardwareBlob. Let’s start with the Cashed one! As shown below this CachedHardwareBlob has the same contents as the cachedhash.txt we noticed in the wmansvc folder
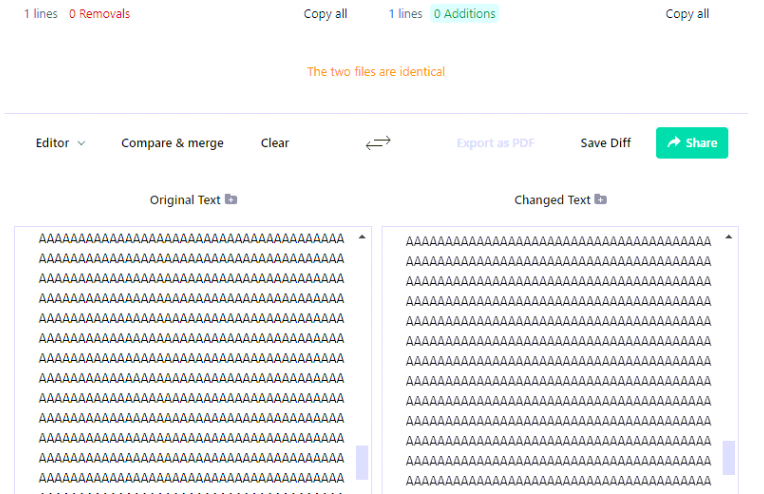
When looking at the second blob AKA the CachedHardwareBlob and decoding it with the OA3TOOL. We will notice that this blob is just the old hardware with the “OLD” serial and UUID in it.

When looking back at the CurrentHardwareBlob and doing the same as with the Cached one we will notice that this one has the NEW Serial number and the new UUID .
This information is generated by using the ./DevDetail/Ext/DeviceHardwareData CSP

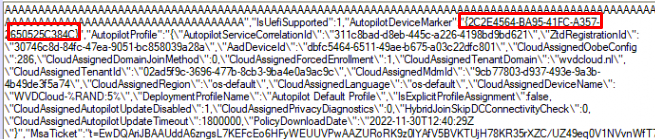
Besides this information, we will also notice some information from the Autopilot Profile. For example, the Autopilot marker I blogged about last week
Of course, this takes place in the system context but if you want to know which MSA tickets are cached for your user, you could take a look at the Software\Microsoft\IdentityCRL\Immersive\production\Token registry key.
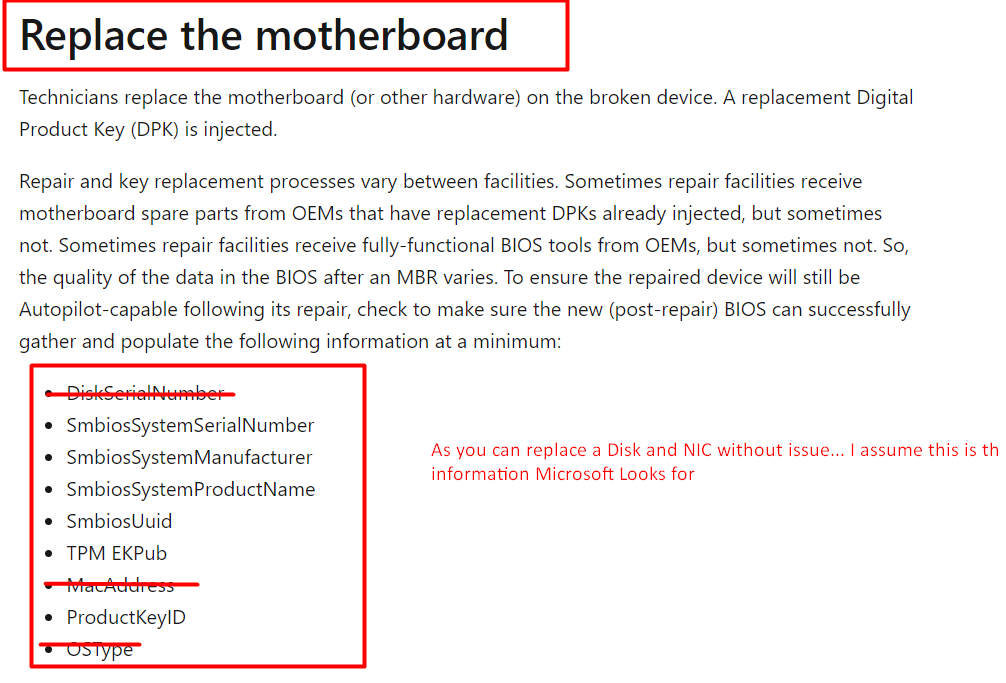
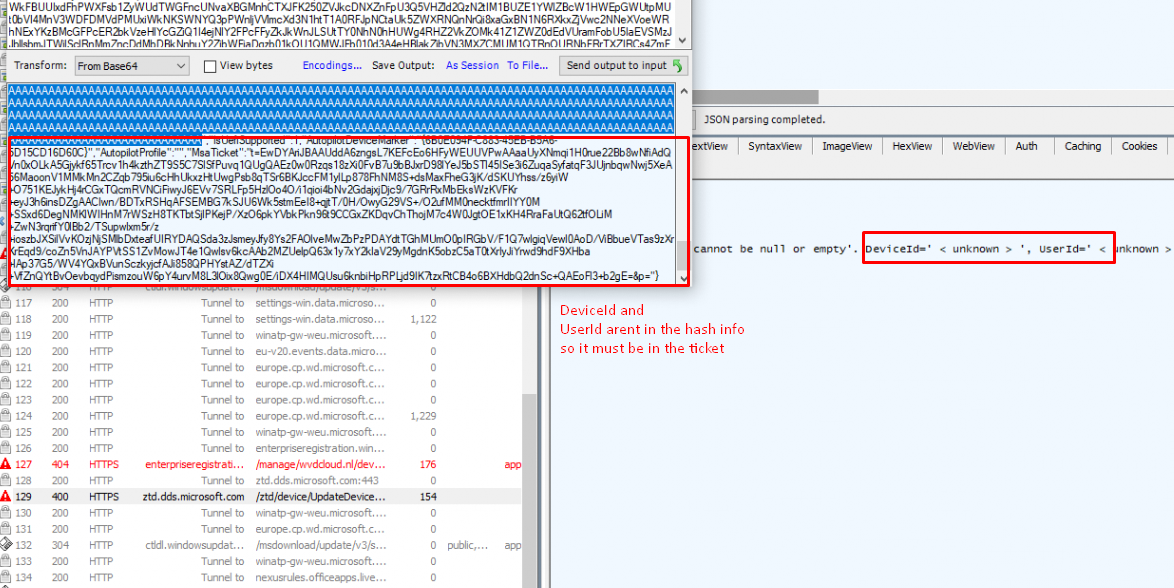
If you want to know more about this registry location, you could take a look at my previous blog. With all of this information sent to the Autopilot service (CurrentHardwareBlob, CachedHardwareBlob, AutopilotMarker, IsUEFISupported) Microsoft will look at the details about the hardware change it got and will try to “fix” it. When looking at other Official documentation, I assume Microsoft will look for this information in the BLOBs
Let’s continue and let’s take a look when we open the Windows Autopilot devices blade and press the sync button
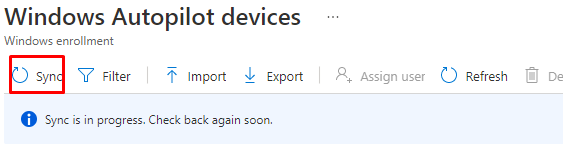
We will notice that the device with the old serial number mentions that a hardware change was detected on this device and they are trying to automatically register the new hardware!!
After 3 days of waiting the Profile Status was still showing “Fix Pending”
If this is the way it works…and we need to wait such a long time before it is fixed I rather remove the hash and reupload it again. To be sure it wasn’t already fixed in the background I reinstalled the same VM and run the same PowerShell scripts I mentioned in my previous blog.
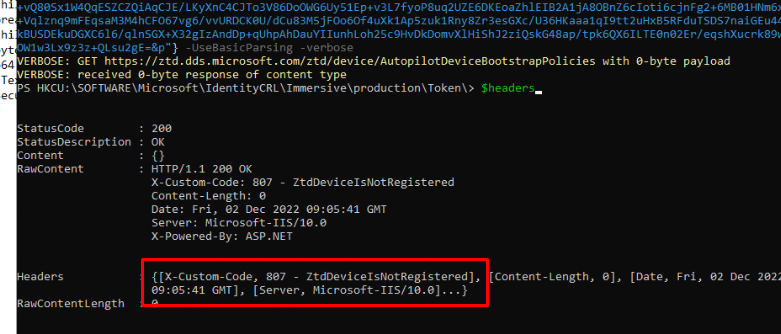
As shown above, after waiting 3 days, the device still shows ZtdDeviceIsNotRegistered. So, I guess I need to wait a bit longer.
3. The Flow

4. Detect Hardware Change Scheduled Task
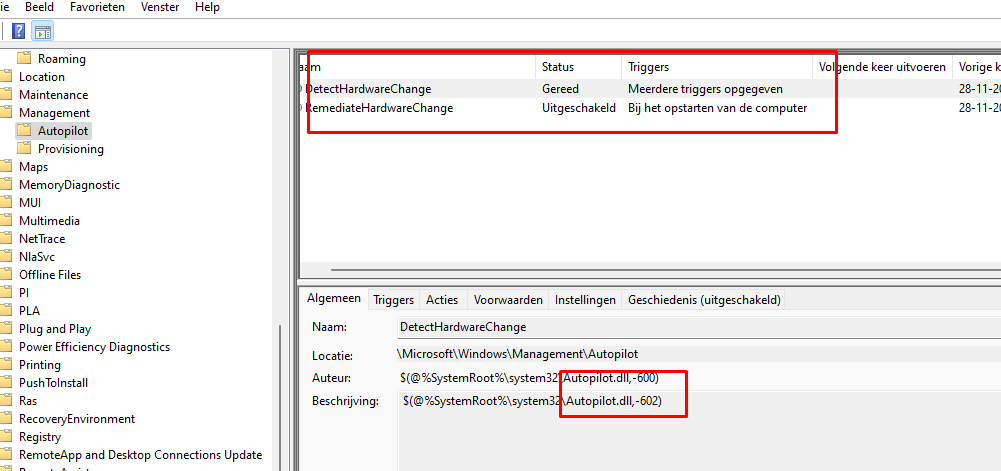
I stumbled upon this scheduled task by looking at the WPR trace I got. As shown below the trace is showing us the DetectHardwareChangeHandler and it is mentioning “EnableSpecificTask” and the corresponding task “RemediateHardwareChange”
After exporting all scheduled tasks with PowerShell it showed me where to look. It showed me the \Microsoft\Windows\Management\Autopilot scheduled task location
Of course, the first thing I did was open Procmon and launch the DetectHardwareChange scheduled task. As shown below, svchost.exe goes through all the hardware and the TPM. I also noticed the CLIPC.Dll being called upon, so I assume it also performs some licensing checks in the background!


I guess that task really goes through all the hardware to detect if any changes were made.
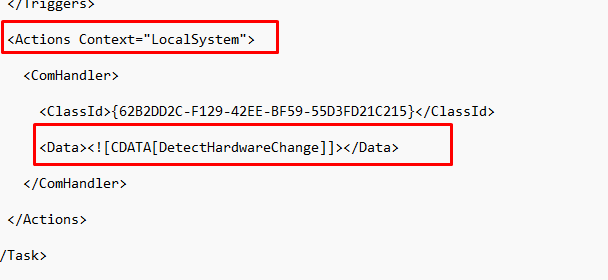
The next thing I did was export the task to XML with the use of the schtasks executable, just like I did when I needed to export the TPM-Maintenance task.
Ready For Attestation False and the 0x81039001 TPM time-out (call4cloud.nl)
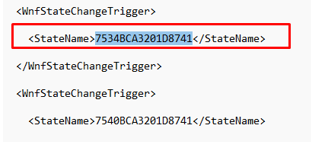
As shown above, we will notice the WnfStateChangeTrigger and the Statename: 7540bca3201d8741. However, you will be out of luck when trying to find anything useful on Google about this state name.
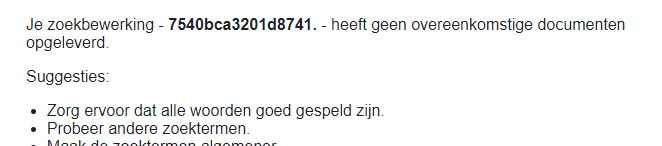
Shall I let you into a little secret? We need to read it backward, just like I did when I was playing around to retrieve the tenant Id from the Intune MDM certificate
function Translate-StateName {
    param (
        [ValidateLength(16,16)] [String] $StateName
    )

    process {
        $CharArray = (&{for ($i = 0;$i -lt $StateName.length;$i += 2) { $StateName.substring($i,2) }})
        $TranslatedStateName = (&{for ( $i = 7; $i -ge 0; $i-- ) { $CharArray[$i] }}) -join ''
        return $TranslatedStateName
    }
}
This PowerShell script from above will allow you to translate that WNF statename to something more useful.

This TaskName: 41871D20A3BC3475 will show you one hit on google but I decided to open IDA again and open the ContentDeliveryManager.utilities.dll

Guess why I opened this specific DLL! Because that’s the DLL with all the Windows Notification Facility IDs in it! When searching for this specific ID, it showed me a couple of hits

As shown above and below: It’s again mentioning the: WNF_MSA_HARDWARE_DEVICE_IDENTITY_UPDATED

After spending some time on google I stumbled upon this WNF trigger: WNF_MSA_ACCOUNTSTATECHANGE

That one led me to the Wlidsvc.dll AKA Windows Live ID. Windows Live ID… that one rings a bell or two when combining it with MSA?
Again and again, each time, it mentions WNF. I guess I need to take a look and explain a bit about what WNF is
5. WNF
WNF stands for Windows Notification Facility… Whoop part 5 is finished.

Not yet, I guess, because, as I mentioned in the first part, I manually triggered that Scheduled Task. As mentioned before, the scheduled task trigger points to WNF, so let me try to explain how this is triggered.
WNF is the notification system within the Windows Operating System. As we noticed in part 4, the task scheduler can subscribe to an event before it occurs and launch a scheduled task against it.
So, to put it in simple words… every time a hardware change event occurs, the Detect Hardware Change scheduled task will launch.
Let me give you a simple example: If you want to be notified each time an application is launched from the desktop we could create a scheduled task and define the StateChangeTrigger: 7550BEA33E06830D AKA WNF_SHEL_DESKTOP_APPLICATION_STARTED
When adding an action to this scheduled task, we can ensure a specific action will be triggered when this type of event occurs. This action could trigger a DLL function or just a simple PowerShell script that outputs a file to a directory each time a desktop application is launched
I guess I love WNF… because without this Trigger the DetectHardwareChange scheduled task isn’t going to be executed and without it… no Hardware Remediation
6. When you break the remediation Flow
I guess you know me…. If you don’t break it, you never know how you could put it back together. So I did the same with the Hash Remediation. I enrolled a new VM with a vTPM uploaded the hash and enrolled the device with Autopilot.
I disabled Bitlocker and shut down the VM. I created a new VM and attached that hard disk and booted the device. After running the dsregcmd /forcerecovery to fix the broken TPM authentication, I decided to run the DetectHardwareChange scheduled task.
After a few seconds, the device-management-diagnostics\autopilot event log was filled with the error… As shown below it’s mentioning an invalid remediation request and that the device profile cannot be null or empty.

Besides this error, it also showed me that the Autopilot hardware remediation report failed with the error 0x80190190. I have a slight feeling that the Autopilot hash remediation isn’t working.

Of course, I also enabled the Fiddler trace to determine if I could spot something different going on
7. Some Tips
To finish off this blog post, here are some tips.
- Don’t rebuild your device manually! Use the “Wipe” option in Intune! Otherwise, you could be stuck with an older OS build that doesn’t know about the Autopilot Marker. If you rebuild it manually, please make sure you do so with the latest Windows Build!!!
- If a hardware change occurred (motherboard replacement) this is indeed the message you could receive. If you are in a hurry delete the Autopilot Object (hash..which is not an hash) and upload it again
- I am hearing people mention that when the bios/firmware was updated, they also could get the same message. If that’s the case, please leave me a message if you also put in a Microsoft Ticket!
Update: Microsoft’s Change of Course on Hardware Hash Remediation
While this blog originally focused on how hardware hash remediation worked within Windows Autopilot, there’s been a big twist. In a recent update, Microsoft decided to pull the plug on the very feature that was supposed to smooth out hardware hash validation errors. Yeah, you heard that right—the remediation feature is no more.
Over on Patch My PC, I explained how Microsoft quietly phased out the remediation process in favor of a simpler but stricter approach: you’re either using the right hardware hash from the start or not deploying the device at all. This move is part of their effort to streamline Autopilot deployments, but it also means you’ll need to be even more careful with your hash management. No more easy fixes if the hash goes missing or doesn’t match up—Microsoft has shifted focus towards getting it right the first time.
If you’re wondering how this impacts your deployments, make sure to check out the blog on Patch My PC for all the details on what to watch out for moving forward.
Microsoft ditched the Autopilot Hardware Hash Remediation feature (patchmypc.com)
Conclusion
I am stumbled upon the Autopilot Profile download issue. Let me do some digging and some more digging. Even when there is still no Official Microsoft documentation about the Autopilot Hash Remediation, I hope this blog showed you a bit about how it could possibly work and how Microsoft pulled the plug on the feature as well.

Hi Good day!
Just a quick question.
We do have an existing machine, perfectly working.
But recently reported that the machine unable to proceed Autopilot. Upon checking in Intune, we do have the “Fix Pending” under profile status. Do you have any idea why the machine tagged as if it changed its hardware? Do any programs/driver that may cause the “Fix Pending” status?
Thank you very much.
Could be the “autopilot marker” i was telling about in a previous blog
We are suddenly seeing this multiple times in the past two weeks.
Do you know something that could trigger this?
And is the only way to “fix” it by removing the device from enrollment and re-enrolling it?
By the looks of it , the device had the idea (wnf trigger) that somehow a hardware change occurred on the device. DId you also checked the event logs on the device that I was mentioning? or the folder with the old and the new hash in it?
Modified the BIOS Guid. No hardware change detected. Modified Guid and the serialnumber baseboardserialnumber and ChassisAssetag need to be modified together? I gave a existing VM serialnumber or modify last two digital number. when check event log, it mentioned Autopilot detect hareware change failed. 0x80190194. Any idea?
Intereting post. I recently upload a bulk set of HWID in a customer’ target AP tenant, as the information included in a ConfigMgr AP report exported from a source company. Because of the source company acquisition in target environment, source computers are required to be rebuilt with Win10, while some of them are installed with W11.
The OS downgrade may cause the “Fix pending” issue? In fact, I noticed this status on some records related to W11 computers that have been rebuilt from scratch with W10.
Than you 🙂
I just had to update my TPM firmware and this behavior is happening. A profile is assigned that requires TPM 2 and the machine was only on TPM 1.2 so the Profile status was showing “Failed” with an explanation “ProfileName’ failed – Self-Deploying mode requires TPM 2.0 hardware”.
After updating the TPM firmware Profile on the machine status now show “Fix Pending” with an explanation “We’ve detected a hardware change on this device. We’re trying to automatically register the new hardware. You don’t need to do anything now; the status will be updated at the next check in with the result;a href=”https://go.microsoft.com/fwlink/?linkid=2169163″>Learn more about resetting the profile.</a>”
Isn’t this auto remedy fix, gone..:
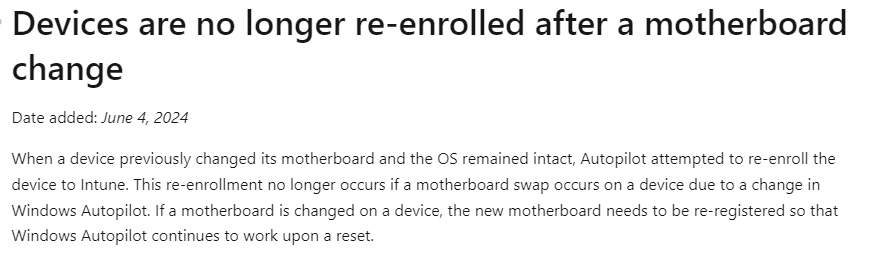
Devices are no longer re-enrolled after a motherboard change
Date added: June 4, 2024
https://learn.microsoft.com/en-us/autopilot/whats-new#devices-are-no-longer-re-enrolled-after-a-motherboard-change
Heheh yep.. totally forgot to update this blog… as i explained how microsoft ditched this feature on patch my pc.. thanks for reminding me 🙂 its updated now mentioning the fact that this feature no longer works