In general, using Active Directory Group Policies to deploy certificates is the easiest and best way to go; however, what if you don’t trust Group Policy, your organization isn’t willing to use Group Policy or has so much red-tape involved with Group Policy that its impractical to use, or you have workgroup systems? Use Compliance Settings in ConfigMgr. This is a great answer for just about anything that can be done in Group Policy given any of the aforementioned limitations by the way — you just need to find the appropriate registry values or write/find the right script to do the job.
Certificates aren’t registry values so that leaves us with writing a script; two in fact because we need a discovery script and a remediation script. To be clear, the following scripts aren’t for certificate enrollment or issuance, they are for deploying existing certificates to systems; e.g., a code signing certificate used by SCUP to sign third-party updates. Although this post is a bit lengthy, if you are familiar with Compliance Settings in ConfigMgr and PowerShell, the below shouldn’t take you more than about 5 minutes to implement. Also note that in Windows 8 and above there is an Import-Certificate cmdlet. I avoided use of this cmdlet because it requires an actual file but there is no good way to reference a file in a distributed network in a location independent way without the use of some other technology like DFS. Also, I wanted to be able to support Windows 7.
The Certificate
You will first need to have the certificate that you want to deploy to your systems handy. This certificate should not contain the private key as that’s not something that you want to deploy to any system — the private key should be private. Import the certificate into the desired store on a test system. From there, export the certificate into a Base-64 encoded file using the export function in the Certificates MMC snap-in.
The Discovery Script
The discovery script (PowerShell of course), as its name implies, discovers whether or not the certificate is present or not:
[sourcecode language="powershell" title="Certificate Discovery Script"]
$sn = '590000000ad02bb70017be36f700000000000a'
$storeName = "TrustedPublisher"
$store = New-Object System.Security.Cryptography.X509Certificates.X509Store $storeName, LocalMachine
$store.Open([System.Security.Cryptography.X509Certificates.OpenFlags]::ReadOnly)
Write-Host (@( ($store.Certificates | where {$_.SerialNumber -eq $sn}) ).count)
$store.Close()
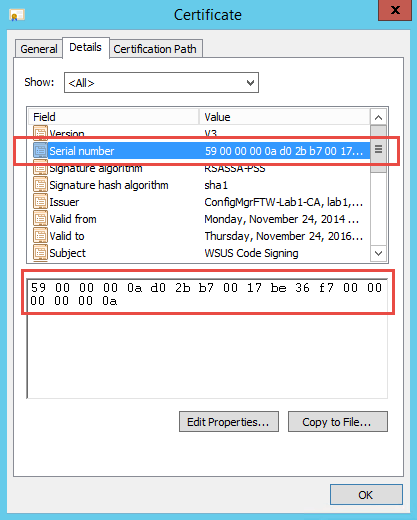
[/sourcecode]Simply replace the value of the $sn variable in the above script with the actual serial number of the certificate you are installing (unless you really want to check for the code signing certificate in my lab). You can easily grab this from the Details tab of the Certificate dialog in the MMC Certificates snap-in. Just copy and paste it (get rid of the intermediate spaces though).

Also, replace the value the $storeName variable if necessary. The script above checks for certificates in the Trusted Publisher store. Other possible values include My for the Personal store and Root for the Trusted Root Certificate Authorities store.
Alternatively, run the following script to list the serial number from all of the certificates in the given store:
[sourcecode language="powershell" title="Get Certificate Serial Numbers"]
$storeName = "TrustedPublisher"

$store = New-Object System.Security.Cryptography.X509Certificates.X509Store $storeName, LocalMachine
$store.Open([System.Security.Cryptography.X509Certificates.OpenFlags]::ReadOnly)

$store.certificates | select Subject, SerialNumber
$store.Close()
[/sourcecode]
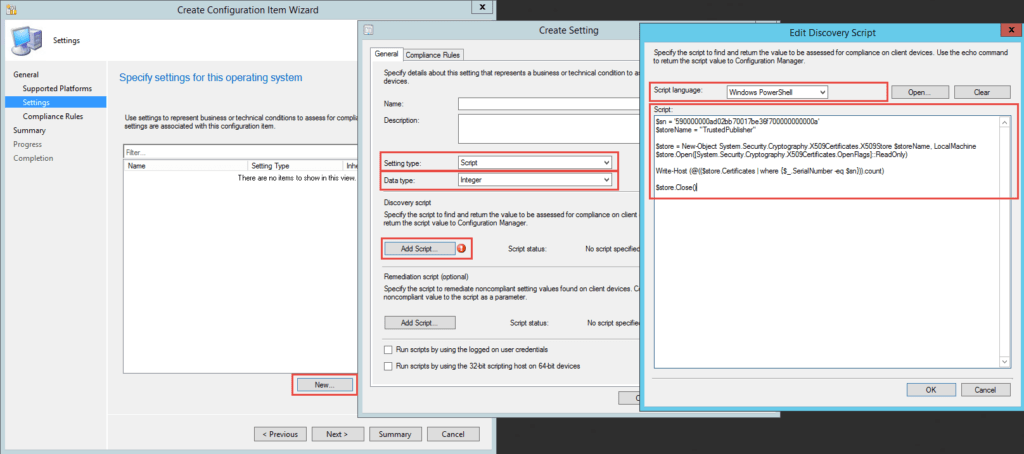
When creating the Configuration Item in ConfigMgr choose Script as the Setting type, Integer as the Data type, and paste the above Discovery Script (including the updates to the two identified variables) into the Edit Discovery Script dialog choosing PowerShell as the language.

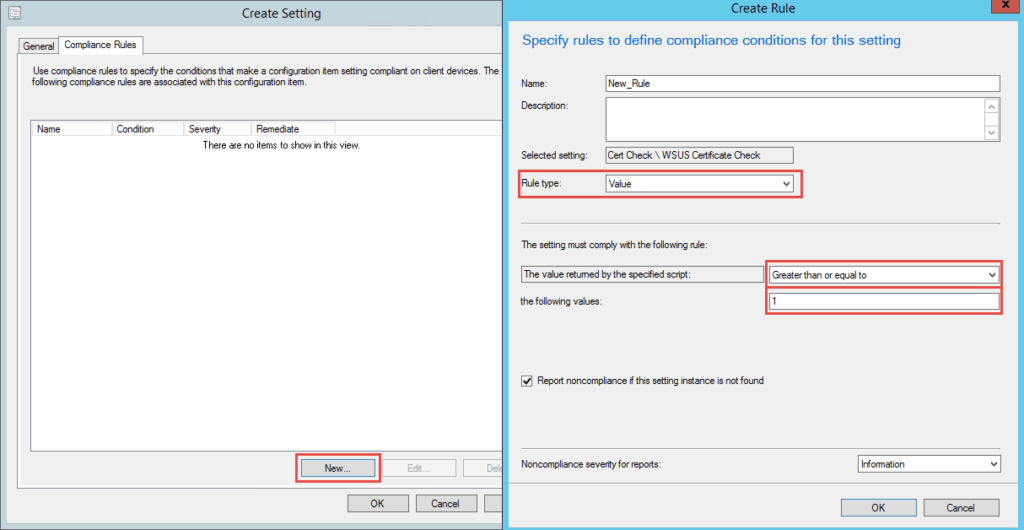
For the compliance rule, select Value as the Rule type, change the operator to Greater than or equal to, and then set the value to 1.

The Remediation Script
If all we wanted was to check for compliance we could stop here, but we also want to add the certificate to the appropriate store which requires a Remediation Script.
[sourcecode language="powershell" title="Certificate Remediation Script"]
$storeName = "TrustedPublisher"
$certString = "--Insert Base64 encoded certificate here--"

$store = New-Object System.Security.Cryptography.X509Certificates.X509Store $storeName, LocalMachine
$store.Open([System.Security.Cryptography.X509Certificates.OpenFlags]::ReadWrite)

$certByteArray = [System.Convert]::FromBase64String($certString)

$cert = New-Object System.Security.Cryptography.X509Certificates.X509Certificate2
$cert.Import($certByteArray)

$store.Add($cert)
$store.Close()
[/sourcecode]
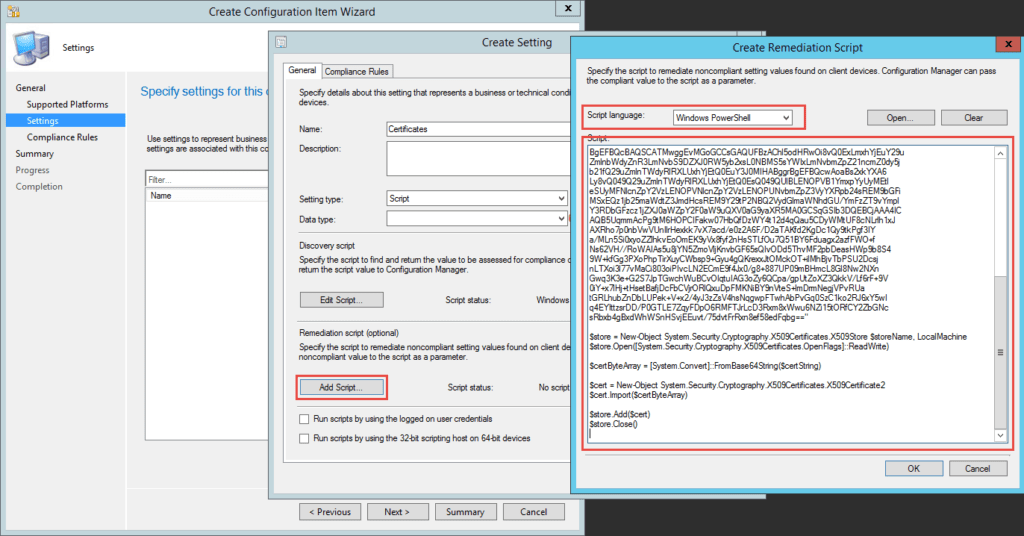
Just like with the discovery script, update the $storeName variable appropriately. For the $certString variable, open the base64 encoded certificate file that you exported above in notepad, and then copy and paste the complete text from between the —–BEGIN CERTIFICATE—– and —–END CERTIFICATE—– markers as the value replacing the –Insert Base64 encoded certificate here– text shown above. Don’t worry about the new lines, the underlying API is smart enough to deal with those.
Alternatively, if you already have the certificate in a DER encoded binary file, you can forego exporting it. To get the base64 representation of the certificate from a DER encoded binary file, run the following (replacing the values of the Path and FilePath parameters as is appropriate). This will output the base64 representation into the specified text file where you can copy and paste it from.
[sourcecode language="powershell" title="Get Base64 Representation of a Certificate"]
[System.Convert]::ToBase64String($(Get-Content -Path .\mycertificate.cer -Encoding Byte)) | Out-File -FilePath .\mycertificate.txt
[/sourcecode]
Copy the edited script into your configuration item as the Remediation Script choosing PowerShell as the language.

And Finally
Finally, add the configuration item to a compliance baseline and deploy. Make sure that you choose Run the specified script when this setting is noncompliant on the Compliance Rule you created before (this checkbox doesn’t show up until after you add a Remediation Script to the setting) and Remediate noncompliant rules when supported when creating the deployment.
[ms_panel title=”Certificate Profiles” title_color=”#f5f5f5″ border_color=”#00274c” title_background_color=”#00274c” border_radius=”2″ class=”” id=””]If all you want to do is add a certificate to the Trusted Root or Intermediate certificate stores and all of your clients are on Windows 8.1 and/or Windows 10, then using the built-in Certificate Profiles functionality is the easy button here. The official documentation gives a great overview of this: Introduction to Certificate Profiles in Configuration Manager.[/ms_panel]


Jason,
Another great blog. Just read over really fast and will go back and read it again. Great job at MMS this year by the way.
Thanks!
Thank you for the kind words and you’re very welcome.
Jason you rock dude! will have to give this a test in the science lab 🙂
Thanks Sam!
Useful for showing how to construct compliance settings which is not a widely used functionality despite being one of the most useful, but why not just use certificate profiles? I use them quite widely with customers and they are extremely effective. You can also deploy SCEP profiles to devices in this way.
Because certificate profiles cannot place certificates in alternate stores like the trusted publishers store (which is the primary example given) and because this isn’t about issuing new certificates so has nothing to do with SCEP. Also, cert profiles does not work for Windows 7 which is also explicitly called out.
Jason
Thank you for this, we were trying to do something along these lines for a particular Intermediate Certificate. Here’s the thing though, i understand that your script will read those certificates that have the ReadOnly status field set. Unfortunately i’m trying to read a cert that does not have the ReadOnly flag set. I’ve already tried using the other flags; ReadWrite, MaxAllowed,OpenExistingOnly,IncludeArchived but the cert will still not show for me in Powershell. Any ideas how to achieve this?
Thanks
That’s incorrect — certs don’t have a ReadOnly flag. That flag in the script is for opening the store in read-only mode because that’s all that is needed during discovery. Notice in the remediation script that the ReadWrite flag is used to open the store in in Read-Write mode.
Your issue probably stems from the fact that these script are for the TrustedPublisher store but you are looking for and trying to add a cert in the Intermediate store. Thus, you need to change the value of the $storeName variable in the above script to “CertificateAuthority”. See https://msdn.microsoft.com/en-us/library/system.security.cryptography.x509certificates.storename(v=vs.110).aspx for additional values.
Jason
You are correct, I’m trying to read from the CA or Certificate Authority. That part works, to a point. It only reads some of the certs though, not all of them. It appears to only detect those that have a Status of “R” (that’s why I thought the ReadOnly)
I’ve never seen a cert with a status of R. The one reference I can find on web says that it means Read only but I don’t honestly believe that. The .NET technical reference doesn’t mention this at all and the only this it mentions as a valid status is A for Archive. If I had to guess it means Revoked but that’s just me guessing. I’ve reached out to an expert PKI resource so hopefully he responds and maybe we can figure out a little more.
So, my expert PKI source @thepkiguy (Mark Cooper) confirmed that a cert with a status of R is indeed read only. I have no idea how or why a cert would be marked as read-only though and I also have no idea why the .NET class doesn’t pick them up or how to make it pick them up as the reference on MSDN does not refer to them at all. You can certainly try the modes as listed on MSDN though: https://msdn.microsoft.com/en-us/library/system.security.cryptography.x509certificates.openflags%28v=vs.110%29.aspx
Great blog post Jason.
You should update the article to direct people to use the built-in Certificate profile deployment — which requires nothing more than uploading an exported certificate — if the cert is to be stored in the Trusted Root Certification Authorities, or Intermediate Root Certification Authorities stores. Since it is by far more simple and easy to deploy this way. Your method using powershell script is ingenious way to get to those other stores which are not supported by the UI for certificate profile deployment, but is more complicated and not needed for the most basic stores.
Hi Kevin,
Yes, you are absolutely correct … assuming the clients are all running Windows 8.1 or Windows 10. This is not the case in the vast majority of organizations and probably won’t be for years to come. Also, it doesn’t do trusted publishers which was really the motivation behind this post. For completeness though, I added a note above pointing to the official docs about using certificate profiles.
Hi Jason, great article, thanks! One little thing – a remediation script would only kick off if you change the rule value to “Equals”. You cannot tick the box if it’s set to anything else. As you described it the remediation script would never run.
No, that’s not correct.
The discovery script returns the number of matching certs that it finds in the store specified. To be compliant, this must be one (or more) which is exactly what I’ve defined. The criteria defined determine compliance; if true, the setting is compliant.
Thus, for the remediation script to kick off, this condition must be false meaning that the discovery script returned a zero or IOW did not find any certs matching the criteria.
Michael is correct, I could not check the box to tell it to remediate until I set the drop-down to “Equals.” Any other option, and the checkbox disappears completely. It even is gone in your screenshot above.
And yes, the remediation script was already put in, still box missing.
Sorry, way late reply. You are correct. You should file a bug on Connect.Microsoft.com.
Jason,
I keep getting this error when running your discovery script.
In-line script returned error output: ?2cda7337343695a94d86c344c3cc1b06 : The term
‘?2cda7337343695a94d86c344c3cc1b06′ is not recognized as the name of a cmdlet,
function, script file, or operable program. Check the spelling of the name, or
if a path was included, verify that the path is correct and try again.
At C:\Windows\CCM\SystemTemp\c0e4cda8-3979-4195-ab0a-fde2bbfa461d.ps1:1 char:7
+ $sn = ?’2cda7337343695a94d86c344c3cc1b06’
+ ~~~~~~~~~~~~~~~~~~~~~~~~~~~~~~~~~~~
+ CategoryInfo : ObjectNotFound: (?2cda7337343695a94d86c344c3cc1b
06:String) [], CommandNotFoundException
+ FullyQualifiedErrorId : CommandNotFoundException
Any Suggestions?
Aaron
Hi Aaron,
Where exactly are you getting that error and how are you trying to run it?
Great article. The discovery part of the script is working for me but the remediation isn’t kicking off or it is kicking off but failing. Is there a log I can look at for more detail please? If I run my remediation script manually it fails because it wants to be run from an elevated PowerShell session. If I run it from an elevated PowerShell session it works and I get Baseline Compliance. What context does SCCM run the remediation script under please (I’d guess SYSTEM)?. Any help appreciated. Thanks. James.
Correct, they are run as the local System. CIAgent.log and DCMAgent.log should contain what you need to help troubleshoot.
Can I use this approach to provide a report of all certs contained in a store? I setup the discovery script portion and copied the script that pipes out the subject and serialnumber of each cert however I can’t find a compliance report or view in the database that lists the discovered results. Thanks in advance!
You can use the basics of the script for sure as a starter, but a CI is not great for inventory purposes of anything more than a single value really. Depending on your exact requirements, you could adapt the script to create a custom WMI namespace and class with the information and then add that to hardware inventory. I haven’t tested these, but they look like they will work: https://imakaron.wordpress.com/2015/09/01/sccm-report-inventory-certificates/ and https://blogs.technet.microsoft.com/askpfeplat/2018/10/15/extending-hardware-inventory-for-system-center-configuration-manager/
Can you point me in the right direction for Mac (OSX) support. I want to know if SCCM can in fact deliver a trust cert to MacBooks via SCCM and place it within the “System” section of the Keychain Access.
Hi Jeremy,
MacOS support in ConfigMgr is rudimentary at best. You may be able to accomplish what you are asking about using a script packaged for delivery using ConfigMgr, but it wouldn’t be a straight-forward task at all. I generally recommend that folks don’t even think about using the MacOS management in ConfigMgr as it adds complexity to the infrastructure without actually providing much of anything useful.
Could this be used to check and remediate for a .pfx with a password?
Possibly, although that’s not the intent here. It’s also something I wouldn’t recommend as that means you’d have to supply and embed the password in the script which is not secure at all.