This blog is going to show you some magical things that are happening in the background when you have enabled and configured Windows LAPS Automatic Account Management
1. Introduction
Windows LAPS (Local Administrator Password Solution) is the perfect solution for keeping the local Windows Managed account password secure by regularly changing it.
When Windows LAPS was first released, we manually needed to create the corresponding managed account if we didn’t want to use the built-in administrator account. This could be done in many fancy ways, but not by LAPS itself.
Luckily, with the latest Windows build, we now have the possibility to define some new policies to configure Automatic Account Management Mode. In my opinion, this is what we need! I have been waiting for this a long time!!! It’s magic in a box!!! Let’s dive into the magic box a bit because with Automatic Account Management, we now have the option to create the managed account with LAPS. We can even randomize the account name!!!!
This AAM feature is not enabled by default. To enable it, we need to configure a GPO or a CSP or configure Automatic account management in the Account Protection policy (Endpoint Security).

When we look closer at the Automatic mode, though it’s off by default, we see that it lets Windows LAPS handle all aspects of the managed account.
- It will automatically create the managed account
- It will set the required password
- It will randomize the account if configured
- It will enable or disable the account
Obviously, with this new feature, we could still use the Post Authentication Actions! If you are not familiar with PAA, please read this blog.
Post Authentication Actions | Windows LAPS | SAMSRV (call4cloud.nl)
2. LAPS Account Management
Let’s start by looking at what the LAPS Account Protection Policy looks like

As shown above, when we want to configure LAPS Automatic Account Management, we need to configure the same settings I discussed in the introduction.
Instead of managing the built-in admin account, as shown below, we will need to make sure we select the option to manage a custom admin account.

Once we select the option to manage a custom admin account, we also have the option to define a prefix.

In addition to the option to configure the prefix, we can choose to randomize the LAPS account name and enable or disable the managed account.


This “EnableorDisableAccountIfNecessary” checkbox is more important than you will think it is! Why? Let me explain a bit. If your customer wants to maintain the managed account in a disabled state, we can now enable the managed account without making any other changes just by toggling the select box… nothing more! Off by default, turned on when needed. That’s cool, right?
Of course, we can also still configure the AutomaticAcccountManagement with a CSP. To do so, we need to manually configure some CSPs.
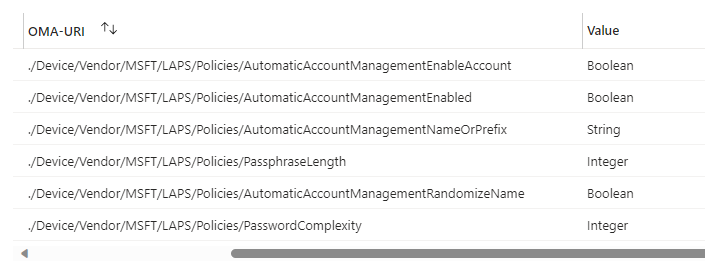
- ./Device/Vendor/MSFT/LAPS/Policies/AutomaticAccountManagementEnabled
- ./Device/Vendor/MSFT/LAPS/Policies/AutomaticAccountManagementEnableAccount
- ./Device/Vendor/MSFT/LAPS/Policies/AutomaticAccountManagementNameOrPrefix
- ./Device/Vendor/MSFT/LAPS/Policies/AutomaticAccountManagementRandomizeName
- ./Device/Vendor/MSFT/LAPS/Policies/AutomaticAccountManagementTarget
As shown above, it also allows us to define the Passphrase option (PasswordComplexity). A passphrase is a much better option, in my opinion, than the old-school passwords. It’s easier to read and type (as long as you don’t create passwords with a password length of 20)
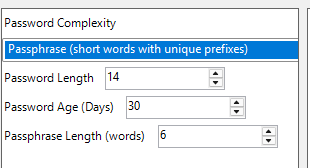
Once we have deployed these CSPs to our device, which is running the latest Windows 11 24h2 build, we will notice that we can spot the LAPS’ new features in Intune. If we take a closer look at the local admin password of the device, we will spot the new randomized account with the prefix and with the Passphrase password
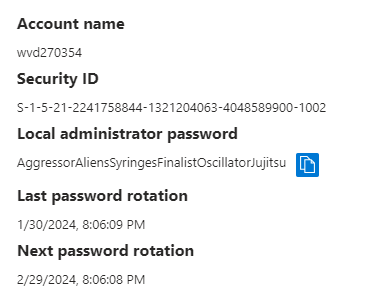
Cool, right? Job done, right? NOPE!! I noticed something weird while looking at the security logs… yep the security logs NOT the LAPS event log!
3.WlapsPending
Well, I am a cool guy, and I am doing cool stuff, right?? I can create a CSP in Intune to deploy these settings or I could configure the GPO to configure this new LAPS feature, right?
Well… I decided to use the new and shiny SYNCML tool version 1.2.0 to configure the new corresponding LAPS CSP. Why? So I could have an exact time frame for when the LAPS policy was picked up by the LAPS background policy processing.
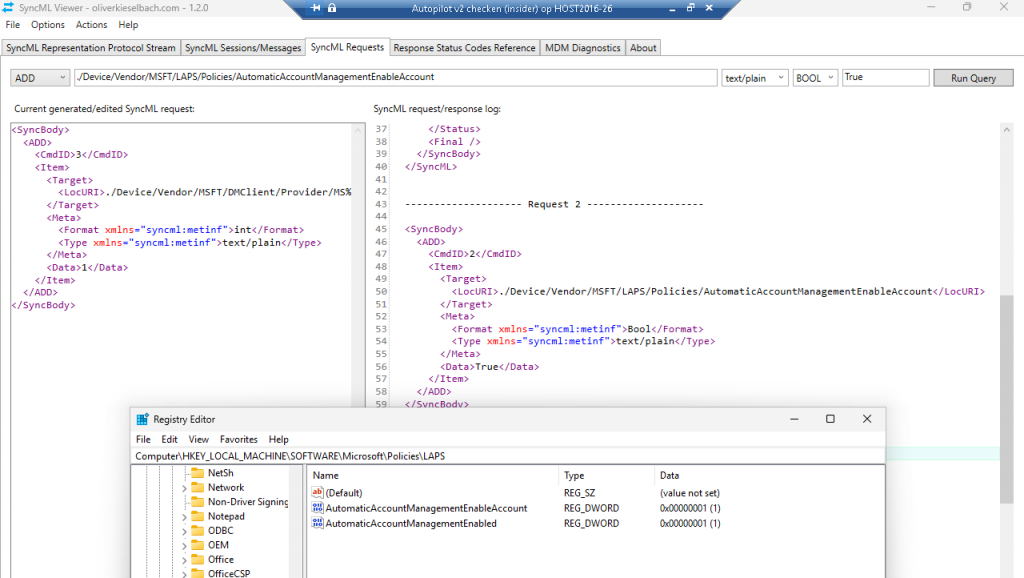
Yeah…. the SYNCML tool now has a SYNCML request in it!!!!! At the same second, I enabled the Automatic Account Management feature with the SYNCML tool, this message appeared in the security event log!

As shown above, somehow a WLapsPending121249 account was created. Huh?? I am pretty sure that I didn’t define “Pending” in any policy.
I guess if I hadn’t spotted this weird message above, I wouldn’t have taken a deeper dive into the new Account Management Feature. Luckily for everyone, I did notice it.
When opening the LAPS.DLL and searching for the WlapsPending keyword, I noticed it was indeed mentioned in the DLL.

Okay… I am interested! I decided to take a closer look at how the LAPS Azure Core Processing function in the DLL got to this point.
When we take a look at the video, it becomes obvious that the WlapsPending account name will be the first one that will be used when the managed account gets created.
4. The Story and the Flow
From there on, I reinstalled the VM and started to take a closer look but this time with Procmon enabled and by creating a timeline of what is happening.
So far, I can tell there seems to be more happening in the background than the LAPS event log is telling us. By the looks of it and going back and forth in the LAPS.dll code, I believe this is what is happening.
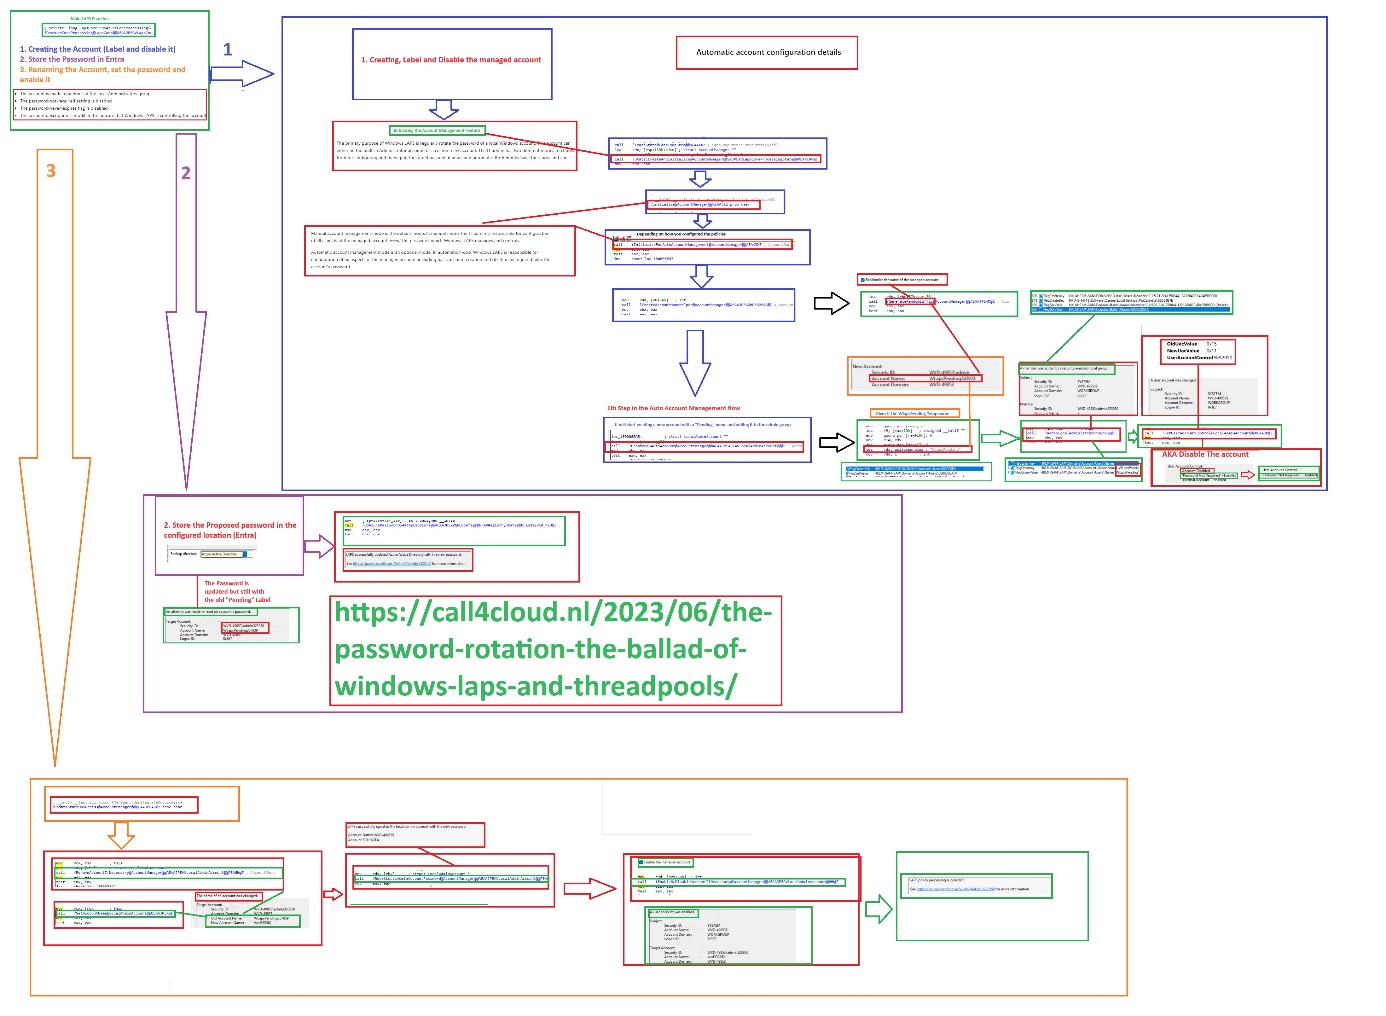
The LAPS Auto Account Management will create the new custom account with the corresponding settings in 3 steps.
- The first step in the automatic account creation process is to create a new local account. It will create the account with a randomized value AND with a “pending” label/account name. Once the local account is created, it will be in the default disabled state. After the Account is created, it will change the UACvalue and will add the account to the local administrator’s grou.p
- From there on, it will perform an Azure ad password update and store the password in Entra (depending on the location policy). If you want to find out more about this process itself, I have already written a blog about it.
- Once the account creation is marked as successful it will rename the account if necessary. So, we would notice that it will change the old account name WlapsPending to the prefix we configured. Once the account is renamed, it will reset the local password of the account (Azure Ad Password update always comes first). After the local password has been updated, it would enable the account if necessary and with it, the LAPS processing is succeeded.
The corresponding paint flow
5. A small Teaser
While looking at the Automatic Account Management feature, I noticed a feature called Defunct Account. at the end of the code

I have a wild guess about what my new LAPS blog will be about!! Defunct!!
Windows LAPS | Defuncted | Automatic Account Management (call4cloud.nl)
Conclusion:
LAPS received some major improvements with the latest Windows Update. With this update, we can now create the managed account directly from the endpoint security account protection policies.


Great write up. Finally they made LAPS complete.
Where did you get that GPO settings? I don’t have it and I’ve got the latest July 2023 ADMXs for Windows 11 (23H2).
what about Windows 10 devices?
How do you mean 10 devices?
Trying to test Automatic Account creation but somehow it looks stuck in the very first step. It creates the WlapsPendingXXXXXXX stays in disabled state, moves it to Administrator group and a new WLapsPending account is created again with distint random numbers.
Device is 26100.3476, policy settings:
Backup Directory = Backup the password to Azure AD only
Password Age Days = 7
Password Complexity = Large letters + small letters + numbers + special characters
Password Length = 14
Post Authentication Actions = Reset the password and logoff the managed account: upon expiry of the grace period, the managed account password will be reset and any interactive logon sessions using the managed account will terminated.
Post Authentication Reset Delay = 24
Automatic Account Management Enabled = The target account will be automatically managed
Automatic Account Management Randomize Name = The name of the target account will not use a random numeric suffix.
Automatic Account Management Name Or Prefix = TestAAM
Automatic Account Management Enable Account = The target account will be enabled
Automatic Account Management Target = Manage a new custom administrator account
HI… I am missing the setting: administrator account name in it? as i am using almost the same settings except that i have configured the administrator account name with the same automatic account management name
Hi! Added administrator account name, but in the meantime found it was also disabled in EntraID.
Now it is working as expected.
Behaviour confirmed – Enable Microsoft Entra Local Administrator Password Solution (LAPS), if disabled, several “Pending” accounts will be created in disabled state and never progress.
Hi Rudy,
I have the same problem als mentiod above. I already checked all the settings but i cannot find anything. I checked the logs, and the problem which i see is that it cannot save the password in entra id. Do you know a fix for this?
Can you send me your settings and setup in a pm (info@call4cloud.nl) so i can check it out whats happening