This blog will be about me showing how the device tries to fetch its device token (x-device-token) and use it to fetch the Autopilot profile. I will also show you how you could get it yourself by using the same cached device token you could get from the registry!!
1. Introduction
When looking back at the blog I wrote about the Autopilot Marker and how it could cause issues when fetching your Autopilot profile, I decided to remove a specific part from the troubleshooting section because I was still unsure if it could work. This troubleshooting section will show you how to determine if the device is capable of fetching the Autopilot Profile.
So let’s dive into some background information first to know what happens before we are finally getting this wonderful Company branded Autopilot screen

Please Note: While writing this blog, I decided to remove some additional deep dives. I will dedicate a unique blog to each one of them. I will add the direct link to the blog, once they are released!
- OfflineDeviceID
- GetMSATicket
- DeviceAddRequest

2. How it works
A small heads up! It’s best to just forget everything you probably know about how Autopilot before starting to read further.
When the device first boots and shows the OOBE screen, it establishes an HTTPS connection in the background and starts communicating with the good old, well-known service (1) login.live.com/ppsecure to perform some Device Authentication.

The device will perform a DeviceAddRequest AKA DeviceAddCredential/AddCredentialRequest post to the https://login.live.com/ppsecure/deviceaddcredential.srf URL to start the Authentication and to fetch the device its Device Unique Identifier (DUID)

In this Passport SOAP post sent to login.live.com, you will notice some nice DeviceInfo. This DeviceInfo contains a lot of information about the device itself such as the EKPub/SmBiosSystemSerialNumber, OfflineDeviceID, etc. The stuff that makes the device unique!
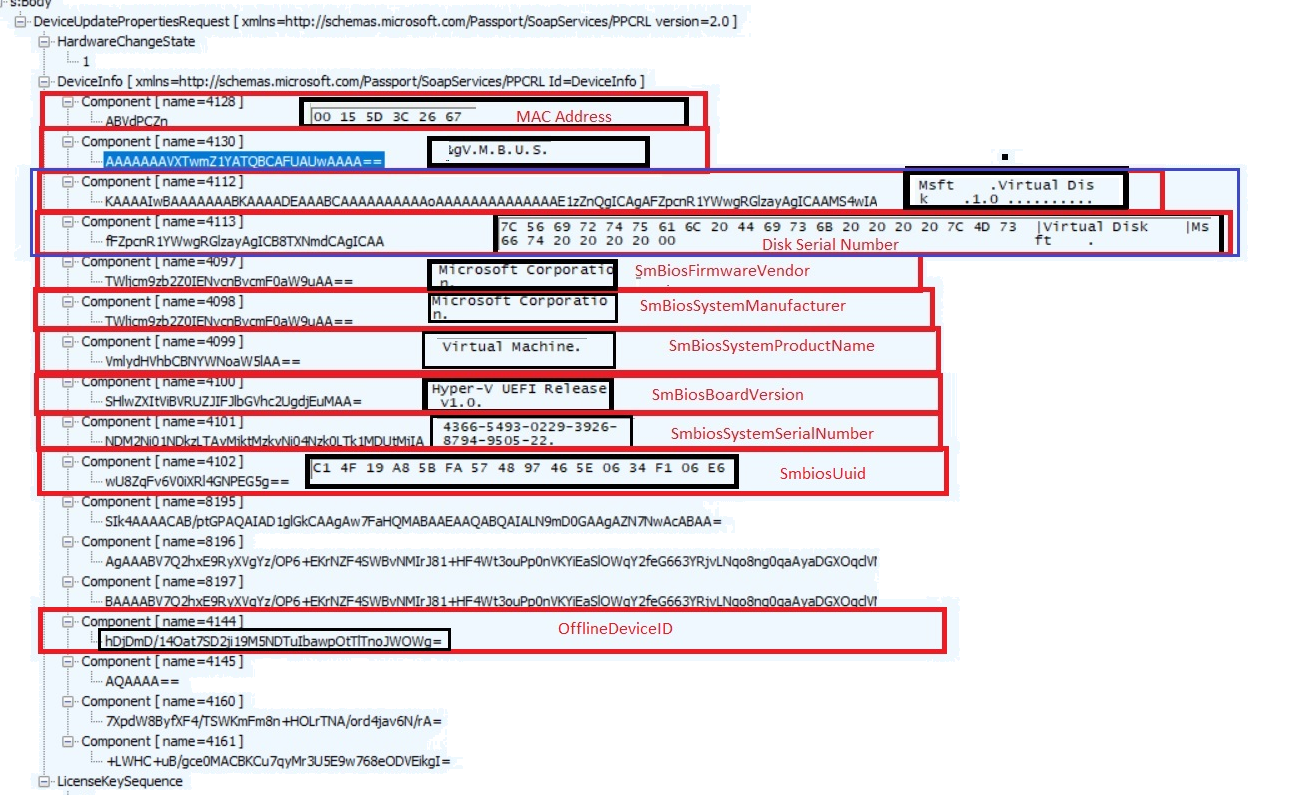
It almost looks like the same information as from the HardwareHash……… ow wait it is…
Of course, besides this SOAP post with DeviceInfo in it, we will also notice the same DeviceAddRequest in the LiveID event log with the event 6115

In the SOAP-response the device got (2) when sending out the device info, we will also notice a unique HWDeviceID and the GlobalDeviceID in it (which seems different each time)


After we got ourselves the HWDeviceID, the device needs to (3) request a security token (RST) from the Security Token Service (STS): login.live.com/RST2.SRF.

To retrieve the security token, it needs to confirm its identity to the STS. I will assume for now, that it will also pass the HWDeviceID/DAToken we got before to confirm its identity to the STS

As shown below, a great overview from mohamad halabi of how a client requests a security token to get access to the “Service”

After login.live.com (STS) has verified the device its identity, the STS will send back the (4) x-device-token (MSA Ticket with the DDID in it).
I guess this security token/device token is stored in this Encrypted CipherData that we got in the response. (Need to spend some more time on it, I guess)

This security token is going to be used to (5) get the AutopilotDeviceBootstrapPolicies by sending out a get command to ztd.dds.microsoft.com/ztd/device/autopilotdevicebootstrappolicies with that same x-device-token as we noticed in the headers.

As shown above, only the X-Device-Token is being sent to the Autopilot Service in its headers. The device DOES NOT send out the Hardware Hash directly but “only” the Security Token it got when authenticating to login.live.com/RST2!
Please Note: After the 2022-07 build, we will spot a small difference. In this get command to the same Autopilot service, it will also send out the Autopilot_Marker and the Hardware-Hash.

If the Autopilot Service recognizes the device it will check if it matches the Autopilot Device that was created when uploading the Hardware Hash in Microsoft’s back-end database. If it’s a match it will (6) return the famous Autopilot profile in JSON format as shown below if not you will end up with the error “Unable to get device ZtdId”
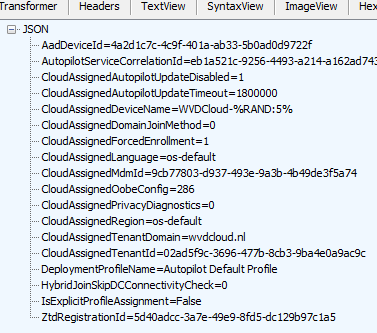
The Autopilot profile will be stored in the wmansvc folder, and it can (7) show us the Autopilot Company branding screen.

After entering the user its email address/password and approving the MFA the device will (8) start the AAD join and the Intune Enrollment. Let’s continue our story by looking at the corresponding flow below
3. The Authentication Flow
Even when I showed you a graphical overview about how ws-trust works, let’s convert all of the text and information from above into a simple flow to get it a bit more clear.
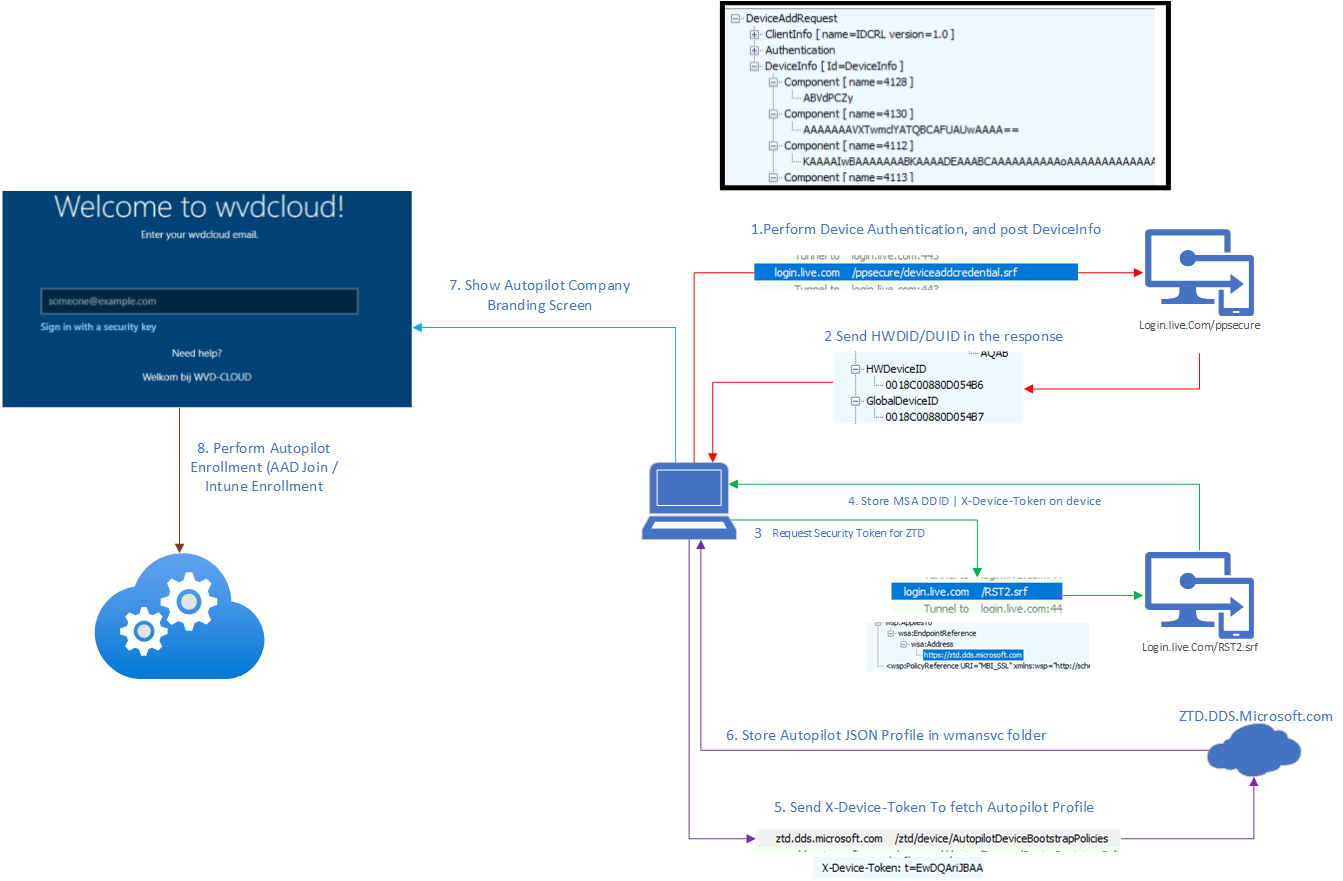
4. Fetching the Profile ourselves < August Build
Before continuing my store I noticed some funny behavior while playing around with the November update 2022-11
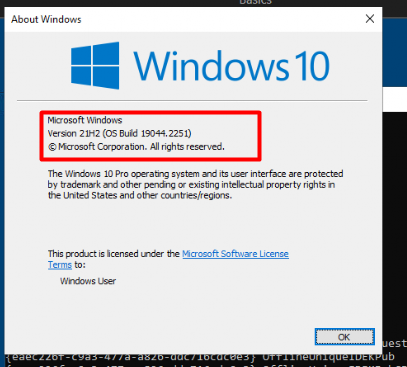
The funny behavior I am referring to is that after uploading the hash from the OOBE, clicking next, and letting the device reboot, it doesn’t get its Autopilot profile the first time.
To solve this stupid issue, you will need to reset/reboot the device and again click on next, next to watch the device reboot again. Before rebooting the device again to start over the language wizard etc I wanted to make sure the device was able to get it’s device-token and could authenticate with it out ztd.dds.microsoft.com
Of course, I first made sure the device its serial showed up on the Windows Autopilot Devices.
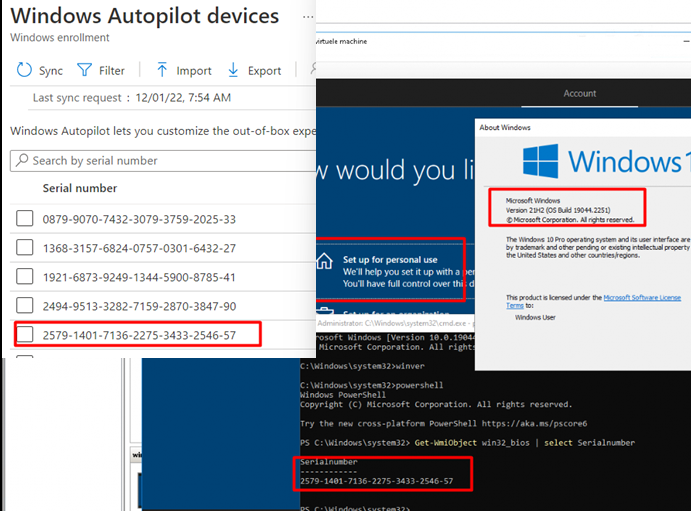
After I made sure the hash was uploaded successfully, I didn’t reboot the device, but I opened the registry as the current user (defaultuser1). Why I opened the registry? Because while writing this blog, I stumbled upon some nice cached Security Tokens / MSA Tickets locations being mentioned in the WLIDSVC.dll

Let’s take a look at the IdentityCRL registry key and how it looks on the device.
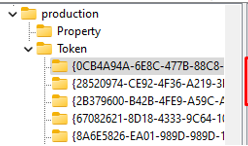
As shown above, HKCU:\SOFTWARE\Microsoft\IdentityCRL\Immersive\production\Token\ will show you some nice Security Tokens! Let’s fire up a PowerShell session and launch this script to find if I could spot some tokens with a ZTD reference in it (I borrowed this nice script from Dirk-Jan Mollema 😛 )
Add-Type -AssemblyName System.Security
$key_path = 'HKCU:\SOFTWARE\Microsoft\IdentityCRL\Immersive\production\Token\'
cd $key_path
$childs = (Get-ChildItem $key_path | where { $_.Property -eq "DeviceTicket" })
Foreach($child in $childs) {
$child."DeviceId" | write-host
$bytes = (Get-ItemProperty -Path $child.PSPath)."DeviceTicket"
$b64 = [Convert]::ToBase64String($bytes[4..$bytes.length])
([Text.Encoding]::Unicode).GetString([Security.Cryptography.ProtectedData]::Unprotect($bytes[4..$bytes.length],$Null,
[Security.Cryptography.DataProtectionScope]::LocalMachine)) | write-host
 }
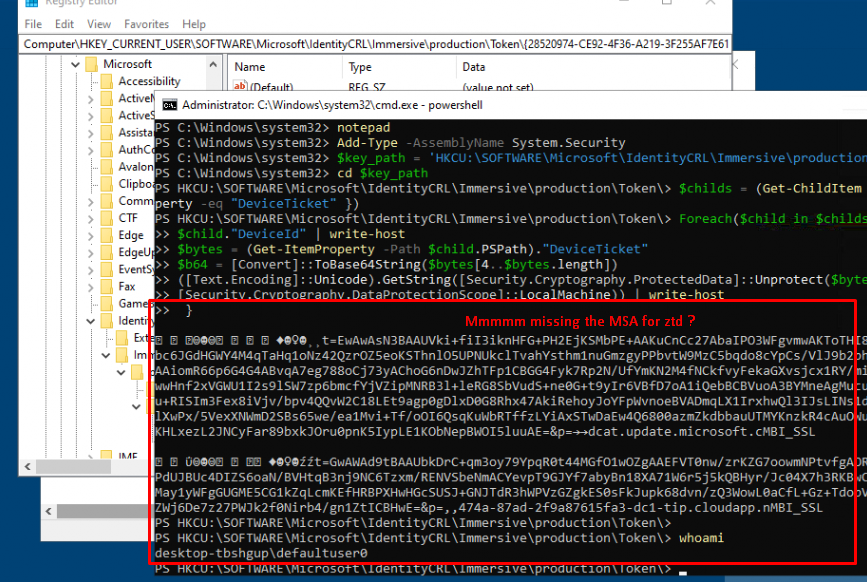
As shown above… It doesn’t mention the ZTD. Okay, so we got no ZTD information in the defaultuser1 its registry keys, let’s proceed and take a look at the same registry key but this time for the s-1-5-18 AKA NT Authority\SYSTEM user
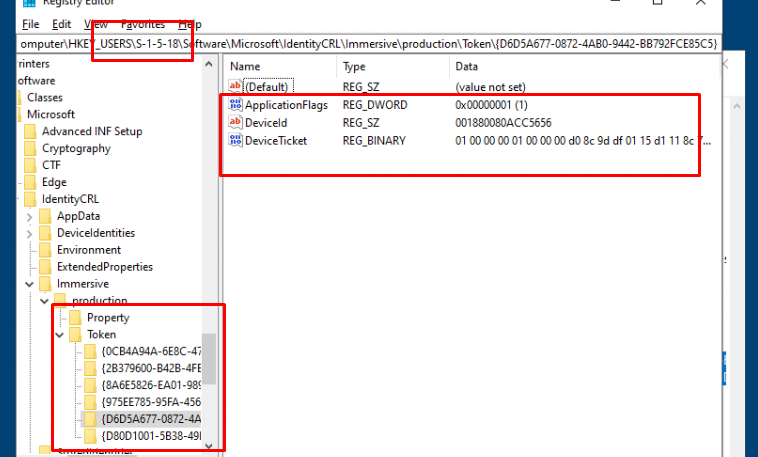
By the looks of it, the s-1-5-18 system user also has some beautiful tokens we could use, I guess? As the keys are DPAPI protected, it looks like you can’t unprotect the SYSTEM token from another user session.
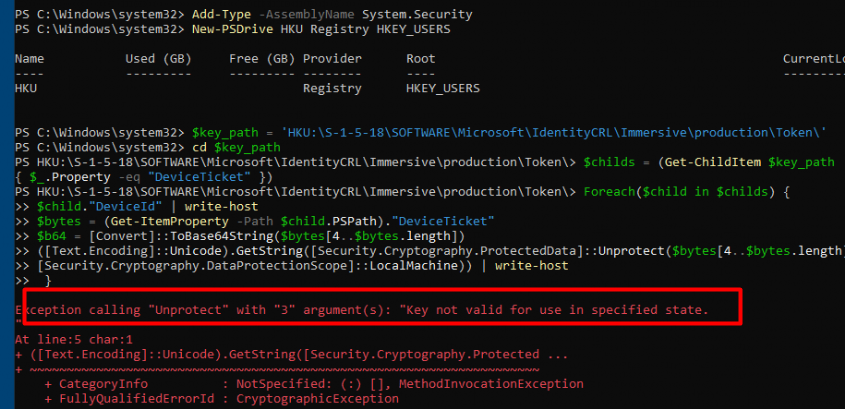
As shown above, when trying to fetch the token from the SYSTEM account it will throw an error mentioning the fact that the “Key not valid for use in specific state”. Almost sounds like the error you could get when you want to export a certificate with its private key from the Certificate stare and the key is not marked as exportable. But who cares, we have Psexec. So Let’s elevate ourselves to SYSTEM by using psexec -I -s powershell.exe.
After elevating to SYSTEM privileges I entered the same PowerShell command I got from Dirk-jan to see what it could trigger. As shown below… yes we can spot something pretty useful! The MSA device ticket (X-device-token) for the ztd.dds.microsoft.com service AKA the Autopilot Service.

Let’s copy-paste that ticket and let’s invoke a web request to that same service and add the x-device-token to the headers
$headers = invoke-webrequest -uri "https://ztd.dds.microsoft.com/ztd/device/AutopilotDeviceBootstrapPolicies" -headers @{ "user-agent" = "Autopilot.10.1.1"; "X-Device-Token" = "TOKENYOUGOTFROMTHEREGISTRY"} -UseBasicParsing -verbose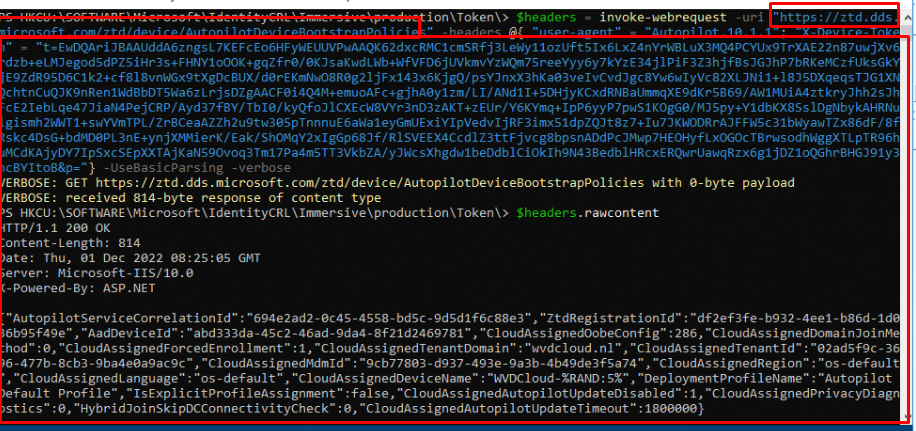
As shown above… we got a nice response. When we request the “raw content” from the $headers variable, we notice that it shows us the Autopilot information in JSON format. It looks familiar, right? Yeah, it does! It is your JSON Autopilot profile!
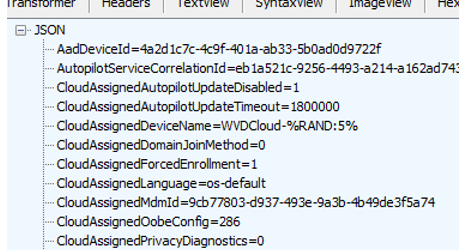
Please Note: The screenshot below is from another trace, so it shows a different AadDeviceId
When comparing the AadDeviceId, with the one in the Azure portal it is a match!!! Woohoo!! Isn’t that just wonderful?

Even when the device wasn’t triggered to fetch the profile, we could still determine if the device should be capable to do so.
5. Fetching the Profile ourselves > July Build
In one of my latest blogs, I mentioned that a device could fail to download its Autopilot profile when the Autopilot_Marker was set. With this new “Autopilot requirement,” I also need to show you how you can fetch the profile when your Autopilot Device was enrolled > July build. So my advice…please read this blog below first!
The bottom line: Microsoft added the Autopilot_Marker. If the Autopilot_Marker was set in the past (>July Build) and the device reaches out to the Autopilot Service, that Marker needs to match! If the device doesn’t send it or it isn’t a match, you will end up with the famous 908: HardwareMismatchDetected

When looking at the PowerShell script I mentioned above and looking at the Fiddler trace, it now sends 4 properties in its headers.

Luckily only 2 of them are necessary to fetch the Profile. As shown below, only the X-Autopilot-Marker and the X-Device-Token are required.

So the only thing left is the AUTOPILOT_MARKER and to fetch it we can use the get-UEFIVariable I also showed in that blog

Once we got that second requirement, we can simply add it to our existing PowerShell script shown below
$headers = invoke-webrequest -uri "https://ztd.dds.microsoft.com/ztd/device/AutopilotDeviceBootstrapPolicies" -headers @{ "user-agent" = "Autopilot.10.1.1"; X-Autopilot-Marker: "MARKER"; "X-Device-Token" = "TOKENYOUGOTFROMTHEREGISTRY" -} -UseBasicParsing -verbose
Once we added the UEFI_Marker and fired off that PowerShell script, we will notice that as shown above, the Autopilot service will deliver your Autopilot Profile
Conclusion
Knowing what happens behind the Autopilot curtains is always nice, but knowing how to determine whether the device should be able to fetch its Autopilot profile is really important.


Cool! 🙂 My hope was to manually trigger autopilot branding on devices that pretend they are not supposed to enroll. One yesterday just skipped forward to normal Windows logon-screen.
Hi, thanks for the detailed explanation of the tokens. I was following your guide today and first I managed to access S-1-5-18 SystemAccount tokens, but later that day it didn’t work. I am using an elevated powershell 7, and get the “Key not valid for use in specific state” error. Here is the complete code I use:
“`
Add-Type -AssemblyName System.Security
New-PSDrive -PSProvider Registry -Name HKU -Root HKEY_USERS
$key_path = “HKU:\S-1-5-18\SOFTWARE\Microsoft\IdentityCRL\Immersive\production\Token\”
cd $key_path
$childs = (Get-ChildItem (Get-Location).path | where { $_.Property -eq “DeviceTicket” })
Foreach($child in $childs) {
$child.”DeviceId” | write-host
$bytes = (Get-ItemProperty -Path $child.PSPath).”DeviceTicket”
$b64 = [Convert]::ToBase64String($bytes[4..$bytes.length])
([Text.Encoding]::Unicode).GetString([Security.Cryptography.ProtectedData]::Unprotect($bytes[4..$bytes.length],$Null,[Security.Cryptography.DataProtectionScope]::LocalMachine))
}
“`