Some time ago I wrote a blog about conditional access, the PRT, the “DeviceID” and the “iscompliant” attribute… That blog triggered me somehow, even more, to learn the whole “being compliant” process.
While reading and learning the flows I decided to create a separate blog about Device Health Attestation and this time with all strings attached. I need to warn you this blog will be a little bit more technical than I first wanted it to be, but I needed to explain it all!
And another warning… while writing this blog, I got addicted to TPM attestation and white-glove issues!

1. The Issue
Before I am going to show you all the information we need to have to get a good understanding of how Health Attestation works, we need to take a look at the issue first to connect all the strings.. uhhh dots later on.

I guess we all saw this message when we logged on to the device for the first time and opened the OneDrive app. We will notice that Know Folder Move isn’t working, and OneDrive isn’t signing in. When we take a closer look, we will notice that the device is not compliant with the compliance policies we configured. Our device does not have encryption turned on.
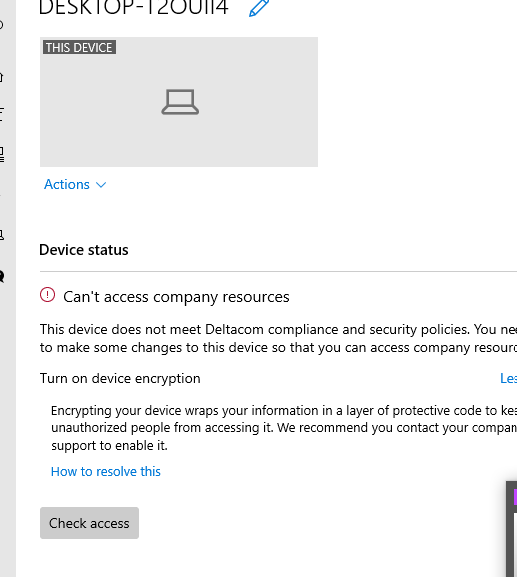
Let’s take a look at the MS doc to see if Microsoft is offering us a proper solution.

So let’s check if that’s the cause.
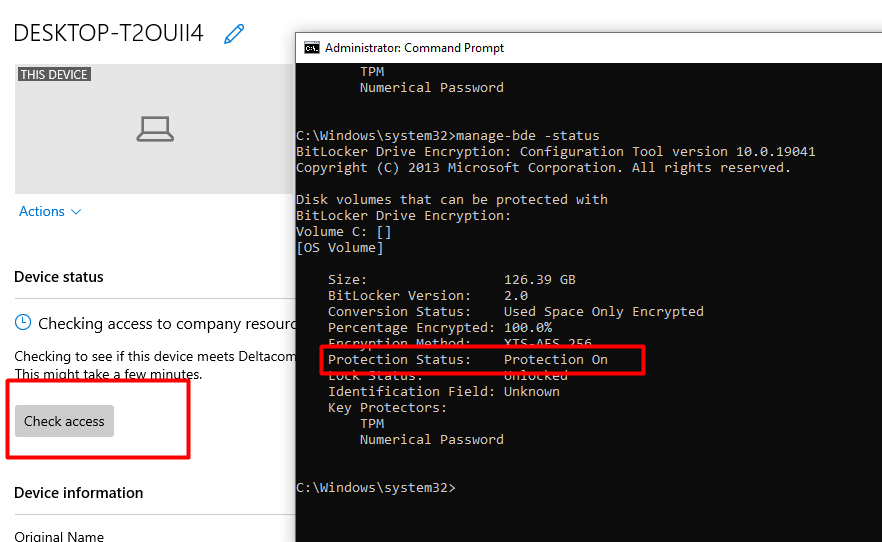
As shown below the protection is on and fully encrypted! Of course, I know what the issue is, but I guess we need to keep reading to get to the flow.
2. The Compliance Policies
Let’s check the Intune Compliance policy! We are trying to divide each compliance setting into a different policy, so troubleshooting it or changing one is somehow easier (in my opinion.. don’t hate me for it)
But that’s not the only reason, want to know why else we have multiple policies. Please stick with me and read further.
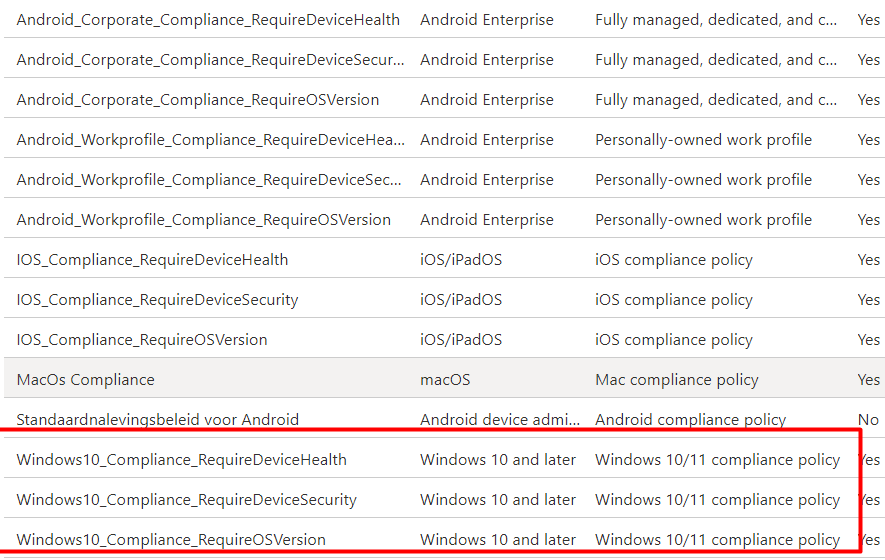
After we have opened the Compliance policies pane, let’s open the “RequireDeviceHealth” Policy. We notice 2 things:
“Windows Health Attestation Service evaluation rules” and “Require Bitlocker”

Instead of only “encryption” ?

Why should we choose the “Require Bitlocker” option? That’s easy because using the “Require Bitlocker” option is way more robust as it leverages the Device Health Attestation to validate the Bitlocker status at the TPM level.

Open Intune, and let’s examine the Intune Reports to determine whether the device is compliant with the Bitlocker Compliance policies we configured. Did you notice that name again? It’s the Windows Hardware Attestation report!
We can open the report by going to Reports –> Device Compliance –> Windows Hardware Attestation Report: https://intune.microsoft.com/#view/Microsoft_Intune_Enrollment/WHAReport.ReactView
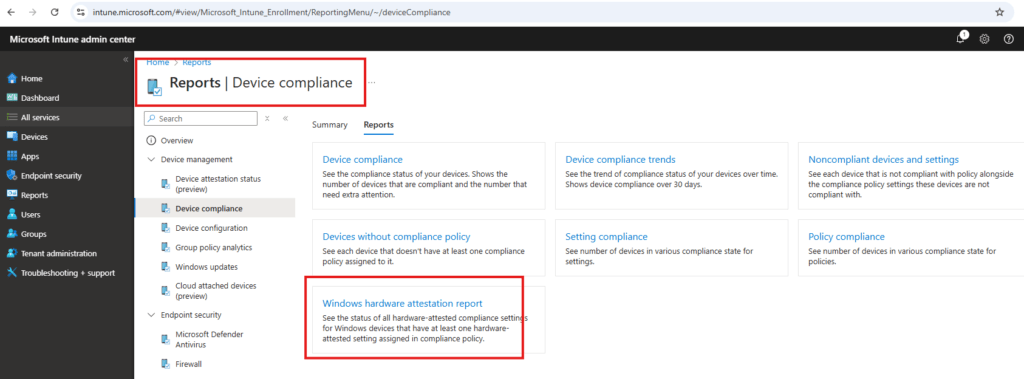
From there on, we can generate the Windows Hardware Attestation Report

3. The Device Health Attestation (DHA)
So device health attestation it is! And nothing more… Guess I am done writing?….
Let’s focus on the word “Attestation” first. It’s all about trust. Attestation is a critical component for establishing trust, and trust is necessary. Attestation runs at the TPM level and ensures that the information is secured, verified, and has not been tampered with.
Now let’s add the word Remote to Attestation. When a client needs to authenticate and verify its hardware and software to a remote server to be a trustworthy client, the Remote Attestation method is used.
Now we know what (remote)attestation is, shall we take a good look at DHA to determine how it works?
It’s very important to understand that the options you have to protect your device against malware attacks are focused on prevention.
Of course, prevention is a good thing, but how are we going to monitor if all the security measures are still in place and do some prevention? To make sure the devices are compliant with the (BitLocker) settings we configured, we can create compliance policies. Those compliance policies must be compared/checked by some remote service on the device.
That’s where Device Health Attestation kicks in. With the use of DHA, you can monitor / report device compliance and take corrective actions when the device is not compliant. This whole process is based on TPM-protected data.
Let’s briefly explain how this happens. When a device is booting, Information about the firmware, boot process, and software measurements is logged inside the TPM. This information, along with the TCG log and PCR values, is sent to the Device Health Attestation Service. The DHA service will determine what changes have occurred on the device and whether it is still in a healthy state and has not been tampered with.
*TCG log (AKA Windows Boot Configuration Logs. These Logs contain all the measurements throughout the whole OS boot process)
But if we want to enforce some rules (Conditional Access) we need to have an MDM solution (like Intune). Otherwise, we only have some health information and nothing more! Please read my blog about when and how you could make sure your AADJ or AADR devices can be compliant!
https://call4cloud.nl/2021/08/entra-joined-vs-entra-registered
When you want to access data from an MS365 App, the device could contact Intune through the MDM agent with the use of the Device Health Attestation Configuration Service Provider (DHA-CSP)
Intune then will inspect the health XML report (DHA-Report) generated by the DHA-Service for that device (Which the device had to send earlier to the DHA-Service itself) and can determine if the device is healthy (compliant).
After Intune has made its decision, it will update the “iscompliant” attribute in Azure Ad. If you want to read some more on this topic please visit another blog from me
https://call4cloud.nl/2021/08/conditional-access-compliance
4. Device Health Attestation Components:
Now we have discussed/introduced the DHA a little bit, let’s take another good look at what’s inside. I will divide this part up into multiple subparts to give you a better understanding.
4.1 TPM, PCR, EK, SRK and A(I)K
4.2 Device Health Attestation CSP (DHA-CSP)
4.3 Device Health Attestation Service (DHA-Service)
4.1 TPM, EK, PCR, STORAGE Root Key, and AIK (QUOTE)
As mentioned earlier the DHA logs the measurements in various sections. During each step of the boot process, all these measurements are stored inside the PCR’s ( Platform Configuration Registers). What do we need for this to happen? Let’s explain it a little bit more and take a look at the first flow.
TPM
A Trusted Platform Module (TPM) is a hardware component that provides unique security features. It’s an international standard for a secure cryptographic coprocessor. The TPM will protect your device against unwanted tampering.
Windows 10 makes use of the security characteristics of the TPM for measuring the boot integrity sequence. With that information, the TPM could unlock the BitLocker protected drives automatically. The TPM is also used for protecting credentials (Like example the PRT) or for Health Attestation.
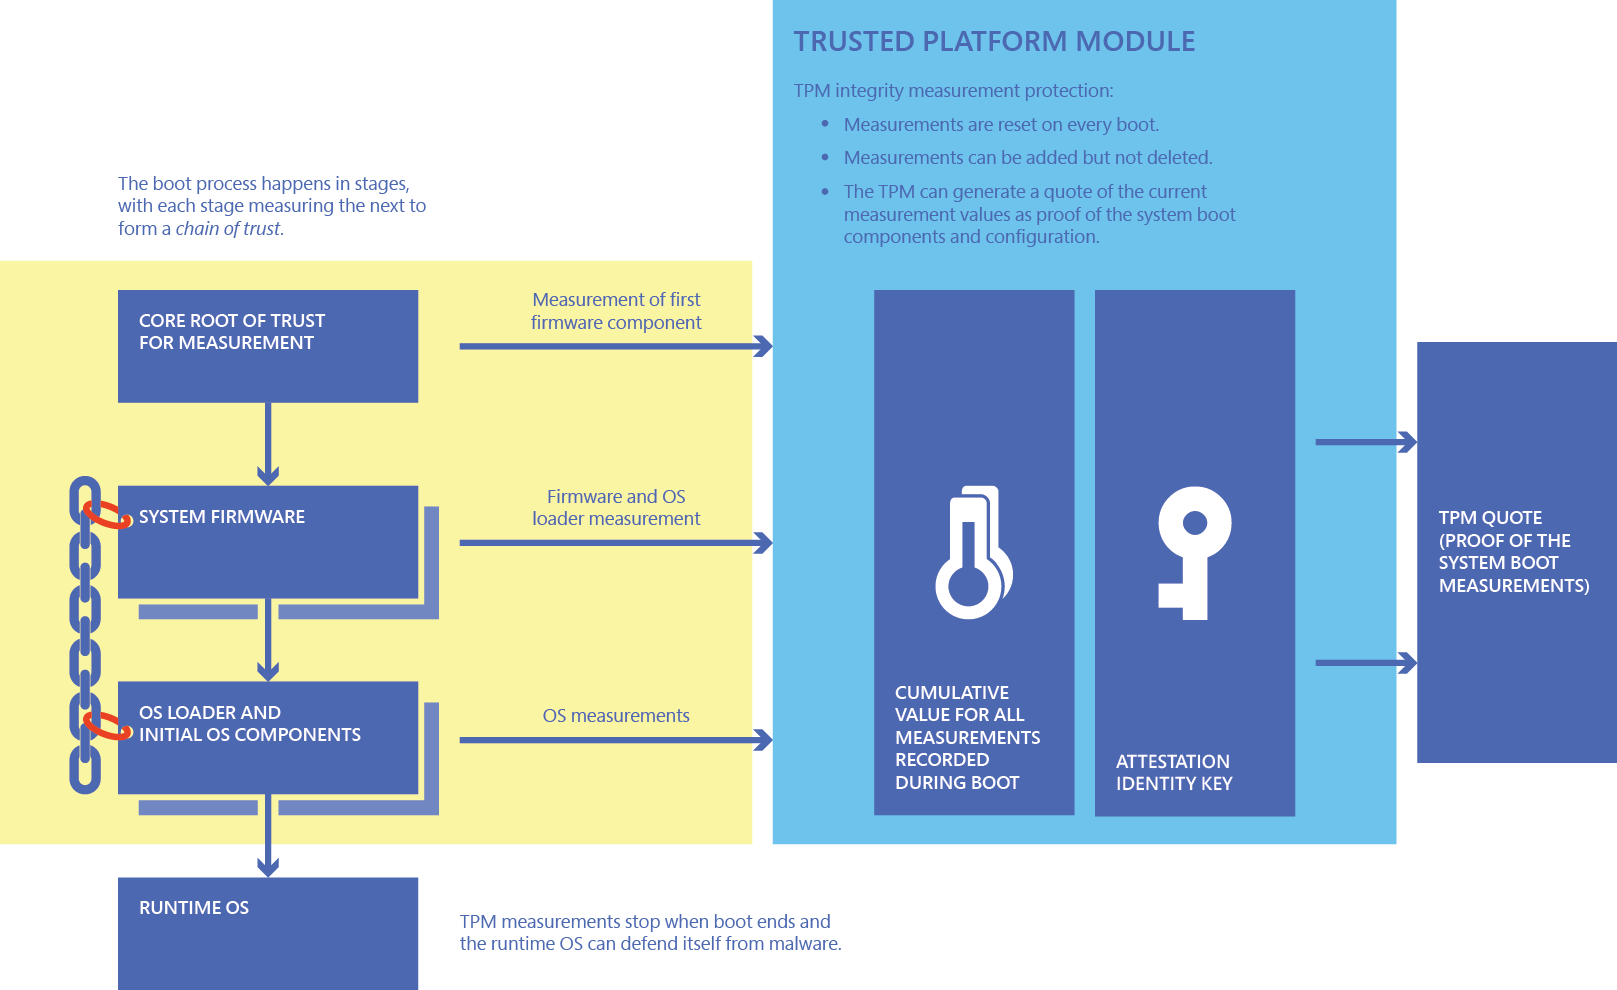
When your TPM-enabled device boots up, a measurement of different components is performed. A few examples, it will check the firmware, UEFI drivers, CPU microcode, and also all the Windows 10 drivers whose type is Boot Start. When it’s done checking, the measurements are stored in the TPM PCR registers, while the details of all events (executable path, authority certification, and so on) are available in the TCG log.
Let’s also take a look at a nice picture of what’s inside the measured boot.

So to resume, the TPM stores measured boot information in a secure way but you will need something else to deliver the judgment if the measurements are evil (not compliant)
EK (Endorsement Key)
The Endorsement Key (EK) is one of the three types of keys which can be used by the TPM. It can be best described as an Encryption (RSA) key that is permanently stored in the TPM when the device is being manufactured.
The EK’s function is to prove you are communicating to a real identity, the TPM. So you could say the EK is the root of the TPM’s identity, without it the TPM could not operate.
When there is a TPM operation that involves sending sensitive parameters, it can make use of the public part of the EK (EKPub).
When there is a TPM operation that involves data decryption the private part of the EK (EKpriv). The private part (EKPriv) never leaves the chip and is not exportable! The EKPriv is also used to create secondary keys, just like the AIK key!
It’s also good to know that the EK contains 1 or 2 certificates.
The first one: is the Endorsement Key Certificate which is burned to the device when it’s manufactured OR when the firmware-based TPM (Intel, AMD, or Qualcomm) first reaches out to the online service.
The second one: is the Platform Certificate. The hardware vendor will supply this certificate to show the TPM belongs to a specific device.
You can check out the Public Key with this PowerShell command

PCR
PCRs (Set of registers) are a key ingredient of the TPM. The PCR’s are primarily used to cryptographically measure the software and hardware state when booting the device. The PCR Banks will represent the platform software state and the history of the configurations that have run on the device until now.
So, in some simple words, PCR’s are a part of the memory in the TPM, used to store sensitive information about the measurements. This information will be reset when the device reboots.
Windows uses these PCR banks to measure the boot parameters. When the device is booting, it starts with a zero (hash value), that “object zero” is totally/absolutely trusted and becomes the Core root of trust for measurement (CRTM)
Every next step/component the boot process goes to is cumulative and will be measured by taking the hash and recording/extending it in the PCRs with. This TPM command does this
EXTEND: PCR[n] = Hash { PCR[n] || data }
Maybe this picture explains it somehow a little bit better

As mentioned earlier, the PCR’s job is to ensure that no one has manipulated the TCG log. Let’s take a look at some PCR’s that will be measured during boot.

So, PCR 11 is definitely used for BitLocker. You could check it out yourself by opening a “cmd” and executing this command: manage-bde -protectors -get c:
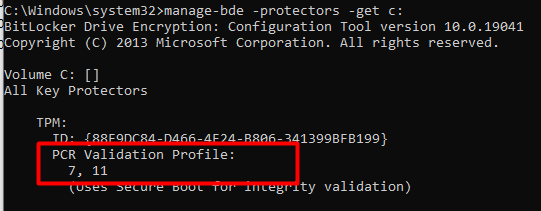
You will notice it “uses” PCR 7 (secure Boot) and PCR 11 (Bitlocker) for validation. At first, I was under the impression it was also using 0,2 and 4, but it only uses PCR 7 and PCR 11 by default
AK (AIK)
Before we can use TPM attestation, we need to have the AIK Certificate. This certificate will be delivered by an online CA( TPM entity). As told in the TPM and PCR parts, all of the information is stored inside the TPM. But how will we make sure the information inside the TPM is not tampered with when it’s being copied from the TPM to the CPU. Just like always, we need to sign the PCRs! (data/measures)
Before the TPM sends the data to the CPU, the TPM provides this TPM command.
(TPM_Quote)
QUOTE: S = Signkey { PCR[n], nonce, …}
It will request the “operation of signing”(quote) of the PCR data. I guess it’s all in the name because we need a special key to sign the data. Unfortunately, the Endorsement Key (EK) can’t sign it. Because as we noticed earlier, the EK can only encrypt data, not sign it.
Luckily we have the Attestation ‘Identity Keys’ (AK/AIK). Their dedicated purpose is, is to sign the information/quote. This will prove the data was coming from inside the TPM and is not tempered with.
But I am not done yet, because you still want to be sure the AIK belongs to the same TPM as the EK, this process is done by the credential activation protocol. Credential activation makes sure the EK is on the same device as the AK.
So the resume. A signed report can be created of the PCR’s values by using the AIK. With this report (DHA-Report) a remote server like Intune could determine the trust state of the device.
STORAGE Root Key (SRK)
There isn’t much to tell about the storage root key (SRK) except that it is an asymmetric key pair (RSA with a minimum of 2048 bits length) with a very important job to do! It needs to ensure that those RSA keys can’t be used without the TPM itself. You could say the SRK is the mother of protection, I guess.
4.2 Device Health Attestation CSP (DHA-CSP)
First, let me explain a Configuration Service Provider (CSP). A CSP is a component that connects with the Windows Intune client and provides a published protocol for how Intune can configure settings (set/get/delete, etc.) and manage Windows-based devices. Of course, other MDM systems also use these CSPs.
The Device Health Attestation configuration service provider (DHA-CSP) allows you to check if a device is booted to a trusted and compliant state. The DHA-CSP also gives you the power to take action when the device does not fit in with the compliance policies
Let’s take look at what the Device HealthAttestation CSP is responsible for:
- It will collect device boot logs, TPM audit trails, and the TPM certificate (DHA-BootData) from a managed device
- It will forward the DHA-BootData to the DHA-Service
- The DHA-CSP can receive an encrypted blob (DHA-EncBlob) from DHA-Service
- The DHA-CSP will also receive attestation requests (DHA-Requests) from Intune and reply with Device Health Attestation data (DHA-Data)
During a health attestation session, the Health Attestation CSP forwards the TCG logs and PCRs values that are measured during the boot, by using a secure communication channel (SSL/TLS) to the Health Attestation Service.
4.3 Device Health Attestation Service (DHA-Service)
The core purpose of the DHA-Service is to evaluate the set of health data (TCG log and PCR values) it received. When this data is received it also needs to check if the reports are signed by an (again) trustworthy AIK. The health data will determine what changes have occurred on the device. When it’s done it will generate an encrypted health blob and send it back to the device
.So resume the DHA-service(has.spserv.microsoft.com) is the remote reporting server-side and the DHA is the client-side
The DHA-Service provides the following information to Intune about the health of the device:
- Secure Boot enablement
- Boot and kernel-debug enablement
- BitLocker enablement
- VSM enabled
- Signed or unsigned Device Guard Code Integrity policy measurement
- ELAM loaded
- Safe Mode boot, DEP enablement, test signing enablement
- Device TPM has been provisioned with a trusted endorsement certificate
5. Device Health Attestation Flow
Now we have a good understanding of each part that is required to report the device as compliant, first, take a look at an easy flow, to begin with… to get a feel for it.
The health attestation protocol can be initiated asynchronously after boot once the TPM has been provisioned or it can be initiated as a part of a service request by Intune (synchronous).
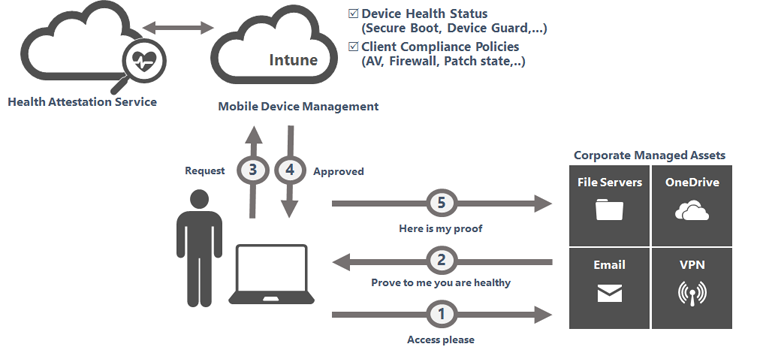
When you want to read more about this flow, please visit the blog I also mentioned earlier.
The Death of Compliance – Call4Cloud
It will show you a more detailed approach to how this flow works and what it requires.
Now let’s step it up a notch and take a look at a more detailed approach.
5.1 Windows 10 Device Health Attestation (DHA) and MS365
And some information that goes with the flow. As mentioned earlier It depends on if the flow is Asynchronous or Synchronous.
Please beware!: When a user wants to access data from the Office 365 apps the process will be initiated by Intune. (Synchronous). When this happens, the first parts (1.1 and 1.2) are taking place after 2.2 and 2.3 will be initiated from the device instead of from Intune

5.2 Asynchronous Flow
1.1 After the device boots a task will be triggered (TPM-HASCertRetr) and it will forward the *DHA-Boot-Data to the DHA-Service.
* DHA-Boot-Data: TCG Log (Windows Boot Configuration Logs: WBCL), the related boot state Data, the AIK Certificate and the PCR Bank values
1.2 After the TCG, the AIK certificate and the boot state are received by the DHA-Service, the DHA-Service will validate the data and check if it is signed by a valid and trustworthy AIK certificate. After the DHA-service has validated it, it will also check if the TCG logs correspond with the reported PCR values.
After everything is validated it will send back an encrypted summary report *blob to the device (DHA-CSP) together with a Device Health Certificate.
*DHA-encBlob –> Device Health Status, Boot Counter and the Device ID
2.1 When Intune needs to get the *DHA-Report it will initiate the DHA Data validation Session to start querying the health state of the device.
*DHA-Report: It’s a XML report with the Bitlocker status/Secureboot/PCR[0] etc in it
2.2 The device (MDM Client) will inform Intune that the DHA-Validation-Data is ready for transport.
2.3 After Intune is informed that the data is ready, Intune will send a *Nonce and a request to the device to get collect the health data.
*Nonce: It’s a random number used in cryptographic communication. It makes sure Intune protects the device health attestation communications from man-in-the-middle type (MITM) attacks)
2.4 The device will send the DHA validation Data (Health Data) to Intune
3.1 Intune will forward the data to the DHA-Service, but while forwarding it will also add a Nonce.
3.2 The DHA-Service will review and validate the Health data and will send back the DHA-report to the MDM.
4.1 After MDM receives the report, MDM will evaluate the compliance based on the configured compliance policies and will decide if the device is healthy (or not).
4.2 Depending on the outcome, Intune will set the “iscompliant” device attribute in AAD to True or False
5.1 If the user wants to open an Office 365 app it will trigger a token acquisition.
5.2 After the token acquisition it will request an access token for the specific service by using the PRT.
5.3 Azure / Conditional access will check if the device is who it says it is by checking the “deviceid” and will validate the device compliance state (iscompliant attribute) and will issue an office 365 access token if the user is authorized and of course only when the device is compliant.
5.4 The Device will forward/use the token for the Office Apps.
6 The Office App will present the token to the Office 365 Service to get access and trusted communication is born.
5.3 Synchronous Flow
2.1 Intune send a request to the device to get the *DHA-Report it will initiate the DHA Data validation Session to start querying the health state of the device.
*DHA-Report: It’s a XML report with the Bitlocker status/Secureboot/PCR[0] etc in it
2.2 The device (MDM Client) will inform the MDM that the DHA-Validation-Data is NOT ready for transport. The MDM will ask the client to send the DHA-boot data to the DHA-Service
1.1 The device will be forced to forward the *DHA-Boot-Data to the DHA-Service.
* DHA-Boot-Data: TCG Log (Windows Boot Configuration Logs: WBCL), the related boot state Data, the AIK Certificate and the PCR Bank values
1.2 After the TCG, the AIK certificate and the boot state are received by the DHA-Service, the DHA-Service will validate the data and checks if it is signed by a valid and trustworthy AIK certificate. After the DHA-service has validated it, it will also check if the TCG logs correspond with the reported PCR values.
After everything is validated, an encrypted summary report *blob will be sent back to the device (DHA-CSP) together with a Device Health Certificate.
*DHA-encBlob –> Device Health Status, Boot Counter and the Device ID
2.3 The device will inform Intune that the data is ready for pickup. Now Intune knows the data is ready for pickup it will send a *Nonce and a request to the device to get collect the health data.
*Nonce: It’s a random number used in cryptographic communication. It makes sure Intune protects the device health attestation communications from man-in-the-middle type (MITM) attacks)
2.4 The device will send the DHA validation Data (Health Data) to the MDM
3.1 The MDM will forward the data to the DHA-Service, but while forwarding it will also add a Nonce.
3.2 The DHA-Service will review and validate the Health data and will send back the DHA-report to the MDM.
4.1 After MDM receives the report, MDM will evaluates the compliance based on the configured compliance policies and will decide if the device is healthy (or not).
4.2 Depending on the outcome, Intune will set the “iscompliant” device attribute in AAD to True or False
5.1 If the user wants to open an Office 365 app it will trigger a token acquisition.
5.2 After the token acquisition it will request access token for the specific service by using the PRT.
5.3 Azure / Conditional access will check if the device is who it says it is by checking the deviceid and will validate the device compliance state (iscompliant attribute) and will issue an office 365 access token if the user is authorized and of course only when the device is compliant.
5.4 The Device will forward/use the token for the Office Apps.
6 The Office App will present the token to the Office 365 Service to get access and trusted communication is born.
6. Device Health Attestation Logs
Now that we have discussed DHA, let’s examine the DHA logs and how to find them. There are three options for getting more information and logs about the DHA /Measured boot Process.
The first will be about checking the logs on the device itself, and the other will be about the DHA report option you have in Intune.
1: Device Logs:
If you are interested in some event logs go, you will find them in (of course) the measured boot log folder. These logs can be used to decode the measured boot logs to track PCR changes
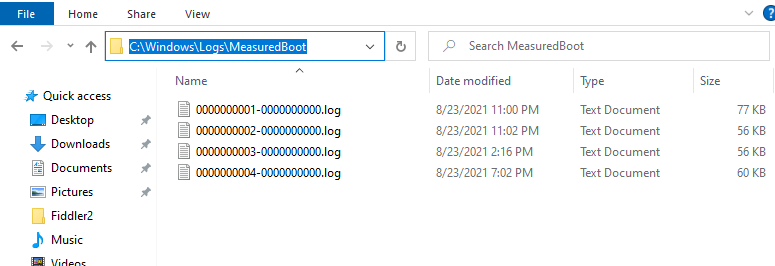
Please note: When there aren’t any log files in the above folder, please check out this registry key: PlatformLogRetention in the registry: HKLM\SYSTEM\CurrentControlSet\Services\TPM . If it’s set to zero, I guess you know what that means…it’s off. If you want to enable it, change it back to 0xffffffff
But the logs are pretty useless, except if you download this PowerShell module and convert them. Please visit this Github website, and download the Module so you could take a look for yourself
TCGLogTools/README.md at master · mattifestation/TCGLogTools · GitHub
2: Intune Logs:
How great it is to see that the DHA reports are also visible in Intune itself. First, let’s look at when you DON’T have any compliance policies configured that leverage DHA. As shown below… no devices were found.

Now let’s look at when we have a compliance policy configured that leverages DHA.

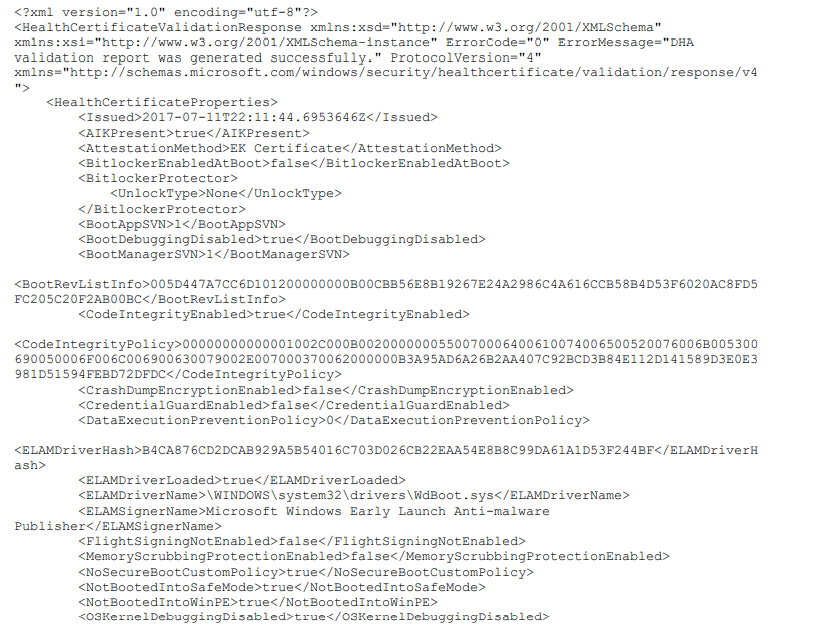
Every detail you want to know about DHA is in it: Bitlocker, Code Integrity, Early Launch Antimalware, AIK keys, Health Certificate Issues, and even the PCR values I discussed earlier.

But did you take a good look at the PCR Value above? Do you know what this PCR value stands for? Let’s take a look at option 3
3: TPMTool
It’s such a fantastic tool when you want more insights into the TPM itself. When you want to produce the logs, the only thing you will need to do is enter this command: tpmtool gatherlogs

Two nice files will be put inside that same folder you ran the command from

Let’s open the TPMinformation.txt and scroll down to the TPM_ALS_SHA256 PCRs. You will notice all the PCR values will be shown here. Mmmm… That first one PCR[00] looks familiar? Yes, it does, as you will also see the PCR[00] value in the DHA-Report in Intune.

So, let’s retake a look at what the PCR[00] stands for!
- EFI BOOT SERVICES
- EFI RUNTIME SERVICES
- PLATFORM FIRMWARE

And now, translate the PCR information file to something understandable instead of some “random” numbers

7. Intune Policy
I almost forgot about a neat Intune Policy you can configure. Let’s take a look at the CSP OMA-URI
./Device/Vendor/MSFT/Policy/Config/Security/RequireRetrieveHealthCertificateOnBoot
I guess, looking at the name, you know where it’s for? Let’s take a look at what Microsoft has to say: “When you have configured this policy, you can specify whether to retrieve and post TCG Boot logs, and get or cache an encrypted or signed Health Attestation Report from the Microsoft Health Attestation Service (HAS) when a device boots or reboots”

When configured, this policy will improve the performance and reduce the latency during Device Health verification by enabling the device to fetch and cache the data.
8. A Reboot to fix Health Attestation?
After reading how the DHA works, we also know that the BitLocker compliance state is captured during boot. When you enable BitLocker after the first boot, the device will still not be compliant as the measured boot state (DHA-Boot-Data) does not know that Bitlocker was enabled.
So, the only thing left to fix it all and ensure Bitlocker is enabled is to reboot your device to initiate the measurement. After the device reports that BitLocker is enabled from the measured boot date, you are good to go!
Or????????
As I showed in the beginning, we are using multiple compliance policies. My advice is just to create a new Compliance policy and only require Bitlocker in it. Changing the Bitlocker Compliance policy to mark the device as not compliant after 1 or 2 days will give the device the time it needs to report its compliance state!

Of course, looking at the schedule, the minimum number of days you could set is 1. For the DHA Bitlocker compliance policy, that is pretty fine, but for other policies, it could be way too long.
If that’s the issue, please look into the “gracePeriodHours” when using the New-IntuneDeviceCompliancePolicy.
(New-DeviceComplianceActionItemObject `
            -gracePeriodHours 1 `
            -actionType block `
            -notificationTemplateId "" `
        ) `
You will notice you can configure it by the hour instead of specifying the number of days! Isn’t that great?
9. A Bonkers Solution
As we read in part 8, the device needs to reboot after it has been encrypted with Bitlocker to pass the information to the DHA-Service and become “compliant.”
If we don’t want to specify a grace period we could warn the user that he needs to reboot after logging in for the first time.
It’s a great idea, that’s true, but I just want it to work at first sign-in! Let me explain some more. We need 3 things to do so
- A reboot?
- Bitlocker enabled before user login
- Time
9.1 A Reboot?
When using WUfB, you can assign it to devices or users. When you have targeted the update ring to devices, there is a slight change. Your device will reboot AFTER the device ESP Phase.
Windows 11, WUfB and the Autopilot pre-provisoning issue (call4cloud.nl)
9.2 Bitlocker enabled before user login
Okay so we have our required reboot but we are still missing some things because when using a Bitlocker device configuration policy, Bitlocker will only be enabled AFTER logging in with the user.

So, we need to switch to a PowerShell script to deploy and configure Bitlocker. With this PowerShell script, BitLocker will be enabled during the device phase of Autopilot!
Configure Bitlocker | Intune | Escrow error 0x801c0450 (call4cloud.nl)
9.3 Time
The Bitlocker PowerShell script will enable Bitlocker during the device ESP phase. If you change the WUfB assignment to be assigned to devices, the device will reboot after it finishes the device ESP phase.
After the reboot, the device needs some additional time before the Health report is delivered to the DHA service. Of course, the health report also needs some time to be verified.
That’s where the Online Company Portal and Conditional Access kick in! The device needs to fetch the Company Portal from the Microsoft Store but to do so; it NEEDS to be compliant first!
When the user arrives at the account phase, it will try to fetch the Company Portal, but because it’s not compliant yet, it doesn’t succeed on its FIRST attempt! After it fails the first time, it will try again and again, and within a couple of minutes, the device is marked as compliant, will fetch the online Company Portal, and will finish the account ESP phase.
After the user logs in for the first time, OneDrive KFM and Teams will all just work!
I am explaining the whole MS-Store flow in this blog
Requiring Online Microsoft Store Apps and the Autopilot ESP (call4cloud.nl)
Conclusion
First, a small resume about compliancy and the DHA:
Intune determines if the device is Compliant by using the DHA-Report, which Intune received from the DHA-Service. When the device is Compliant, Intune will change the “iscompliant” attribute to “true”. The DHA-Report that Intune received is leaning on the DHA-Validation-Data that the device received from the DHA-Service when it transferred the DHA-Boot-Data.
Now that’s clear, let’s finish this blog.
It was pretty fun to get a good and full understanding of how DHA works and every step it goes through. I hope it wasn’t too much information and you liked reading it just as much as I did while writing it… Now I need to rest

*Source used: [MS-DHA]: Device Health Attestation Protocol | Microsoft Docs


Do you use compliance and device on user or device groups?