This blog will show you how to install the Microsoft 365 apps during Autopilot by converting the Microsoft 365 Apps setup to a Win32App instead of using the built-in Office 365 CSP option.
I will divide this blog into multiple parts, describing all the options you have to deploy the Microsoft 365 Apps to your devices!
1. Introduction
When you start using Intune and deploying the Microsoft 365 apps to your devices, you will probably use the built-in option. With this built-in option, you can easily ensure that the Microsoft 365 Apps are deployed to your devices.
Some time ago I wrote a blog about how you could make sure you can make sure each group who needs the x64 version will get it and who needs the x86 would also get it installed.
https://call4cloud.nl/2021/02/office-365-apps-and-the-deathly-bits
In the blog I mentioned above, I showed you which options you have to deploy the Microsoft 365 apps. One of these options was using the built-in Microsoft 365 Apps in Intune. It looks great because you only need to configure some basic stuff as shown below and you are good to go

Let’s take a closer look at this built-in option!
2. The “Built-in/CSP Option”
Before I show you the “New way,” let’s examine how Microsoft 365 Apps are deployed when using the built-in option in Intune.
This built-in Microsoft 365 application uses Office *CSP. “The Office configuration service provider (CSP) enables a Microsoft Office client to be installed on a device via the Office Deployment Tool (ODT)”
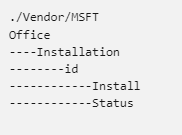
The CSP (POLICY) will download the Office 365 Click2Run setup.exe, the configure.xml. With these 2 files, it will start downloading the necessary Microsoft Installations files from the Office CDN (Content Delivery Network) with the Office CDNBaseUrl :officecdn.microsoft.com

When using Firewall rules, please make sure you are allowing traffic to this OfficeCDN Microsoft endpoint!
Of course, everyone is using delivery optimization so these files will first be downloaded in the C:\Windows\ServiceProfiles\NetworkService\AppData\Local\Microsoft\Windows\DeliveryOptimization\cache folder

After Delivery optimization did its perfect job these files will be moved to the C:\Program Files\Microsoft Office\Updates\Download\PackageFiles folder.

After it finished downloading all the required installations files, it will start installing the Microsoft 365 apps on the device by triggering the OfficeClickToRun.exe

After a while, if the installation is finished successfully with the status code (70) you will end up with the Microsoft 365 Apps installed! Isn’t that nice?

3. Information about the Office CSP Option
I will try to point out some “fun” facts about the CSP option in this section
- Normally a CSP is used to deploy an Intune configuration policy to your device but when deploying Microsoft 365 apps, a CSP is used to deploy the Microsoft 365 apps to your device. I guess that’s the main difference between a normal Win32app and the built-in/CSP option in Intune to deploy Microsoft 365 apps.
- The built-in CSP option in Intune to deploy Microsoft 365 apps is just a POLICY, not an Application!

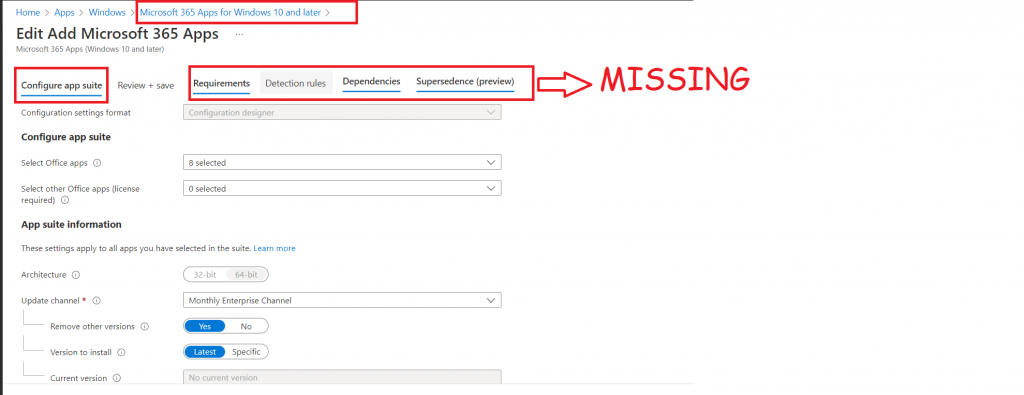
- Looking at this picture below (added some stuff 🙂 ) because this option IS NOT AN Win32App some important configuration items are missing. Comparing the built-in option with a Win32 app, you will notice the CSP option is missing the possibility to configure some, Requirements, Dependencies, Detection rules, and supersedence. These wonderful options could really come in handy but unfortunately, they aren’t available when using the CSP option.
4. What could go wrong with the CSP option
Wondering what could go wrong when choosing the Office365 CSP option? Let me show some examples:
Example 1: FinalStatus
The Office CSP XML and the FinalStatus code are stored in this registry key: Computer\HKEY_LOCAL_MACHINE\SOFTWARE\Microsoft\OfficeCSP\a7226049-b2b4-4a1b-9b3d-50dc78f2e816
FinalStatus:

When the Microsoft 365 Apps are installed with the CSP option, it first checks if the FinalStatus key exists. If it does, it makes sure the FinalStatus key is deleted first. When the installation exits with a specific status, this FinalStatus key is created with the corresponding status code.
- Status = 0: 70 (succeeded)
- Status = 0: 60 (failed)
- Status = 0: 997 (Installation in Progress)
Please Note: This exit code/status could give you some weird issues during Autopilot because sometimes it will give you a nice random status code or the status code 997. I guess we all know what happens when “the installer gets tired & then takes a nap” during Autopilot?

If you somehow stumble upon a device that has the 0:60(failed) status event when Office is installed successfully and you want your device to continue, you could just change that 0:60 to 0:70 (Succeeded)
When the installer is taking a nap while deploying the Microsoft 365 apps, you could stumble upon some weird behavior during Autopilot, and we don’t want that! I guess we don’t want to end up with the installation exceeding the time limit message!

If you are interested in all of the status codes, please visit this MS Doc: Office CSP – Windows Client Management | Microsoft Docs
Example 2: Mixing LOB Apps
Because this option uses a CSP, the Enrollment Status Page (ESP) could have a hard time tracking this! I am also describing it in this blog below!

When deploying the Office365 / Microsoft 365 apps with the CSP option and mixing it up with some other LOB apps, there is a slight chance that you will end up with Office365 installed but without Teams. Let me explain why. The Office 365 apps are including the Teams Machine-Wide installer. This installer is an MSI-based installer as shown below

When your device is enrolling with Autopilot, the Office365 apps are already being installed at the “preparing your device for mobile management” ESP . At that moment other required LOB apps are also being installed. Guess what could happen? Yep! you could end up with the famous error code 1618 (another installation is already in progress)
“{\”message\”:\”InstallTeams: MsiInstallProduct failed due to install already in progress.\”,\”Status\”:\”1618\”}”}
4. The Win32App Option
As told in the first part, the built-in option is using a CSP to deploy the Microsoft 365 apps. Let’s create our own Win32App with the ODT instead!
To do so we also need the Office Deployment Tool. This tool is nothing more than a command-like tool you could use to download and deploy Click-to-Run versions of the Microsoft 365 apps.
Please download it below
https://www.microsoft.com/en-us/download/details.aspx?id=49117

When looking at the official Microsoft documentation about the Office Deployment Tool, you could be tempted to use the “sourcepath” to download the files first with the /download parameter.

After you have downloaded you could wrap the whole folder with the office files in it.

But when converting it to a Win32App you will stumble upon some red flags! So don’t use the SourcePath!.
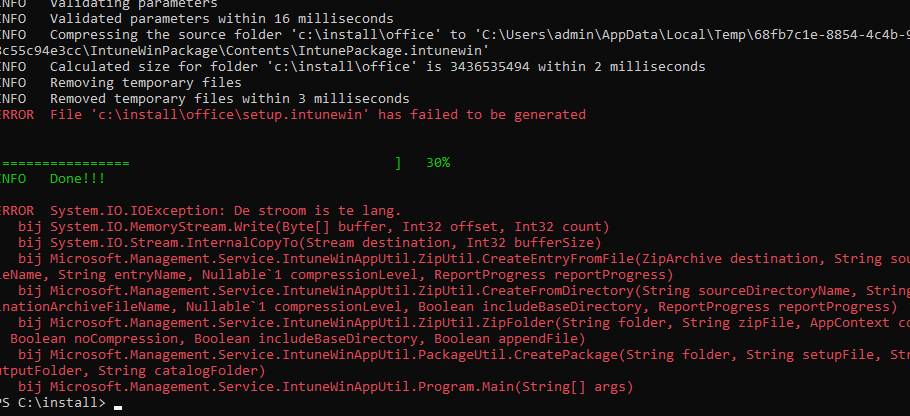
Even when this “stupid” idea would succeed, you will end up with a Win32App you need to update regularly to make sure a new device isn’t going to receive a very old Office build. Also, the ESP issue we could encounter is not as much about the download itself but as we read earlier, it’s more about “something” else triggering the installation instead of the Intune Management Extension (IME)
Let’s move on, shall we? The only things we need to ensure we don’t run into issues during Autopilot are the Office Deployment tool itself and 2 XML Files, as shown below.

INSTALL.XML
In this example below, I am of course using the
*The Current 64 bits Channel version of the Microsoft Apps
*AllowCdnFallback=”True”
“When installing languages, the ODT looks first for source files in the location specified in the SourcePath attribute. If the language pack isn’t available at that location and the AllowCdnFallback setting is set to True, then the ODT will use source files from the Office CDN.”
*MigrateArch=”TRUE”
Migrate Office 365 Apps from 64 to 32 Bits with MigrateArch (call4cloud.nl)
<Configuration>
<Add OfficeClientEdition="64" Channel="Current" AllowCdnFallback="True" MigrateArch="TRUE">
    <Product ID="O365ProPlusRetail">
      <Language ID="en-us" />
      <ExcludeApp ID="Groove" />
      <ExcludeApp ID="Lync" />
    </Product>
    <Product ID="ProjectProRetail">
      <Language ID="en-us" />
      <ExcludeApp ID="Groove" />
      <ExcludeApp ID="Lync" />
    </Product>
    <Product ID="VisioProRetail">
      <Language ID="en-us" />
      <ExcludeApp ID="Groove" />
      <ExcludeApp ID="Lync" />
    </Product>
  </Add>
  <Updates Enabled="TRUE" />
  <Property Name="FORCEAPPSHUTDOWN" Value="TRUE" />
  <RemoveMSI />
  <AppSettings>
    <User Key="software\microsoft\office\16.0\excel\options" Name="defaultformat" Value="51" Type="REG_DWORD" App="excel16" Id="L_SaveExcelfilesas" />
    <User Key="software\microsoft\office\16.0\powerpoint\options" Name="defaultformat" Value="27" Type="REG_DWORD" App="ppt16" Id="L_SavePowerPointfilesas" />
    <User Key="software\microsoft\office\16.0\word\options" Name="defaultformat" Value="" Type="REG_SZ" App="word16" Id="L_SaveWordfilesas" />
  </AppSettings>
   <Display Level="None" AcceptEULA="TRUE" />
</Configuration>
UNINSTALL.XML
Of course, we also need an uninstall XML to make sure there is a possibility to remove the Microsoft 365 Apps
<Configuration>
<Display Level="None" AcceptEULA="True" />
<Property Name="FORCEAPPSHUTDOWN" Value="True" />
<Remove>
<Product ID="O365ProPlusRetail">
</Product>
</Remove>
</Configuration>
I also added Visio and Project to the XML I used. If you don’t want those installed, you can remove them from the XML or create it yourself. You could do so by specifying everything you want on this website, https://config.office.com/, and exporting the XML.
When you don’t want to create the XML files yourself, here is the download link
https://call4cloud.nl/wp-content/uploads/2022/04/office.zip
Packaging the Files
After we have created the install and uninstall XML files, let’s proceed with packaging the app by running the IntuneWinApputil.exe


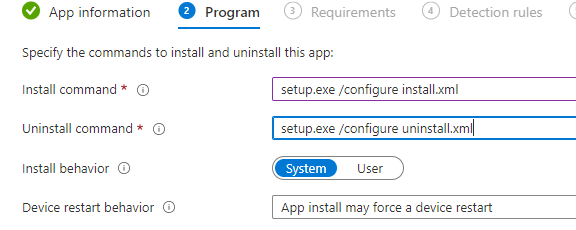
When we have our own Intunewin file, let’s create a new Win32App in Intune and select this file. After choosing the IntuneWin file you just created, you will need to configure some additional parameters:
Install Parameters
Setup.exe /configure install.xml
Setup.exe /configure uninstall.xml
Detection Rules
Detection Rules are always important, to make sure you have the right registry path, open the register and choose your option!
Option 1:
HKEY_LOCAL_MACHINE\SOFTWARE\Microsoft\Windows\CurrentVersion\Uninstall\O365ProPlusRetail – en-us

When you have selected this option you need to configure some detection rules. please make sure you configure the detection rule as shown below.

Option 2:
Another possibility would be to use the ClickToRun registry key itself instead of the uninstall key
HKEY_LOCAL_MACHINE\SOFTWARE\Microsoft\Office\ClickToRun\Configuration

Please Note: When you have messed up the detection rule, you will be prompted with the 0x81036502 error during the ESP Device Phase

When you need to troubleshoot this 0x81036502 error, as always the IME will show you the stuff you need. As shown below: Exitcode is defined as success but it actually failed according to detection result

If you want to ensure that this nice new Win32App is installed during Autopilot, please remember to add it to the required apps during ESP. When adding the custom-made Win32App or the built-in Microsoft 365 apps as required apps during ESP, you can be certain the device is ready to go when the user logs in!
Changing the ESP
Please! Make sure you assign the Microsoft 365 Apps as required in the Enrollment Status Page configuration.

Of course, you want the Microsoft 365 Apps deployed to your device before the user logs in, but have you ever considered the Windows 10 (NOT 11!!) start menu layout? (Thanks, Bruce, for bringing it up!)

As shown above, when you are requiring the Microsoft 365 apps to be installed during the ESP, you will end up with a very nice Start Menu layout when using Windows 10!
Customize the Start layout | Microsoft Docs
5. The PowerShell Script Option
You can use a Win32App with ClicktoRun to download and configure the Microsoft 365 apps on the device, or you can choose the PowerShell option!
https://github.com/mallockey/Install-Office365Suite
On this GitHub page above, you will find all the information required to start using this option
Why choose this option? Because this PowerShell script will first download the latest ODT before installing the Microsoft 365 Apps.

This nice PowerShell script could also be converted to a Win32App and just like with the Win32App option, you could assign it as required during the ESP.
6. What the Win32app version of the Office 365 setup doesn’t fix!
Of course, there are days when just everything breaks, even the Office 365 Apps Win32app version is going to give you errors. As shown below, when requiring the Office 365 apps during ESP (Intune built-in Option or the Office 365 apps) you could end up with the error: 0x81036502 Installation Timed Out

What could be causing this? We switched to a Win32App so we are all good right? I guess not because as mentioned earlier when running setup.exe /configure configuration.xml it will download the required files from the Office CDN. (officecdn.microsoft.com)
Determining on your Office 365 Click to Run configuration.xml it will fetch the right build

Normally this shouldn’t be an issue BUT sometimes there are issues with a specific Office 365 build. When there are issues with an Office 365 build, you need to switch to another channel/version(or wait until Microsoft fixed the issue with the Office 365 build) otherwise your Autopilot deployments will keep timing out!

When using the built-in option to deploy the Office 365 apps with Intune, you will also need to change some settings. As shown below, I switched from the latest version to be installed to a specific version. A version that is not giving you headaches!

Conclusion
If you ever run into weird app installation issues during ESP out of the blue, please remember this blog. Maybe the Microsoft 365 apps CSP option or the Office CDN is giving you some headaches!



Loved the Article, and it is good to see a ‘formal’ write up of the approach we have been using for a while. We started using Win32 for the office deployment when we found that the ‘native’ Office install in Intune wasn’t updating the Office that shipped on the OEM preload for Dell and Microsoft devices.
I just wanted to ask about the detection side of things. We have found that when using the registry keys to check the uninstall values as ‘evidence’ we get a very hit and miss experience. It’s almost like the IME is checking too soon. Using a PowerShell script to check for these values (and doing a greater than or equal to check on the version number) is returning a much more consistent experience.
Hi .thanx!… I indeed noticed the same thing… and indeed not every time but after testing it multiple times it didn’t detect the installation at that time. A powershell script would be indeed a better option
Are you able to share what you did for the detection please?
Thank you for the great article! I used the GitHub script, together with a custom .xml in a script. Works like a charm, except one thing; the script gives after installation a timeout. Can’t pinpoint what is causing the timeout. Installation succeeds.. Can you pinpoint me in the right direction?
Hi there! I’m the maintainer of that script. What is the error timeout you’re getting?
Have you seen any issues with using the built in M365 App deployment method where upon M365 Apps installation a PC loses it’s Windows Activation? I was having all sorts of activation issues, so I scaled back my Intune deployment to just configuration profiles and a handful of PowerShell scripts. I also ensured the Universal Store Service APIs and Web Application was excluded from my MFA Conditional Access policy. After doing this, everything worked like it should including activation. After this, I decided to reassign M365 Apps via the built in method and immediately upon installing the M365 Apps my dev machine lost activation status.
Hi, this has been an extremely helpful article, thank you. One quick thing I’d like to point out is that when you typed “HKEY_LOCAL_MACHINE\SOFTWARE\Microsoft\Windows\CurrentVersion\Uninstall\O365ProPlusRetail – en-us”, the character right before “en-us” is a different sort of dash than what I have in my registry. My registry reads “HKEY_LOCAL_MACHINE\SOFTWARE\Microsoft\Windows\CurrentVersion\Uninstall\O365ProPlusRetail – en-us”
I do not know if this is a locale difference or an automatic formatting effect (I know Outlook and Word will both automatically convert these). As a result of this character difference, my detection rule for Office was failing and I was getting an 0x81036502 error during setup. It was easy enough to correct, but it did cause me to scratch my head for a little bit this morning.
Anyway, I want to thank you again for your blog. It’s been invaluable in my Intune deployment.
Re: Dash types:
I see the character changed in my previous comment after it appears on the site, so it must be related to how text is formatted here. That said, I promise the character is different! The correct character appears to be a hyphen but the character that is rendering is a unicode en dash.
I have been using the O365 apps version in testing but when I came to deploy it, realised I had no control of the deployment due to the lack of the “requirements” and “detection method” settings.
Thank you for this article, I’ve now packaged up Office as a Win32 app. I am however running into an issue where office isn’t installing. I have tested the xml manually and changed the display level to “Full” to try and work out what is happening. The “Please stay online while Microsoft 365 and Office downloads” splash screen is showing and the progress bar stops around 1/5 of the way along and then nothing happens for hours.
Anyone else experienced this same issue?
Very good article. Your work is high quality thanks very much.
I found that the built in intune method was installing fairly quickly, but the company portal hung on ‘downloading’ forever, which would hold the users up. Switching to win32 using this guide and installs were marked completed in just 10 minutes or so.
Regarding the download of the most current Office Deployment Tool, I ‘found’ a static link to ODT instead of the cumbersome download and extract procedure.
Direct link:
https://officecdn.microsoft.com/pr/wsus/setup.exe
Source: https://gravesoft.dev/office_c2r_custom
Although based on ‘activation’ they do give a technical insight into how things work.
This seems a current and static URL to the latest ODT, so this might eliminate some steps :).