

This blog will show you, how you could import your Microsoft Cloud App security/ Microsoft Defender for Cloud Apps template (MCAS/MDCA). You could import this template with all your pre-configured rules into MCAS/MDCA by using PowerShell. Tips and tricks are included at the end of this blog.
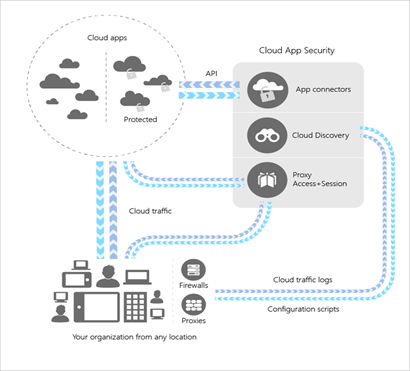
How to best explain how MCAS works? Microsoft Cloud App Security is a Cloud Access Security Broker that supports various deployment modes including log collection, API connectors, and reverse proxy. It provides rich visibility, control over data travel, and sophisticated analytics to identify and combat cyber threats across all your Microsoft and third-party cloud services.
Source: https://docs.microsoft.com/nl-nl/cloud-app-security/what-is-cloud-app-security
You will need at least an EMS E5 license to make full use of all product features. Once activated you will need to configure some settings. I will divide this blog into multiple parts
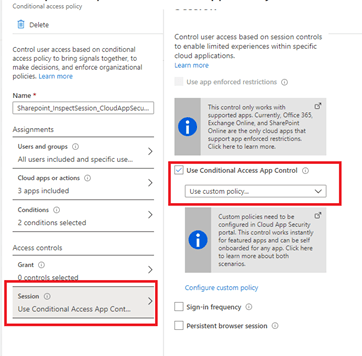
1.Conditional Access Rule
You will have to create a conditional access rule to redirect users sessions to Cloud Apps through MCAS. When redirecting the users’ sessions, it will act as a reverse proxy.
Manually? Nope. Just take a look at my website. You can automate the whole conditional access implementation.
2. Basic configuration MCAS/MDCA
You will need to configure a lot of setting in your MCAS portal when you want to make good use of MCAS.
Some examples:
1. Connectors
2. Enable file monitoring/Azure information protection/Microsoft defender ATP
3. Default notifications
4. Enabling policies
5. Changing the default policies (setup notifications)
6. Creating your own policies
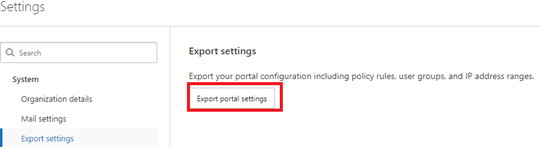
Of course, you can do this manually. But wouldn’t it be great if there was a way to simply export and import the whole config? Unfortunately, you can only export the config. I hope Microsoft makes an import function one day…
3. Automating the MCAS deployment
When you could automate the whole process, it would save you some time and it’s for sure you won’t forget anything.
For now, the best (and only) option you have is PowerShell! However, before you can establish a PowerShell connection, you’ll need a “token” to connect with. So, how do we get a token?
Open settings/Security Extensions to generate a new token
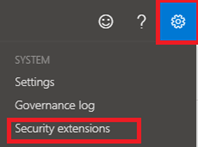
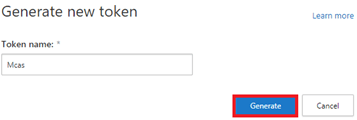
That’s all you need! So go open PowerShell.
*Default config
$mcastoken =  "MCAS TOKEN HERE!!"
connect-azuread
$name = get-azureaddomain | where {($_.name -like '*.onmicrosoft.com') -and ($_.name -notlike '*.mail.onmicrosoft.com')} | select name
$name.name
$ShortName = $name.Name.Replace(".onmicrosoft.com","")
$mcasuri = "https://"+$shortname+".eu2.portal.cloudappsecurity.com"
--------------------------------------------------------------------------------------------------------------------------------------
*Enable file monitoring
$body = @'
{"fileMonitoringEnabled":"true"}
'@
Invoke-RestMethod –Uri "$mcasuri/api/v1/settings/" –Headers @{authorization = "Token $mcastoken" } –Method POST -Body $body -ErrorAction Stop -ContentType 'application/json'
--------------------------------------------------------------------------------------------------------------------------------------
*AIP Enable

$body = @'
{"allowAzIP":"true","ignoreExternalAzIP":"true"}
'@
Invoke-RestMethod -Uri "$mcasuri/api/v1/settings/" -Headers @{authorization = "Token $mcastoken" } -Method POST -Body $body -ErrorAction Stop -ContentType 'application/json'


*default notifications email

$body = @'
{"alert_settings":{"alertEmailRecipients":["Emailaddress"],"alertSmsRecipients":[],"alertDailyLimit":5}}
'@
Invoke-RestMethod –Uri "$mcasuri/cas/api/policy/save_default_alert_settings/" –Headers @{authorization = "Token $mcastoken" } –Method post -Body $body -ErrorAction Stop -ContentType 'application/json'

*Defender ATP App control Enable
$body = @'
{"appControlEnabled":"true"}
'@
Invoke-RestMethod -Uri "$mcasuri/api/v1/settings/" -Headers @{authorization = "Token $mcastoken" } -Method POST -Body $body -ErrorAction Stop -ContentType 'application/json'


*Office365 configure connector

$body = @'
{"appId":"11161","workloadSelectionStatus.Entities":"true","workloadSelectionStatus.AADEvents":"true","workloadSelectionStatus.AADLoginsEvents":"true","workloadSelectionStatus.Apps":"true","workloadSelectionStatus.Events":"true","workloadSelectionStatus.Files":"true"
}
'@
Invoke-RestMethod -Uri "$mcasuri/cas/api/service_deploy/config/" -Headers @{authorization = "Token $mcastoken" } -Method POST -Body $body -ErrorAction Stop -ContentType 'application/json'
Boom! You just configured all the options you need (Of course you can add your own settings you want to change.)
What’s next? Some policies need to be turned on or need to be configured. Here we go again (change the email address to your liking)
###Search Id ransomware policy
$response = Invoke-RestMethod  -Uri $policies -Headers @{Authorization = "token $mcastoken" } -Method post -Verbose
$ransomware = $response.data | where {$_.name -eq "Ransomware activity"} | select _id
$ransomwareid = $ransomware._id
$ransomwareuri = $policyv1+"anomaly/"+$ransomwareid+"/"

###change ransomware policy
$ransomwarebody = @'
{"story":0,"enableAlerts":true,"name":"Ransomware activity","alertEmailRecipients":[{"value":"Emailadress","label":"Emailadress"}],"emailAlerts":true}
'@
Invoke-RestMethod –Uri $ransomwareuri –Headers @{authorization = "Token $mcastoken" } –Method Put -Body $ransomwarebody -ErrorAction Stop -ContentType 'application/json'

###Search malware policy
$response = Invoke-RestMethod  -Uri $policies -Headers @{Authorization = "token $mcastoken" } -Method post -Verbose
$malware = $response.data | where {$_.name -eq "Malware detection"} | select _id
$malwareid = $malware._id
$malwareuri = $policy+"file/"+$malwareid+"/"

###change malware policy
$malwarebody = @'
{"folderSelection":{"folders":[],"type":0},"enableAlerts":true,"policySubType":"MALWARE","consoleFilters":{"extension":{"eq":["dll","exe"]}},"contentFilters":[{"detonationEnabled":true,"type":"InternalThreatDetection","enabled":true,"subtype":0}],"userTagsSelection":{"type":0,"tags":[]},"editable":true,"policyType":"FILE","sensitiveTypesSelection":{"violationsThresholdSelection":"any","types":{}},"name":"Malware detection","enabled":true,"alertDailyLimit":5,"stories":["0"],"emailAlerts":true,"alertEmailRecipients":["emailadress"]}
'@
Invoke-RestMethod –Uri $malwareuri –Headers @{authorization = "Token $mcastoken" } –Method Put -Body $malwarebody -ErrorAction Stop -ContentType 'application/json'


###search id file deletion policy
$response = Invoke-RestMethod  -Uri $policies -Headers @{Authorization = "token $mcastoken" } -Method post -Verbose
$deletion = $response.data | where {$_.name -eq "Unusual file deletion activity (by user)"} | select _id
$deletionid = $deletion._id
$deletionuri = $policyv1+"anomaly/"+$deletionid+"/"

###changefile deletionpolicy

$deletionbody = @'
{"story":0,"enableAlerts":true,"name":"Unusual file deletion activity (by user)","alertEmailRecipients":[{"value":"emailadress","label":"emailaddress"}],"emailAlerts":true}
'@
Invoke-RestMethod –Uri $deletionuri –Headers @{authorization = "Token $mcastoken" } –Method Put -Body $deletionbody -ErrorAction Stop -ContentType 'application/json'
For now, we have configured some settings. The next step would be to create our own policies. I would like to reach out to Matt Soseman. He has some nice videos about which policies you can create . Go check it out to get inspired.
https://www.youtube.com/channel/UCu9ZvquFPRsHbCduV69wkjQ
I put the rest of the script in a text file. It’s a lot of text. It contains some baseline policy (change the email address to your liking)
https://call4cloud.nl/wp-content/uploads/2020/07/MCAS.txt
4. Tips and tricks:
- When creating your policy JSON files, you have to remove “templateID”. Otherwise you will get some errors:

- At the end of the URL’s you have to place a “\”. Otherwise… you will get another error: 404
- Remove the _ID when creating a new policy with PowerShell. Getting policies with duplicate ID’s is not good. When removing one of them, the other ones will break. When opening the other policy you will get an error. You got some “ghosts” policies
Conclusion:
MCAS is a great product, it really helps you to provide visibility and control across all your Microsoft and third-party cloud services.
There are a lot of custom made policies you can create. The possibilities are endless.
Establishing a baseline you could enrol to all your tenants is best practice. I adore automation, what would life have been without automation? In one of my next blog posts, I’ll show you how to make your own JSON’s for MCAS.

I am very interested in MCAS automation.
However, I couldn’t find API guides related to “MCAS policy” on Microsoft’s official websites. This post helped me a lot, but I would like to know more MCAS API usage. Where can I get more information about MCAS API?
Hi,
There is not much documentation available how to perform this automation. Please read my blog about fiddler, it will show you some more information what exactly happens when you configure something in mcas.