

This blog will be about my experiences with Autopilot for pre-provisioned deployments (White Glove) and I will try to talk you through the whole process.
You might ask, why did he write it? Some time ago I was troubleshooting the Autopilot white-glove deployments because there were a lot of issues with the TPM attestation part (0x80180014 and 0x800705b4), while troubleshooting I noticed some weird stuff (in my opinion) as I can’t find any official Microsoft documentation about it.
1. A Brief Overview
Before I try to show you the whole flow, I will need to show you a short summary of what happens in the background when you enroll your device into White Glove after uploading the Device Hash into Intune.

Looking at the picture above, you would think that not too much is happening right? A little bit of an Azure Ad Discovery, a little bit of an Entra ID Join, enrolling the device into MDM and Unjoining the Device…. Wait?? What? Unjoining the device.. I am not performing a Hybrid Autopilot enrollment!
In the next few parts, I will try to explain it a little bit more. Also, it can be useful to read this blog about the Device Health Attestation process first…As it contains some words and explanation you could need later on
2. Uploading the Hash
Of course, we need to ensure we have uploaded the device hash before proceeding.. so go ahead and upload it with the get-windowsautopilotinfo.ps1 Powershell module

When uploading the hash you will notice a graph call will be made to graph.windows.net/tenantid to make sure the hash will be uploaded in the correct Tenant

If it finds the right tenant and, of course, if you have the proper permissions, it will upload the Hardware hash to https://graph.microsoft.com/beta/deviceManagement/importedWindowsAutopilotDeviceIdentities
If we want to be sure the Hash has been uploaded successfully, we could check it out ourselves. I am going to show you two methods we have to check if the hash has been uploaded
2.1 EndPoint Manager Portal
First, let’s open the Endpoint Manager and browse to the Autopilot section. Search for the serialnumber and you will notice the hash has been imported.
Did you read the DHA blog I mentioned earlier? To summon it up, (Technical details will follow) when you uploaded the device hash to Intune you sort of added the EKPub to an allowed list of EKPubs that are permitted to perform Attestation.

Please note: When you upload the “hash,” the Azure AD Registration Service (DRS) will also pre-create the Azure Ad object.

While pre-creating the object, it will also get the famous ZTDID (Zero Touch Device ID) value attached to it.


But beware, when the device is pre-created, the device object will still be configured in a disabled state

Please don’t touch it! just leave it be! it will be automatically enabled when enrolling your device
2.2 PowerShell or Graph Explorer
Like always, you can check out your imported Autopilot devices with Graph. To do so you will only need to open Graph Explorer (or PowerShell )
When you have opened the Graph Explorer, please make sure you have the proper permissions and consent to them, to fetch those devices.

Now put in this URL and watch the magic happen! You will notice that this GRAPH URI, shows you the history of the imported Autopilot Devices. I guess the URI: importedWindowsAutopilotDeviceIdentities just says enough…
(Please note: I don’t know yet for you long it keeps its history)
https://graph.microsoft.com/beta/deviceManagement/importedWindowsAutopilotDeviceIdentities

As shown above, it is perfect when you need to troubleshoot the DeviceImportStatus or the DeviceErrorCode!
3. Starting Autopilot Pre-Provisioning
Now, it’s time to start the Autopilot provisioning part. You could do so by pressing the Windows key five times. Please make sure you configured the “Automatically configure Keyboard” to “No” in your AutoPilot Profile

By pressing it five times, the “CloudExperiencehost” (Microsoft.Windows.CloudExperienceHost) will leave the normal OOBE screen, and you can start with the provisioning part.

After clicking on “Windows Autopilot Provisioning” it will check if there are any Zero-Day Patches that needed to be deployed. I guess it’s very important…your device is always up to date and very very secure.

After Windows made sure it got the latest ZDP it will try to start downloading the Autopilot Profile (AcquireProfile). To download the profile it will reach out to the Windows Autopilot Endpoint service: https://ztd.dds.microsoft.com

To fetch its Autopilot Profile, it will send the X-Device-Token (MSA Ticket with DDID in it) to the Autopilot service. While doing so it will also send its Hardware Hash with the request. (> 2022-07 update) Microsoft will compare if the device mentioned in the X-Device-Token is the same one as the one in the Hardware hash you uploaded earlier. It will do so by looking into their “backend database” and it will determine if the device is valid and to which tenant your device belongs.

If you are interested in this flow, I am describing the whole flow in this blog.
If all lights are green and everything is good to go, your Autopilot profile will be downloaded to your device. We could notice this by looking at the Fiddler trace

Or by looking at the ModernDeployment-Diagnostics-Provider event log

As shown above and below, you will find this AutopilotDDSZTDFile.json in the c:\windows\servicestate\wmansvc folder.

As shown above, it contains all the settings you configured in your Autopilot profile in Intune.
If the Autopilot profile is successfully downloaded to the device it will show you the famous Autopilot landing page to start provisioning. (PerformDeviceEnrollment)

Please note: This whole provision progress will be done within this user context: Defaultuser0

4. The ESP Preparation Phase
Let’s take a look at the ESP Preparation Phase. If you want to know more about the whole flow, I already did a blog in which I also mentioned the Enrollment status Pages.
But I need to go a little bit deeper with this, while dealing with White glove/Self-deploying mode we need to take a better look at the Device Preparation phase so I will also divide this part up into multiple subparts
4.1 Device Preparation (Securing hardware)
4.2 Device Preparation (Joining your organization’s network)
4.3 Device Preparation (Registering for MDM)
4.1. Device Preparation (Securing Hardware)
After the device preparation phase, the device needs to use the Endorsement Key (EKPub/EkCert) from the TPM for attestation to authenticate to Entra ID. But before this attestation process can be performed, the TPM needs to be verified and trusted.
I can’t say it enough! This is one of the most important parts, and many white-glove errors are due to it. Always make sure your device has a TPM 2.0 and supports Attestation, and make sure your device is totally up to date with the latest Windows Build. Let’s go further.

So when you don’t have a device with a discrete TPM but a Firmware TPM you are up for a treat!. Because these firmware-based TPM devices don’t include all needed certificates at boot time.
We have only 3 TPM suppliers who manufacture firmware TPM devices: Intel, AMD, or Qualcomm
These devices must be able to retrieve those certificates from the manufacturer (some from an internal ODCA and some from the vendor itself) when you are performing a white glove.
Part 1: Retrieving the EKCert
Again it’s all about trust, so the TPM needs to get proof that it can be trusted. We all know how you can build up trust! By using certificates. So let’s get the one we need….(as a firmware-based TPM doesn’t have the needed certificates preinstalled like the discrete TPM)
To get this certificate, the AIK request process will kick in (TPMTaskUpdate) to start the SCEP certificate enrollment.
After the Certificate Authority (Intel: https://ekop.intel.com) received the certificate request it will set up a secure channel with the client and will ask the client for more details to prove its identity.
But before proving its identity the client needs also to validate the CA public key as it is a two-way trust. The client will first check if the Public CA is also trustworthy. If the CA is trustworthy and valid, the client will answer the call by sending the endorsement credentials to the CA to prove its identity
*Endorsement credentials contain the Public EK (EKpub), TPM Model, TPM Version and the TPM manufacturer name
With this information, the Public CA will check if the TPM is not at risk (Revoked/Compromised). If everything is good to go it will create and sign it with a certificate (*EKCert) to prove that the EKpub is associated with a genuine hardware TPM.
*The EKcert contains the EK public key and is signed by the manufacturer.
After the client receives the certificate encrypted with the EKPub part (EKCert), it can use this certificate to start the attestation. But still, an important part is missing.
Part 2: Establishing a connection to the Microsoft AIK Service
So now the device needs to establish a secure connection with the Microsoft attestation service (*.microsoftaik.azure.net) to get back the Attestation Identity Key (AIK) certificate . It will do so by sending the AIK and the EKCert to Microsoft CA. Now the Microsoft CA is 100% sure it’s communicating with a real living TPM it will send back the so much-needed AIK certificate!

This AIK certificate will be used to provide the necessary identity trust / platform-based authentication.
Also good to know is, that in this AIK certificate, you will find a special OID. Its job is to certify that the endorsement certificate was used during the attestation.
This process (Getting back the AIK certificate) will be retried 10 times if it could not reach the CA you could end up with a *GetCACaps 404 not found or a 400 bad request in the CertReq_enrollaik_Output.txt.
*GetCACaps: This message requests capabilities from CA. The response is a list of text capabilities

This issue can be due to the fact you are not running the latest Windows 10 build or for example a DNS problem (it’s always DNS?) Luckily with 21h2 the TPM attestation process when you have tiger lake devices will be solved….? But I guess that’s something for another blog! (as testing with 21h2 did not resolve it)

And with this step, the first phase (Securing Hardware) is done. Even when it’s generally done within a few seconds, a lot of stuff happens in that few seconds.
4.2.Device Preparation (Joining your organization’s network)
After the Certificate has been received, the TPM identity is confirmed and the trust relationship is built, a Win32 API call will be triggered to start the discovery operation (AADDiscovery). This Win32 API call is implemented in the dsreg.dll.
Please Note: This DLL file is very important as it is also responsible for the DeviceJoin / Unjoin. So every time such an operation will occur, you will notice the dsreg.dll will be called upon.

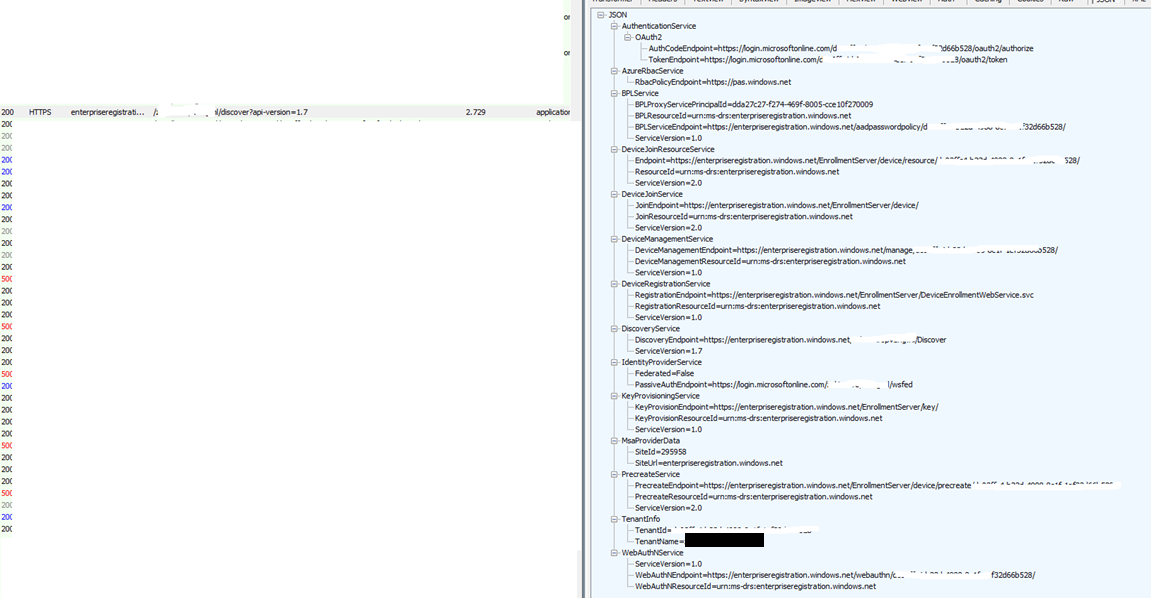
It will now start to get all Azure DRS and device management endpoints it needs to have before proceeding.(DsrGetJoinInfoEx)
Now we have everything we need the TPM will use the EKPub during attestation to prove to Azure Ad that it’s not an imposter and that it’s the same device that matches the hash you imported earlier. Why I am mentioning the hash? Because the hash also contains the TPM EkPub, it can compare those 2!
When the EKPub’s from the device and Azure Ad have a match the device will need to prove its identity. This is done with the EKPriv and setting up a secure challenge (nonce) used to prove its identity

When the device is properly authenticated with Entra ID, it will send back the Entra ID device id token. This device token will be used to join Entra ID later on (JoinDevice) and it will also be used to enroll in Intune. So with this, the device registration begins. An event 102 will be logged with the message: JoinRequest: 11 (device_auto_ddid)

At this moment, the RSA key pair (device key / DKPub/DKPriv) will be created. The DKPub will be used to request the device certificate, which will be signed with the DKPriv.
(I guess that’s why I mentioned the DHA blog earlier… it will show you some insights about attestation)
However, while creating the RSA key pair, an additional key pair (storage transport key /TKPub/TKPriv) is also created. This key will be used to ensure that you can authenticate to Entra ID later on. Of course, all of these keys are stored in a secure place: the TPM.
After all this information has been gathered, a device registration request containing the storage/transport key /device token/attestation data will be sent to Azure DRS.
After Entra has validated the token, it will generate and send back the device certificate

Please note: At the same time the Entra ID device certificate arrives at the device, Azure DRS will also enable and update the pre-created device object.

At this moment it will try to get the Access token (ESTSTicket) to start the Intune Enrollment.

4.3.Device Preparation (Registering for MDM)
When the device is successfully Entra Joined, the MDM enrollment will start. To successfully enroll into Intune, it will need to have a token to authenticate against the Intune enrollment service to start the MDM enrollment (MDMEnroll)

Luckily when the device was successfully enrolled into Entra ID, the device stored the device token in its cache. This token can also be used to authenticate against the Microsoft Intune service to retrieve the Microsoft Intune Device Certificate.

If you are fast, you are going to notice something strange and NOT documented at all. Just a few seconds after the Intune MDM device cert arrives the RegistrationCertHelper
process will start and the Device certificate will be whacked.

I guess we all know what happens when the device cert is removed! The device
will be unjoined instantly! I dedicated a unique blog to it, as I felt it needed more attention than it could get in this blog.
This additional blog will show you more information about the required Unjoin and it will also show you some more information about the fooUser and the Autopilot user
Autopilot Pre-Provisioning | Technical Flow V2 | Intune (call4cloud.nl)
While preparing your device for mobile management, you will also notice the device is reaching out to the Office 365 CDN to start downloading the Microsoft 365 apps even when it’s not in the device setup phase! (if the Office 365 apps are configured in your tenant as a required app)

In this blog, I am only focusing on the first preparation part as the device setup phase speaks for itself, but I still need to mention the Office CDN part as many people are unaware that this is happening before the device setup phase.
If you are interested in the Microsoft 365 Apps and all of their difficulties, please read this blog
Office CSP vs Win32App: Dawn of Justice
5. User Login
After the device is sealed with a nice green screen, it can be handed over to our employees. When the device boots up, it will check if the device is already provisioned. So it will skip this step if it has been provisioned successfully earlier.

So we end up with the nice login screen after again checking for ZDP, which prompts us to log in. Please note, that we are still running the whole process with the DefaultUser0 user context. Normally when logging in, it will need to start with the last ESP phase: Account Setup.
Looking at the Device Preparation flow, you might have noticed the device isn’t Azure Ad joined anymore so how could we log and still get our PRT?
In a normal situation, turning on the device will boot into the Microsoft Account Sign-in page (WWAHOST.exe). In this Sign in with Microsoft screen, you will be prompted to enter your credentials. When entering your credentials at the first login screen, an authentication buffer will be created.
 I guess I still need to learn all the details of this process, so I guess this deserves a blog of its own later on….
“Logonui “will send this authentication/credential “buffer” to the LSA. LSA it’s job is to send it to the *Cloud Authentication Provider.
*Cloud Authentication Provider (CloudAP): CloudAP is the modern authentication provider for Windows sign-in, that verifies users logging into a Windows 10 device. CloudAP provides a plugin framework that identity providers can build on to enable authentication to Windows using that identity provider’s credentials.
So, after the user has entered his/her credentials, the logged-on user “defaultuser” will be logged off and the CloudAP provider will authenticate the user and the device with Azure Ad and it will again start the whole device registration again! But this time with some nice user credentials.

So again the DRS endpoint discovery will start and Azure Ad will validate the user credentials, verify if the device is valid in the tenant, and will send back the encrypted PRT together with the *Session key using the Transport key which I showed you earlier!
*The session key is your Proof of possession for additional requests with the PRT
The CloudAp plugin will ask the TPM to unencrypt this session key and will store the session key, together with the PRT in its cache. Now take a look at your certificates, the lost Azure Ad device certificate will be brought back to life again and your device is again Azure Ad Joined!

At this same moment, it will also push a device configuration change to azure to configure the owner of the device. This will be your user by which you enrolled the device and not the defaultuser0 of course…

So resume: At the first login screen, an authentication buffer will be created to join Azure Ad. This buffer doesn’t like reboots as it is only valid for the deployment itself! So please, pretty please when your White glove screen presents you with a nice green screen, just seal it and don’t touch it anymore! Just send it to your employees
If you are interested in what could happen when you don’t listen to my advice, please visit this other blog about Autopilot and the lost Azure Ad Join
6. Tools Used
I want to finish off this blog by mentioning the tools I used to get a good understanding of what was happening during Autopilot for pre-provisioned deployments
1.WireShark to try to export the client certificates needed for the HTTPS decryption
2.MDMdiagnostics tools to export the needed event logs (User Device Registration, Moderndeployment-Diagnosticprovider/autopilot, AAD, Shell Core)
3.WPR tool to enable event tracing during autopilot and imported it in the Windows Performance Analyzer (I will create an additional blog for this one! As it needs some more explanation!)
And here it is… The blog about how to use the WPA to start some troubleshooting
https://call4cloud.nl/2021/11/theres-someone-inside-your-etl/
4.Sysmon with everything on exclude… so it will include everything
5.Fiddler:
Conclusions:
Looking back at an earlier blog… I guess I now know the reason why it just broke… after the green screen we sealed it… but powered it back on to make sure the device was totally up to date by running the windows updates from the first OOBE prompt. Something is 100% sure… the authentication “buffer” doesn’t like reboots!

The authentication buffer…. I am still intrigued by this one…
There must be some kind of buffer to ensure that when the device is powered on, you will be redirected to the company login page.
If you want to read more about TPM attestation, please check out my attestation series
Attestation and Compliance Series – Call4Cloud
Where does the first screenshot (with redmarked UnjoinDecvice) come from? What is that tool? 🙂
Hi,
that is the WPR tool. I will dedicate a blog to this coming week!
Ihrllo. Is the blogpost fot WPR avsilable somewhere? 🙂 weeks passed …:)
As added to the blog itself… but forgot to respond I guess 🙂 https://call4cloud.nl/2021/11/theres-someone-inside-your-etl/
This is handy information. I am working on this for my organization and encountering MDM enrollment failures due to the TPM chip and the URLS for ekop.intel.com/ekcertservice and *.microsoftaik.azure.net are blocked. Where in Azure can these URLS be added/whitelisted to get this working?
First of all thanks a lot for the huge workload put into this blog. Totally wonderfully to be able to tap your experience like this :).
Please allow me to describe an issue we have with Autopilot pre-provisioning (white glove) and perhaps it will ring a bell for you – as we’re currently out of ideas here.
We have an Autopilot profile, working as good as possible in user-driven mode. No issues here.
Same profile has also the pre-provision option enabled, and we’re now getting ready for depot model as well. But, no surprise here, Autopilot is acting up and the pre-provision process fails. More exactly, the user flow.
Our scenario:
– Hybrid-join
– Co-management
– Windows 11 21H2
– Wi-Fi connections only
What’s happening:
– the technician flow completes successfully, we get the green gratification screen and reseal the device
– on reboot, we get the OOBE once again, connect to Wi-Fi and VPN
– there is NO login screen – from OOBE goes straight to ESP
– and then we get stuck in Device setup, all items marked as Identifying
– behind the ESP other apps are being pushed by Intune
– the device is present in AAD as Joined
– the device is present in on-prem AD
Already checked the usual culprits and… nothing. Seems to be a small issue, but no idea where to go next. We raised a case with MS support, of course – but not very optimistic about it’s outcome.
Any ideas on where to/what for look next? I thought it will pick up your interest as this not the everyday, run of the mill type of issue :D.
Thanks a bunch :).
HI Marian, did you find a solution to this?
This matches our situation.
We have an Autopilot profile, working as good as possible in user-driven mode. No issues here.
Same profile has also the pre-provision option enabled, and we’re now getting ready for depot model as well. But, no surprise here, Autopilot is acting up
machine pop up with user id after pressing five times window button. process started
Device preparation:
Securing your hardware (Completed)
Joining your organization’s network (Completed)
Registering your device for mobile management (6, 0X80180014)
Troubleshoot above error code troubleshooting provided by Microsoft article, no luck
reset the computer, repeat the process again and its same. checked enrolment profile, MDM is enabled.
Any idea?
Feel free to contact me by teams so we can take a look at whats going on. (todo so i need the device management enterprise and the modern management and shell core event logs)