

In this blog, I will try to explain the Technical flow behind the Push Button Reset. I was intrigued to do so after writing my blog about the lingering user files in your Windows.Old folder. Hopefully, you could tell me what’s safer after reading this blog. Is it safer to perform a remote wipe on a BitLocker encrypted device when it gets stolen or just leave it be?
While performing multiple resets and gazing at the “Resetting this Pc” screen, I wondered what happens behind the curtains. So let’s find out!
1.Introduction
When searching for more information about this wonderful topic, I spend some time reading these MS Docs
Troubleshoot Windows 10 upgrade errors – Windows IT Pro – Windows Deployment | Microsoft Docs
Add extensibility scripts to push-button reset | Microsoft Docs
When looking at the last link above, you could have noticed a sort of technical flow in it, telling you what happens when performing a Push Button Reset (PBR)
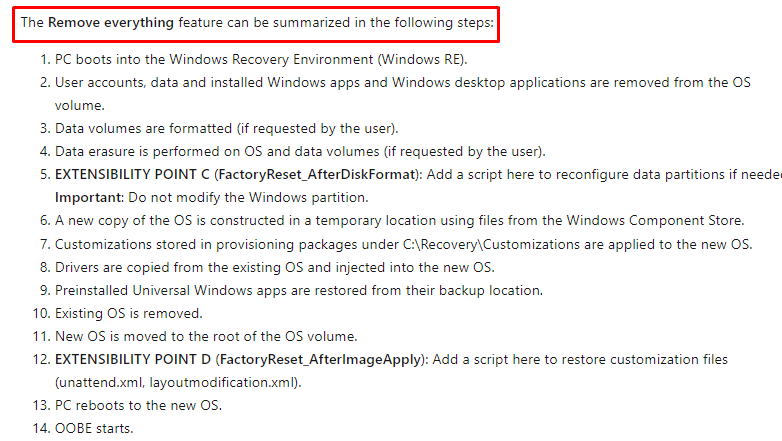
Looking at all of those steps above… “if requested by the user“… I am wondering how a remote wipe is handling those requests. So I was again intrigued to dig further

2. Where to find those events?
But how are we getting a better look at what’s happening? Because when performing a Remote Wipe it could be hard to log everything that was happening during the reset. Luckily when you have performed a remote wipe on a device, a nice hidden folder will be left on the device. When opening the $Sysreset folder in the root, you will stumble upon a folder with the name: Logs… I guess we know what’s in it!
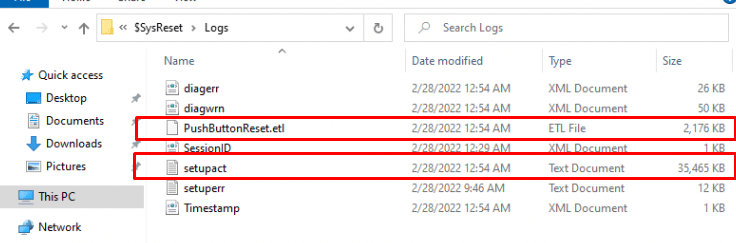
The file you are looking for is the SetupAct log. I will guide you through this log file and explain what’s happening on the device. In the same screenshot above, a nice ETL file is also in that same folder. You could use the WPA tool to check it out.
3. The five most important Phases
When trying to interpret that Setupact log file, you may notice there are 13 phases in total!
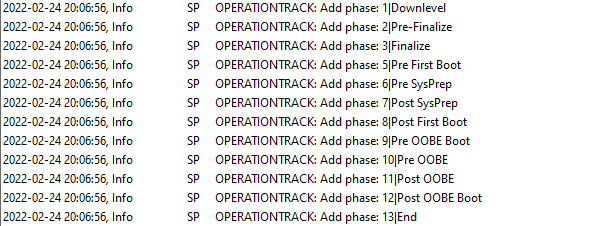
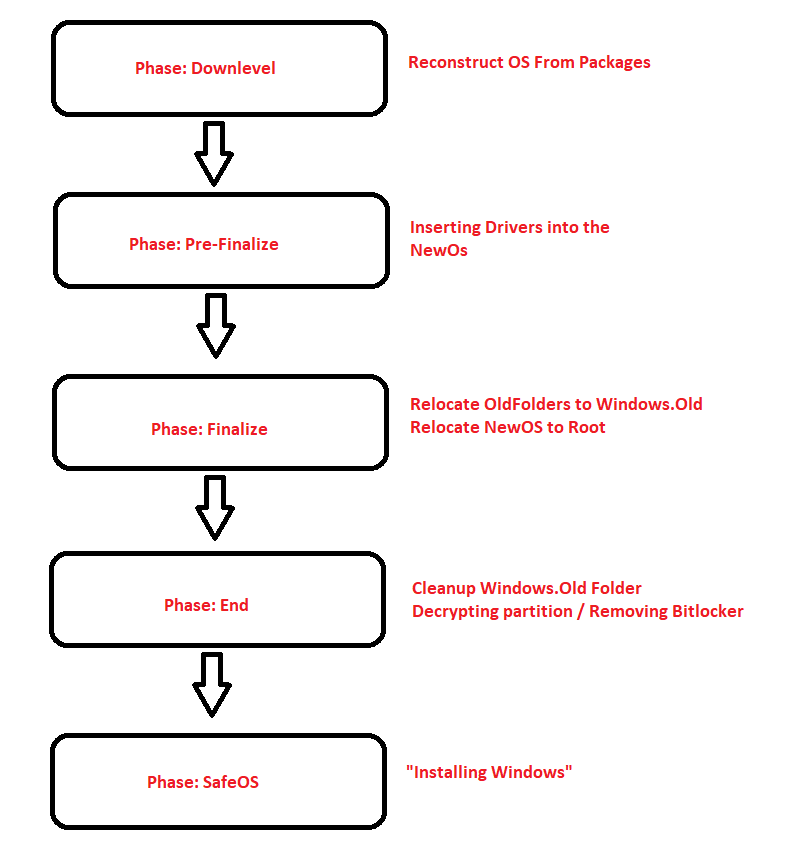
I will explain the five most Important Phases in it: Downlevel, Pre-Finalize, Finalize, End, and after a reboot, it will start with the SafeOS Phase. In this blog, I am only explaining the first four because I was just curious when the “wipe” would occur and when the Bitlocker protection was removed.
Of course, there is a lot more happening during these phases, but I chose to pick out the most important ones because I guess you are not interested in whether the pagefile is enabled.
4. What’s happening during those 4 phases
As told before, I am only showing you the background info for what’s happening during the “resetting this pc” screen.
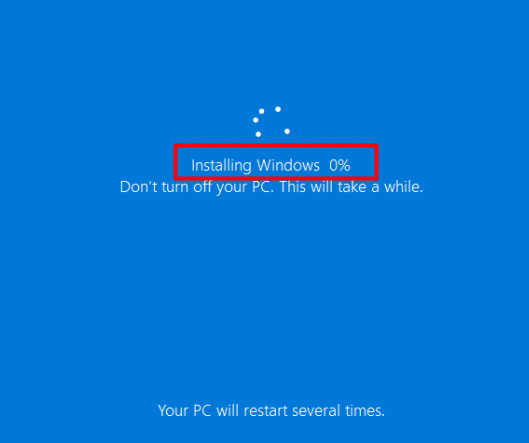
So, the SafeOS Phase isn’t going to be a part of it. After the device is done resetting the pc it will reboot and start the SafeOS phase aka Installing Windows phase
I could just throw the whole setupact.log in this blog and be done with it, but I am trying to keep it slightly light. I will divide this part into 4 subparts.
4.1 Down Level
This phase is all about reconstructing the NewOS, in my opinion. But before I show you what’s happening during this phase, let’s first examine Bitlocker’s action and some archiving operations.
Bitlocker
When the device reboots after receiving the Wipe command, it will keep BitLocker enabled because BitLocker trusts WinRE on the OS, so there is no need to suspend BitLocker on the OS.

Of course, I tried to stop the reset process at various times and stages to check out Bitlocker. Luckily, at each try, Bitlocker was still enabled, and I needed to enter my recovery key to unlock it—as it should be!
Archiving the OldOS
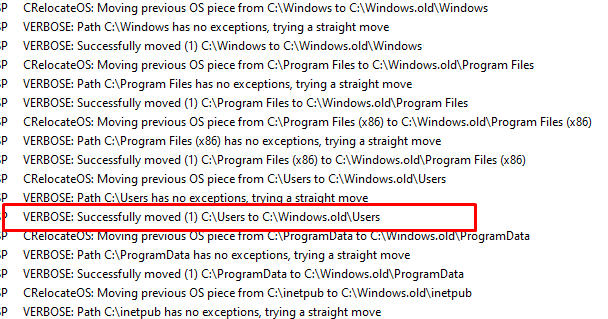
Now we are pretty sure Bitlocker is keeping our data safe, let’s find out what happens next. After the BitLocker check, all of the old (not necessary data) will be moved to the c:\$sysreset\OldOS folder. Of course, the most important folders are exceptions! As shown below they will NOT be moved at this moment.

NewOS
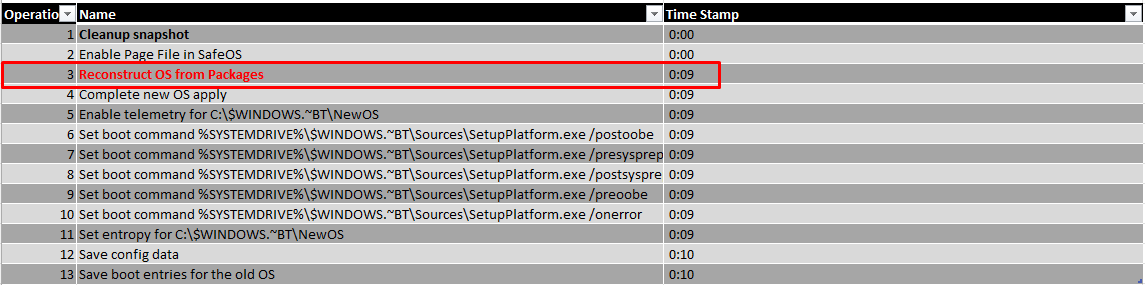
After the archive operation, a new copy of the Os is going to be constructed in a temporary location: c:\$windows.~BT\NewOs
Looking at this step, this reconstruction will take most of the time. With all of the tests, I have done this step took about 9 a 10 minutes.

As mentioned before, there are more operations that need to be executed in this phase, so let’s take a look at a brief summary of what else is happening.
4.2 Pre-Finalize
This small Driver phase is all about injecting some drivers into the NewOS

Looking at the timestamps, on my test devices, this process was done within a minute but then again, my test environments are mostly clean installed virtual machines.
4.3 Finalize
In this third phase, we will be moving some data back and forth. Looking at my last blog about the lingering user data, I was really intrigued with this phase!
Looking at all the steps in this phase, this is the part in which the data will be moved.

But before it will relocate OS from c:\$windows.~BT\NewOS to the root it will first “MOVE” the old data to the c:\Windows.old folder
I wiped a lot of VMs to exactly pinpoint the percentage when the move was going to happen.

At that exact time, after those folders were moved, I pressed the shutdown button to take a look at the contents of the Hard Disk itself. As shown below, just like I showed you above, all of the old folders are moved to the c:\windows.old folder!
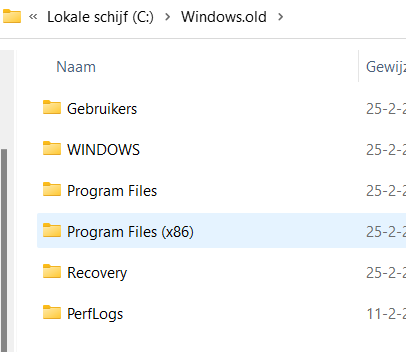
Again… moved… Not deleted! but moved!
“The Windows volume is never formatted, as the files needed to rebuild the OS are on it. Instead, user data files are deleted individually“
As stated here in the MS-Docs:
Please Note: Bitlocker is still enabled at this point! Leave Bitlocker, untouched!

After it moved all the old data to Windows.old folder it’s now time to move the nice newly constructed NewOS folder back to the root!

4.4 The End
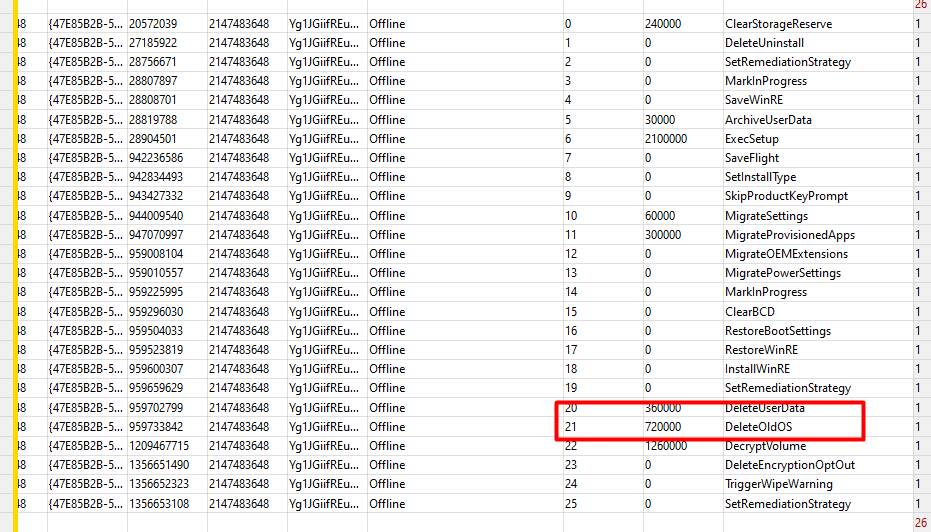
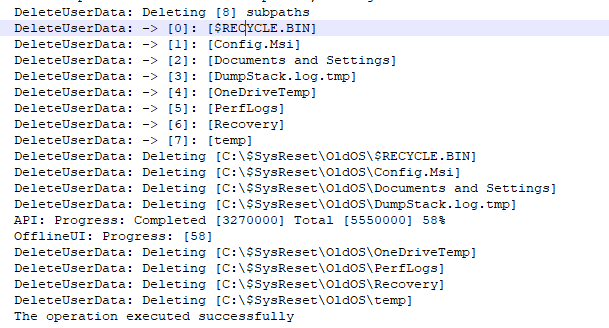
Almost done now, but we still need to do some cleanup before we can reboot the device to start the SafeOS Phase. Do you remember the not necessary data that was moved to the $sysreset\OldOs folder? We still need to remove it! As shown below, the DeleteUserData operation will ensure the OldOS folder is cleaned!
But we are not done yet because we also have some important stuff that needs to be deleted from the Windows.old folder when we have chosen not to retain the data!
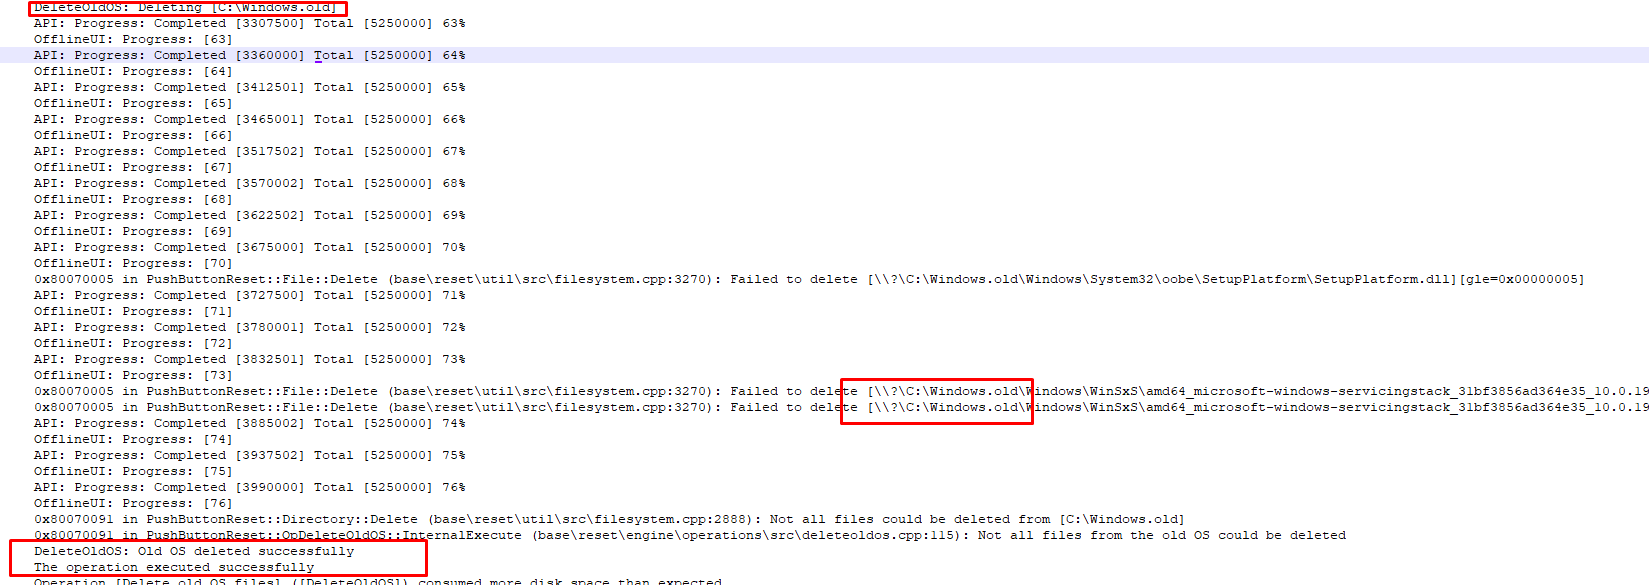
As shown below, the “DeleteOldOs” operation kicks in to “normally” remove all of the contents from the c:\windows.old folder!
Now everything is safe and cleaned, the disk decryption will start, and BitLocker is removed.
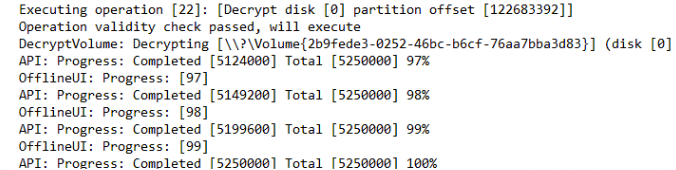
This final operation will occur at about 98% percent and will be complete at 100%

After the decryption is successful it will reboot the device and will start the SafeOS phase.
5.Something… Bad….Again?
As shown earlier… The data is not removed and the hard drive is not being wiped!! All of the data is just moved and just before the decryption kicks in, the data is deleted from that Windows.old folder.
After the decryption is completed, the device will reboot. So what happens when we shut down the VM just after it finishes the decryption operation? At that point, we can make sure the device isn’t going to install stuff and maybe overwrite our sensitive data. Let’s attach the virtual hard disk to a different device and start some recovery. It’s always nice to see these kinds of tools showing up in the Microsoft Store itself.

As shown above, I downloaded a nice simple command-line utility: Windows File Recovery. I guess we all know where to look? Maybe we need to look in the windows.old folder?
so I entered this command: Winfr e: c:\temp\temp /regular /n \windows.old\users\rudy\
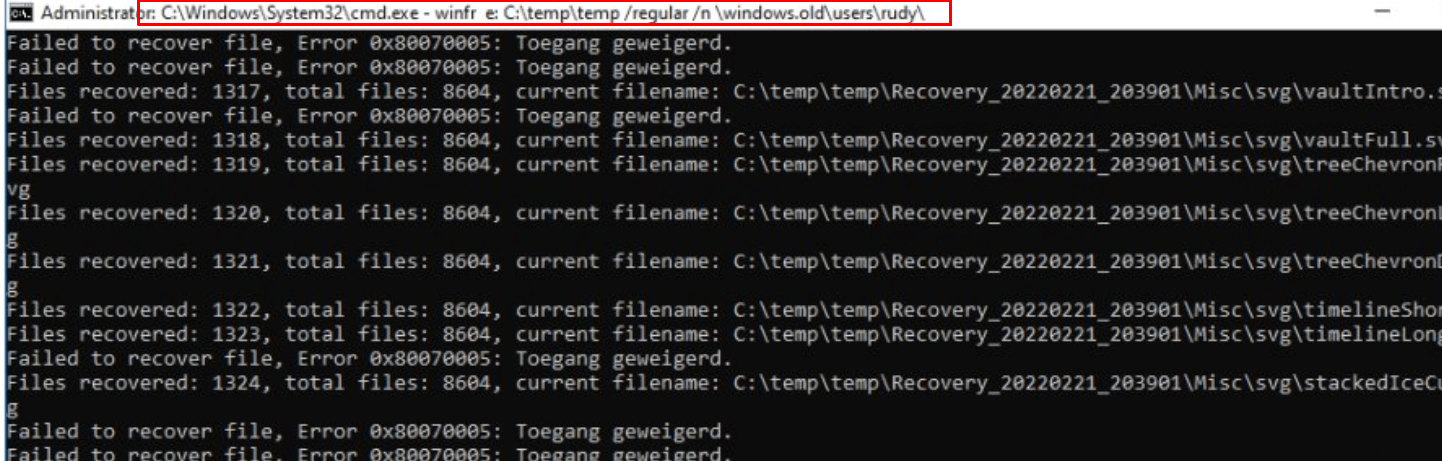
As shown below, the file recovery will start and will drop all of the files in the c:\temp\temp folder even with the old folder structure in it, and opening those files is no problem at all!
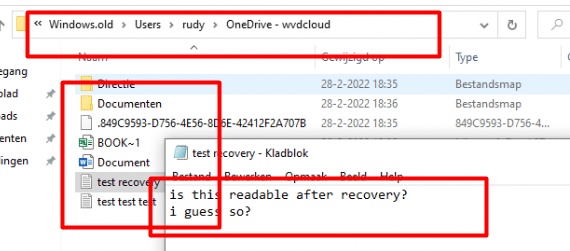
Please Note: I know I am not telling you something new here! I know perfectly well that a not totally zeroed hard disk will always have readable data. Maybe not all of the files are 100% readable but it still shows you the names and some information about them.
6. Looking at the official MS-Docs
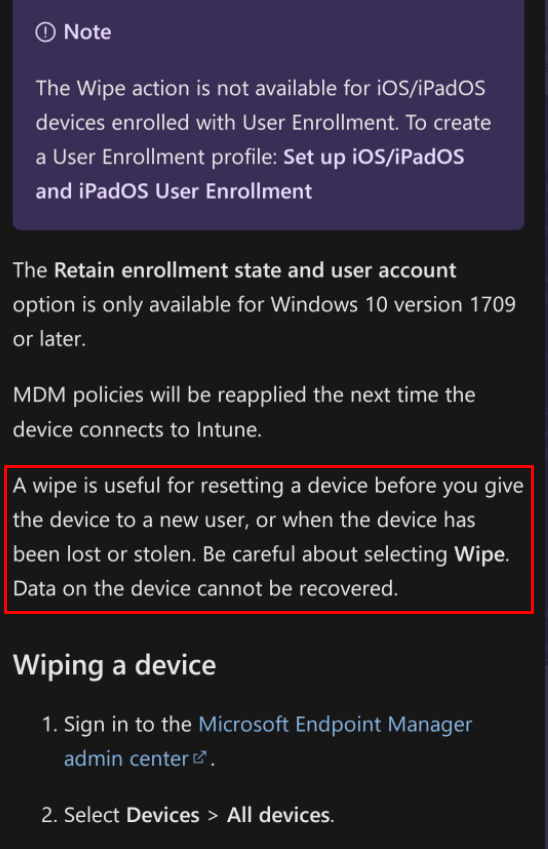
I went through almost all of the official Microsoft documentation and there is “almost” not a single line telling us this remote Wipe is going to be a secure wipe. Except for this one, in “my opinion”. These sentences below COULD be very confusing!
https://docs.microsoft.com/en-us/mem/intune/remote-actions/devices-wipe?id=5004252
It’s telling us two things here.
- A wipe is useful when you give the device to a new user or when the device has been lost or stolen. I guess they need to add an additional sentence: “Except when the device was previously encrypted with Bitlocker” In my opinion, it’s definitely way safer to keep the hard drive encrypted with Bitlocker than performing a remote wipe!
- Be careful about selecting wipe because the data on the device cannot be recovered. This sentence could sound like a secure wipe but that would just be a bad assumption! As I showed you earlier, the data on the device is recoverable! (easily recoverable in my opinion, but ey apparently I am an It pro?). Maybe Microsoft needs to change the sentence to “Data on the device cannot easily be recovered” but then again that doesn’t sound quite safe :). When adding the word “easily” Microsoft could give the expectation that everyone could recover the data within a few seconds and I guess that’s also not true.
Conclusions:
Hopefully, this blog will show you the phases the Remote Wipe process goes through. I guess I need to finish it off with the main conclusions:
- Whatever you do, don’t wipe your device when it gets stolen when BitLocker is configured on it (even when the MS-Docs advise against it!). In my opinion, a hard disk encrypted with BitLocker is way more secure!
- I know the word “wipe” could bring up some confusion or misconception but it just “wipes” some of the data and nothing more… A better word would be: “Resetting”… ow wait.. that sounds familiar right?

3. I know… I know it’s easy to comment on the MS documents. Every word in them could easily be misinterpreted, and I guess the document I showed you above is a great example!
4. If you want to ensure that your hard drive is securely wiped, you need to take another path!

Thanks for your detailed description, really helpful for understanding what’s going on under the hood.
In your conclusion you say “If you want to make sure your hard drive is securely wiped, you need to go down another path!”. How does this path looks? It is not the Intune path alone, is it?
Best wishes from Germany!
That Path isn’t intune….. but I am working on a wipe script myself…. using the same technique but just a little bit different… To make sure when the device is stolen and it receives the wipe…it will be cleaned good
Hi Rudy, today is 3/28/2024 and I have just tested this procedure myself. I am thinking Microsoft may have updated the procedure that is taking place after a wipe for a Bitlocker-encypted device. I was unable to recover any data from Windows.old in two tests. The second of which, the user profile contained 180 GB of sample data to ensure if there was any recoverable data that I would find it.
Well thats good to hear 🙂 … they finally fixed it.. 🙂 thanks for the headsup