This blog will show you how to “Kickstart” your Declared Configuration enrollment on your own turf when the EPM agent is not being deployed even though you have met all the requirements!
1. Introduction
I was pretty amazed when I first looked at EPM and how it triggered a Silent *MMP-C / Declared Configuration enrollment using the AAD device token. If you haven’t read that blog, please do!
*Microsoft Managed Platform – Cloud or is it Microsoft Management Platform – Cloud?
While writing that blog, I also noticed some EPM Enrollment issues mentioned in the tech community.
Those enrollment issues were being caused by not having all the Windows Client requirements met.

If you don’t have an up-to-date device, you can forget about deploying EPM to your device. When looking at some other enrollment issues, were caused by errors with the Device Health Monitoring Policy (Send Elevation Data for Reporting)

If this policy fails to deploy, you will receive an error code 2147749902 and a message mentioning “Allow Device Health Monitoring.” When you spot this error, you can be sure the EPM agent is not installed!

As shown above, it only shows the same error code, nothing more! Microsoft’s advice, for now, is to change the “Send Elevation data for reporting” to NO?

When taking a closer look at the device, you could notice that the device management event log mentions the fact that it couldn’t find the file.

Somehow on those devices, the DeviceHealthMonitoring registry keys were all missing in action. The device should have this key in a normal working situation as shown below.

If those keys are missing, you are up for a challenge! Let me help you a bit!
2. KickStart the Declared Configuration Enrollment on your own!
Kickstarting the EPM / Declared Configuraton enrollment on your own would bypass the requirements. The only requirement is that you have a device with the October update installed. The Declared Configuration Service (DCSVC) needs to be active on the device! So, let’s move on to kickstarting the MMPC / Linked enrollment on your own because it is supposed to be fun!

After ensuring the device was enrolled with Intune and the initial sync was done, I opened a PowerShell session and elevated myself to “SYSTEM” using the psexec tool.
Once elevated, I first installed the localmdm powershell module
Install-PackageProvider -Name NuGet -Force
Install-Module -Name localmdm -Force -SkipPublisherCheck

Once I installed that beautiful tool from some stranger called Niehaus, I created the same CSP I got from another great tool! The syncml tool!

With the <syncbody> in good shape, I opened a new PowerShell session, but this time with the -MTA parameters.

Before we continue, we also need to make sure we are going to target the existing Intune enrollment type and not the local_management enrollment. Otherwise the localmdm enrollment will get a linkedenrollment!
To do so, we need, we first need to change the current local_management enrollmenttype 14 to something that is not in use (so for example, 114)

After ensuring enrollment type 14 is no longer in use, we can alter the Intune enrollment type to match the local_management enrollment.
As shown below, I am going to change the enrollmenttype 6, to 14


After the enrollmenttype has been changed, we can fire off the PowerShell script. Within the MTA PowerShell session, I copy/pasted the sync body and fired off the send-request
$test1 = @"
<SyncBody>
	<Exec>
      <CmdID>12</CmdID>
      <Item>
        <Target>
          <LocURI>./Vendor/MSFT/DMClient/Provider/MS%20DM%20Server/LinkedEnrollment/Enroll</LocURI>
        </Target>
      </Item>
    </Exec>
</SyncBody>
"@

send-localmdmrequest -SyncML $test1
After firing off the PowerShell command, you will need to get back the status:200

When kicking off the localmdm PowerShell command, the scheduled task to enroll the device into MMP-C will be created! With the status 200, we need to ensure that we are switching back the enrollment type to how it was previously configured; otherwise, you will end up in a world of pain and enrollment errors!

Within a few minutes, the device got enrolled into MMPC, got the Intune Enrollment linked to the Privilege Manager, and got the EPM agent installed.

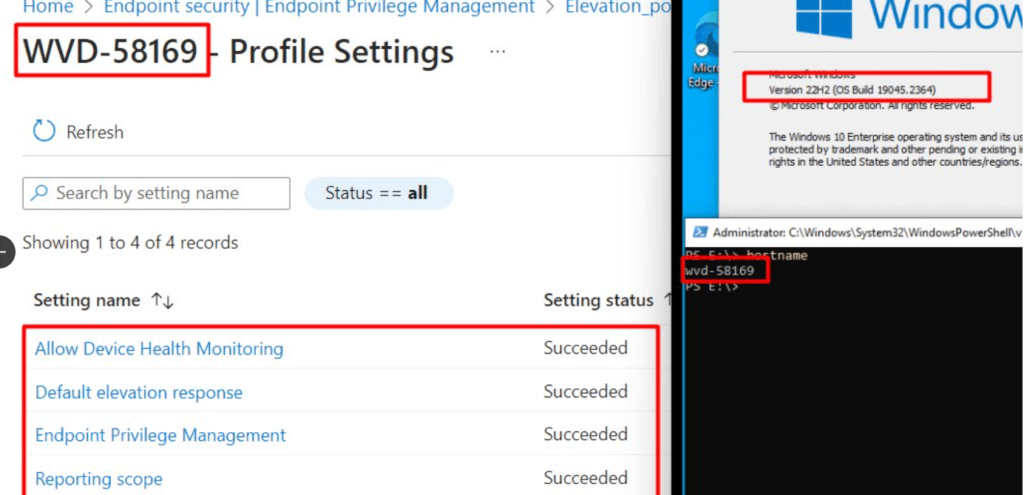
I was wondering if Intune had the same feeling. So I opened the Intune portal and looked up the device, only to notice every required setting was marked as “succeeded”

Conclusion
Knowing how to trigger stuff on your turf can be very useful if you want to spot every single detail. Besides getting to know the details a bit faster, you can also use it to trigger it on your own if, for some reason, the EPM deployment doesn’t work.


