


In this blog, I will dive deep into the Endpoint Privilege Management feature “Support Approved” once more. I will show you how Support Approved works from the inside and outside.
1. Introduction
You might ask me a question… Rudy, correct me if I am wrong, but don’t you already have a blog about this EPM Support Approved feature?
Yep, you are correct… I already wrote a blog about this awesome feature some time ago
EPM | Support Approved | Intune | Flighting | Feature (call4cloud.nl)
In the above blog, I was curious if I could manually enable the Support Approved feature on the client itself without enabling it for my Microsoft tenant.

I did so by manually altering a lot of stuff and permissions. It is not advised to do so in production (maybe you can call it even a bit stupid.. or doing a “Rudy”), but it got me to the part where the Support Approved/Support Arbitrated feature was enabled on my client’s device.

I learned a lot by doing so, and it gave me some good insights before this Support Approved Feature was officially released. Looking back at that blog, it could give you some false information about how it is supposed to work. (as I did a lot of Rudy stuff)
So, I am going to take another look at Support Approved. This time, the EPM feature is publicly available, and my tenant is finally flighted for this cool new feature.
Besides me writing about this great EPM feature, you will also need to check out the blog of Joost Gelijsteen!
2. The Outside
Before going all in, we need to start with an overview of EPM Support Approved. I will walk you through all of the steps it will take to elevate an app. From there on, I will show you what happens when the request is approved.
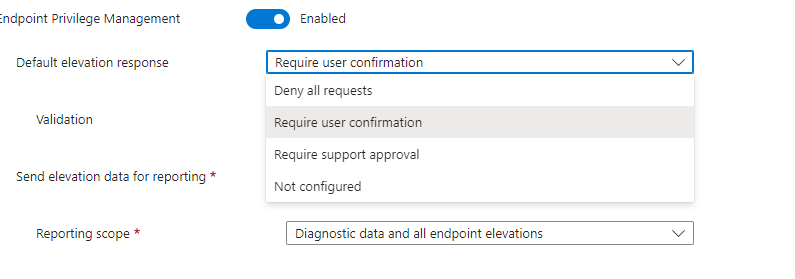
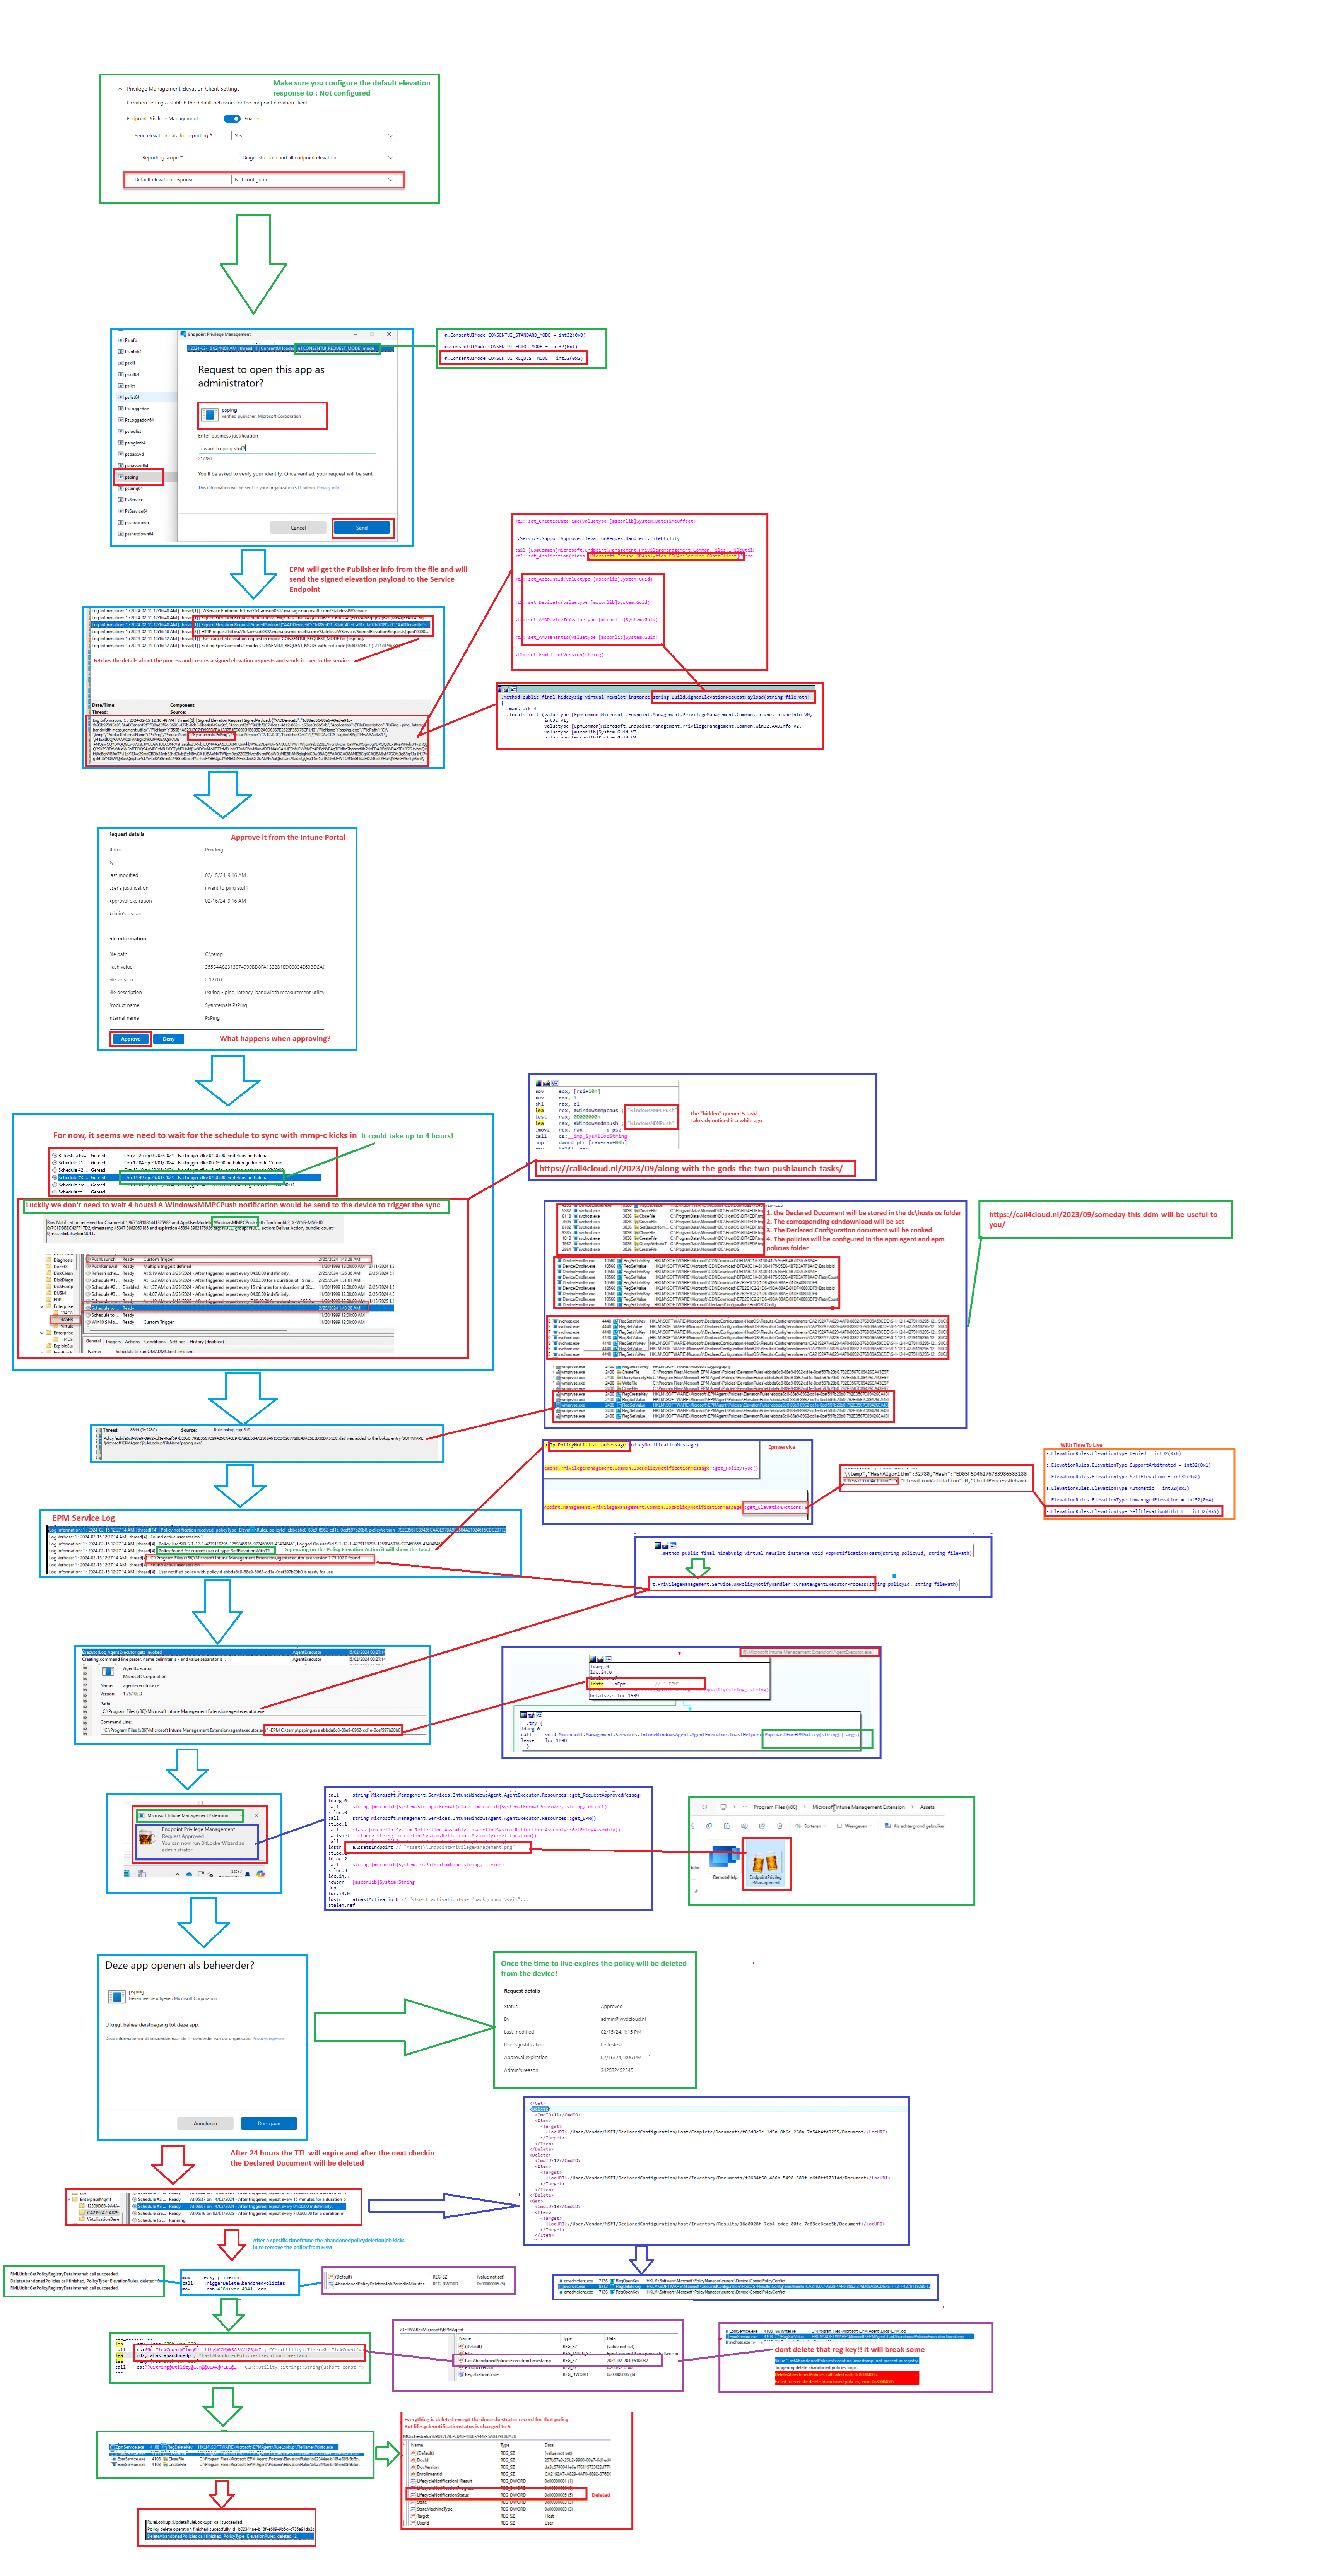
Before we got Support Approval, it was best practice to configure the Default Elevation Response in the EPM policy to Deny All Requests to ensure that all requests would be denied if a valid elevation rule wasn’t configured.

When we want to start using Support Approved, we need to make sure that we change that default elevation response to: “Require Support Approval”
Once we configured the EPM Elevation Settings policy and our tenant is also flighted for this EPM feature, we could start elevating the App
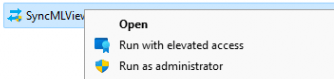
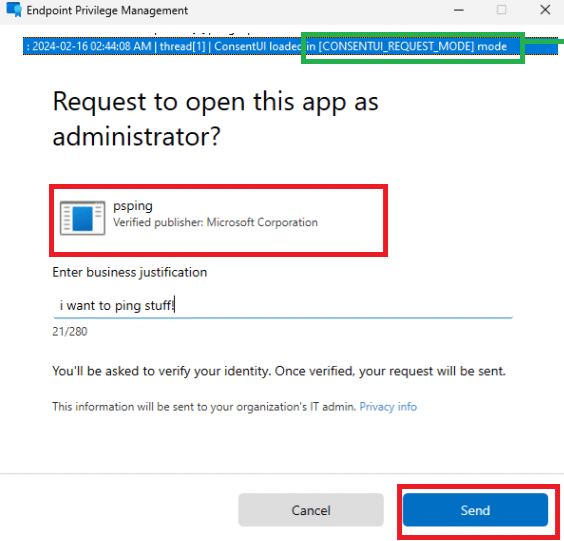
As shown above, without doing anything else, we need to click on the app and select: “Run With Elevated Access.” After we click on it, the Consent Request Mode UI pops up and asks for a business justification.
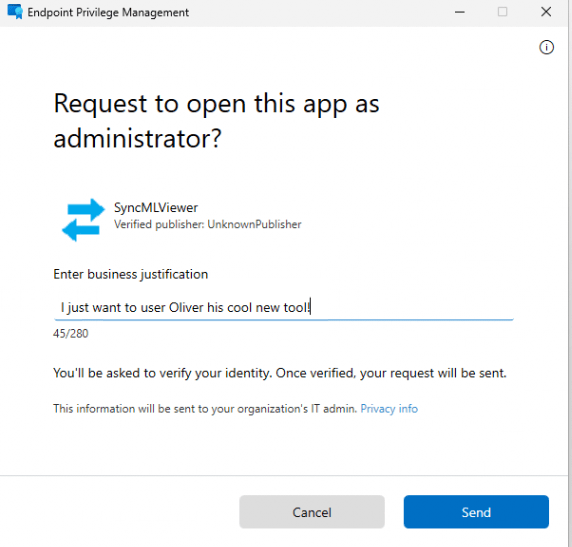
In this example, I will request Oliver’s wonderful SyncML tool. Once I enter the Business justification, I need to click on the send button.
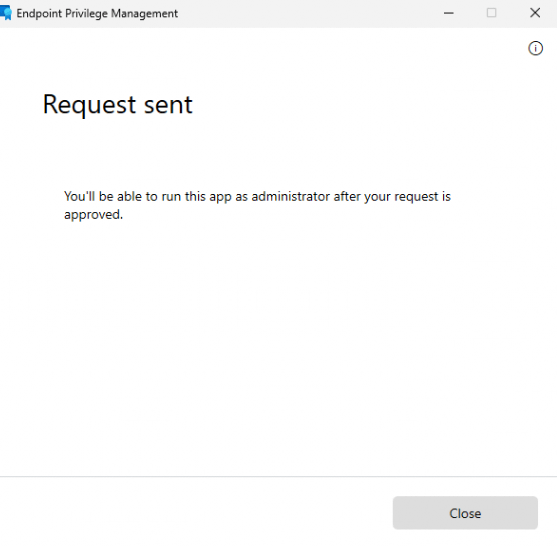
If we press send, an excellent notification will be shown and will notify us of the fact that the request is sent over to the service. With the support request sent to the service, we need to open Intune and select the “Elevation Requests” tab.
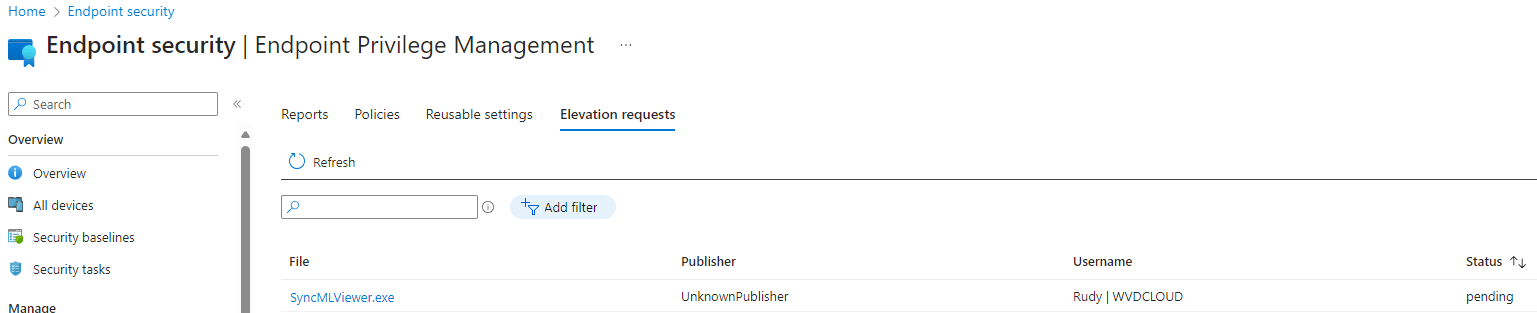
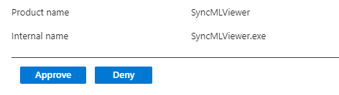
We will notice that the elevation requests contain all of the requests you can manually approve. In this example, I am going to approve the SyncmlViewer. Once we click on it, we will get additional information about the process.
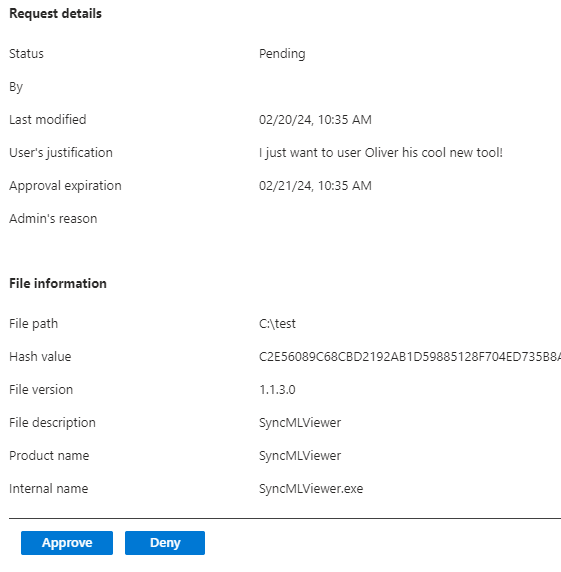
Besides some more information and the hash, we could also approve or deny the request. For now, let’s just “Approve” the application request.
Please Note: If you deny the request, NO temporary declared EPM policy will be created. If there is no policy, there is nothing to be sent over to the device. If there is nothing to be sent to the device, the agentexecutor doesn’t show a toast notification
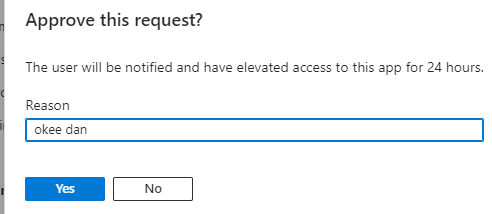
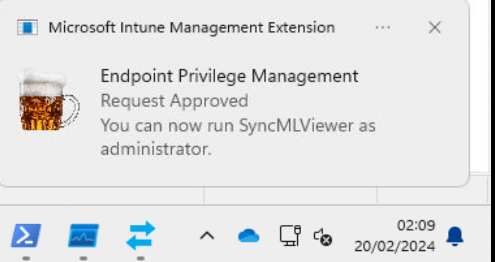
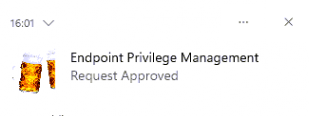
After specifying the reason for approval, we are pretty much done in Intune and need to switch to the device. Once the request is approved and the device successfully synced with the “service“, we will get a nice toast notification that mentions that the request is approved.
After the wonderful beer notification is been shown, we can now execute the Syncmlviewer as the virtual account administrator.
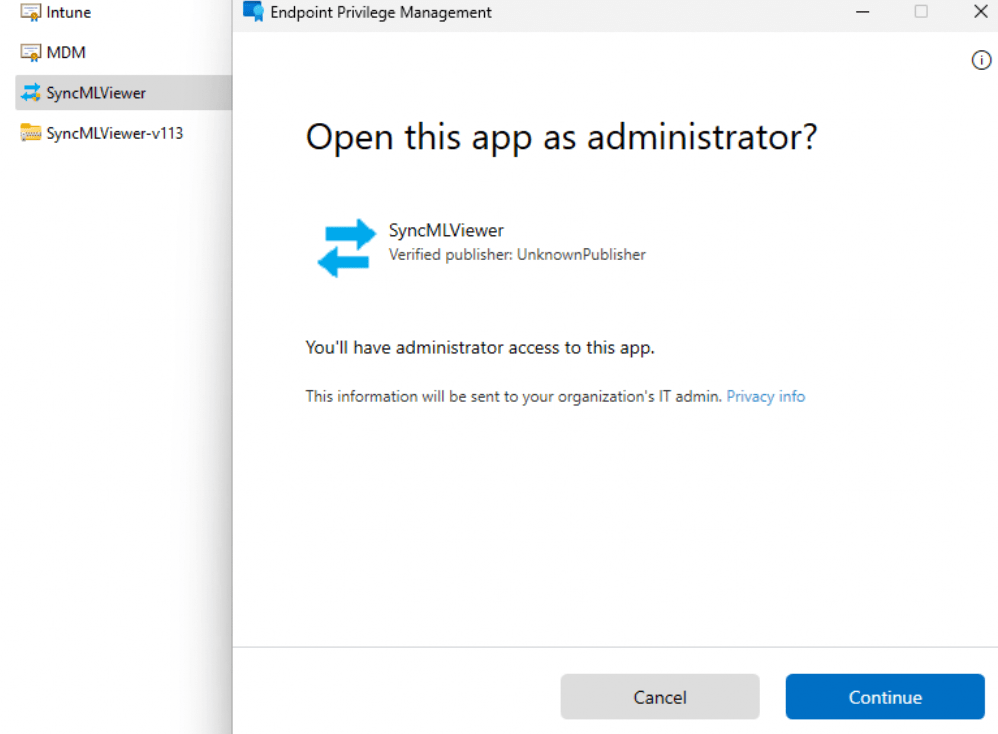
Wonderful, right? With just a few clicks, we can now approve an app request that the user sent over. Let me step up the game a bit and take a closer look at what’s happening on the inside.
3. The Support Approved Inside
Now we have seen some nice pictures of how we could request a new app with the Support Approved feature, let’s dive in. This time I am requesting psping to be approved.
As shown below, when the Support Approved feature kicks in, we will notice that the Consent UI will start the Request Mode
Of course, BEFORE even showing us the Consent UI screen it will need to determine if it already has a valid elevation rule for the requested process.


Once it determines the fact that there is NOT an existing elevation rule for it, it switches back to the default elevation setting and tries to find out if the Support Approved Feature is enabled

Once EPM finished detecting if this Support Approved feature is enabled, EPM will initiate the support request feature.

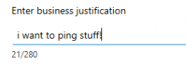
This function in the EPM Consent UI will start asking for the Submitter’s Justification

This submitter’s justification corresponds with the screen I have shown you earlier. “I just want to ping stuff”
The moment we press send, it will create a signed elevation request signature and SignedPayload

To do so the EPM ConsentUI function will reach out to an external function in a second DLL (EPMApiService.OdataClient.dll)

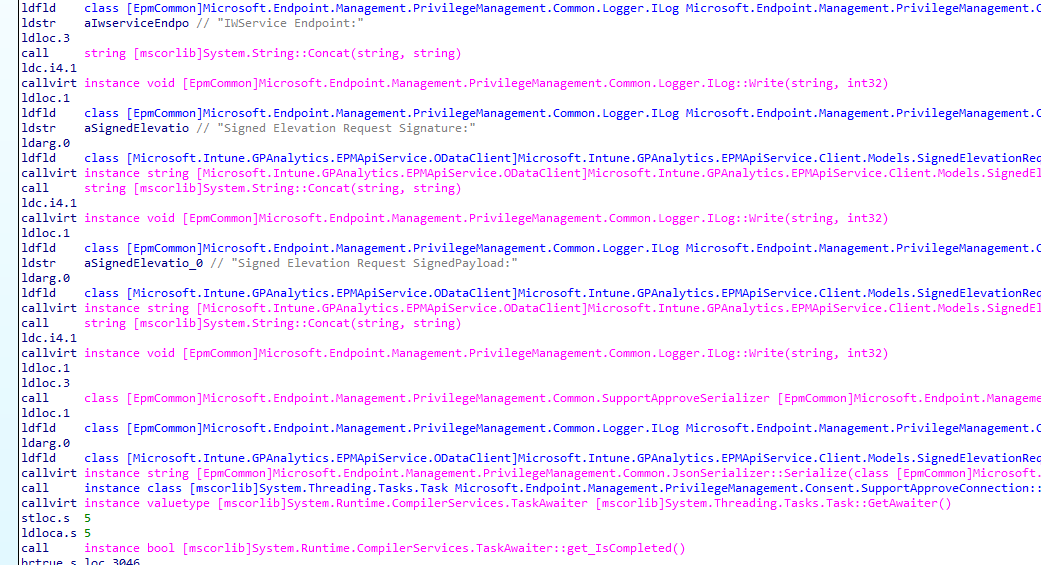
We will notice that it will send over the Signed Elevation Request Payload that contains all the details about the requested application to the WService Endpoint: fef.amsub302.manage.microsoft.com/StatelessIWService

The signed elevation request is immediately sent over to the Service Endpoint, once we press send.

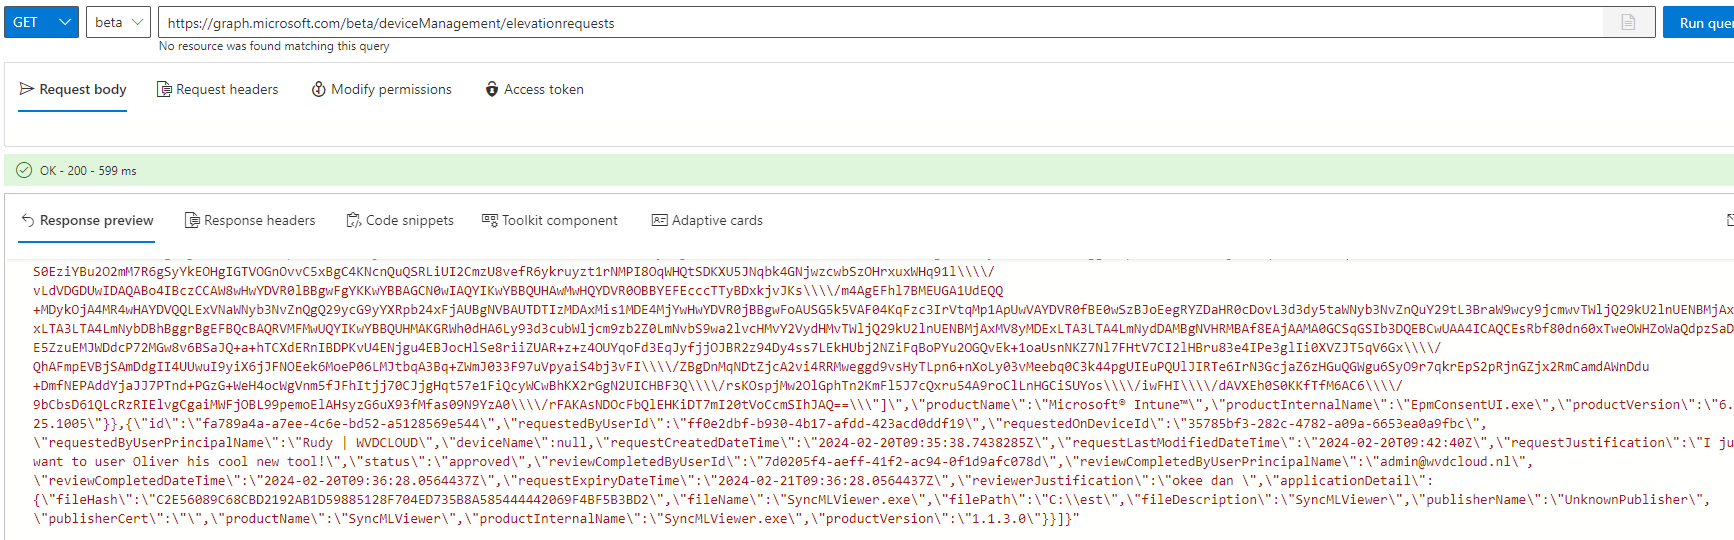
Once the elevation request is sent over, we could also use the graph explorer to check out the elevation request itself (at the bottom)
From there on we have the option to approve the request in Intune.
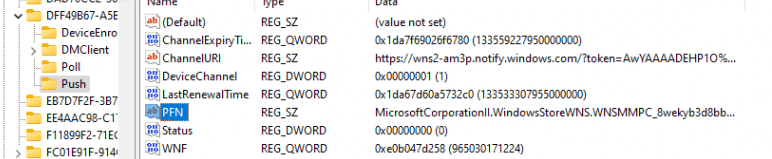
Once we click on approve, the service will reach out to the device in a couple of minutes by sending out a WNS push notification through the MMP-C channel. (Almost The same way DeviceQuery reaches out to the device, except the MMP-C part)

This WNS Push Notification will be picked up by the Windows MMPC Push App, which we can spot in the MMP-C Enrollment.
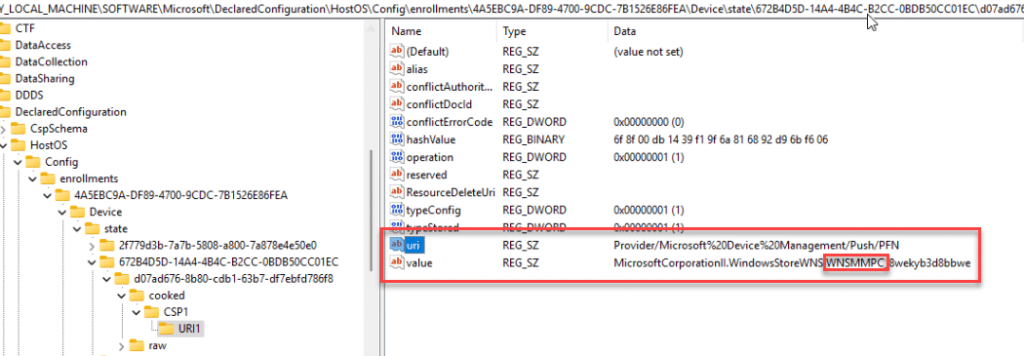
If we take a closer look, we will also spot the declared configuration document that was delivered to our device to enable Windows MMPC Push functionality. This “declared document” triggers the configuration of the MMP-C WNS push app.
The moment the WNS Push is received, the PushLaunch task will queue another scheduled task, that will kick off the sync with the MMP-C (Declared Configuration) service by launching the omadmclient MMP-C scheduled task.

The device would reach out to the MMP-C service to find the latest Declared Documents. If you want to hear more about how this works, I advise you to read all of my Windows Declared Configuration Blogs.
MMP-C | Declared Configuration Service | dcsvc.dll | EPM (call4cloud.nl)
Once the device receives the payload with the new declared configuration documents (Epm temporary elevation rule) in it, EPM will receive the policy to start showing the notification. It will process the policy and if the elevationaction is 5 (SelfElevationwithTTL), a toast notification needs to be shown.


To do so, it needs to reach out to the Agentexecutor (Which is part of the Intune Management Extension)

As shown below, It will kick start the agentexecutor.exe with the -EPM parameter

This will give the IME agentexecutor the proper information to pop a toast message for the EPM Policy

If we take a closer look at this toast notification, we will notice that it also tries to find a nice PNG file in the IME Assets folder
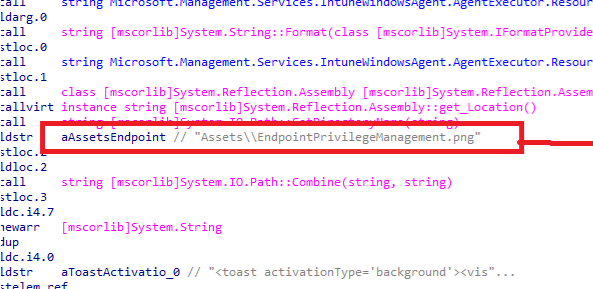
With this PNG being placed in the Microsoft Intune Management Extension\Assets folder, the toast notification will be shown once the declared configuration document is successfully stored on the device
4. The Policy Removal
With the notification being popped up and the application ready for elevation, we still need to take a look at what happens after 24 hours(time to live) and the application is expired.
The moment, the declared configuration document (Syncml approval request) is getting expired at the service side, the service would reach out to the device and would ask the device to check in again.
Once the device checks in, the same way as we noticed with the policy arrival (MMP-C Push Task triggers the Checkin), the device would sync with the MMP-C service. This time the policy is not getting added but deleted.
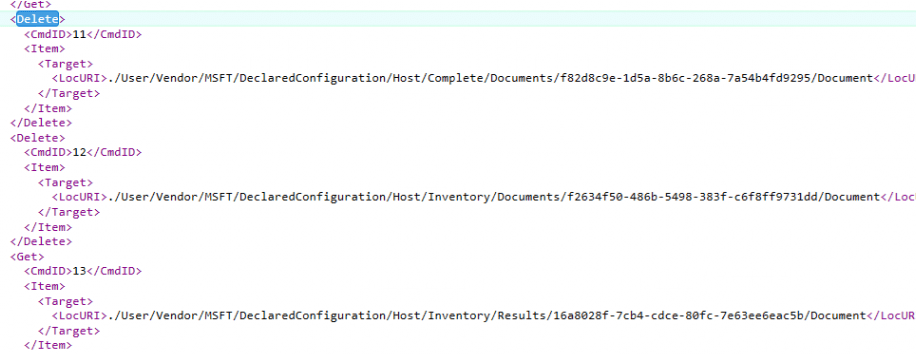
This SyncML message would trigger the deletion of the corresponding declared configuration document in the registry.

Once the declared configuration document is deleted an additional thread pool (that runs in the background) will be launched after a specific time frame. This timeframe could also be configured with a specific registry key if you don’t want to wait a bit longer.(don’t do that in prod… )

The deletion job kicks will trigger the deletion of the abandoned policies.

This EPM function would compare the declared documents with its policies. If there is a difference between them, the EPMService will clear out the abandoned policies in the registry and on the disk

Once the expired elevation rule is deleted, the thread pool call is finished, and we can no longer elevate the app.

5. The Support Approved EPM Flow
As always, the mspaint flow I always create to get the Endpoint Privilege Management Support Approved flow working
6. Troubleshooting “The WNSMMPC”
While playing around with Support Approved, I noticed that all my newly enrolled devices behaved the way they should, but one of my previously enrolled devices was misbehaving.
I stumbled upon the fact that when I approved a request in the Intune portal, it took a very long time for the app to be approved on the device. The app was only allowed when manually syncing or waiting until the 4-hour sync schedule kicked in.
The task responsible for triggering the sync (when the push notification is received) with the service is the PushLaunch task. The PushLaunch task below would create the queued task with a delay of 5 minutes.

Guess what was missing from my device?
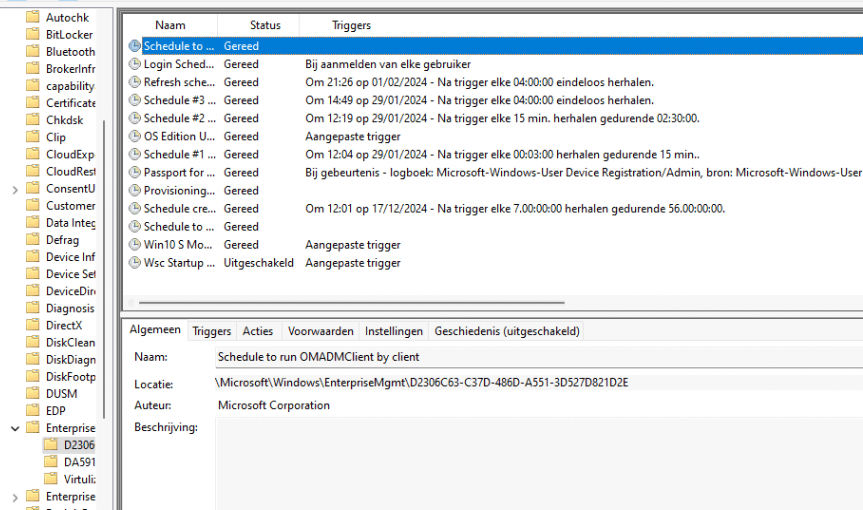
As shown above, the PushLaunch task dedicated to the MMP-C Enrollment was missing and nowhere to be found. Luckily I knew where to start looking and decided to take a look at the DMClient CSP documentation. As shown below, they mention the fact that you could register a device for Push Notifications by deploying a CSP.
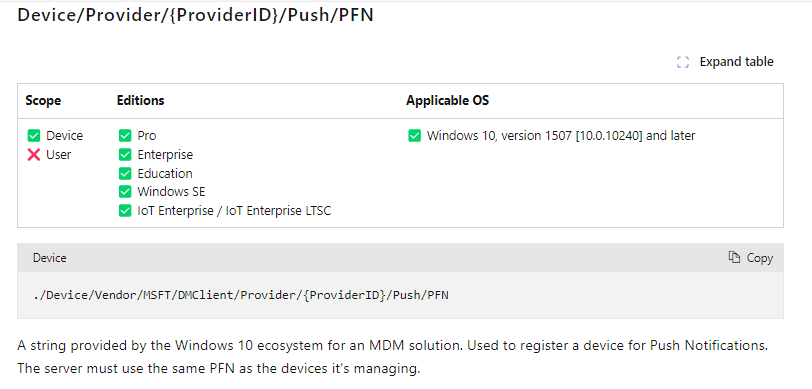
Now comes the hard part because deploying this setting with a CSP from Intune will target the wrong enrollment (Enrollmenttype 6), and besides, it will target the wrong enrollment. I am also still not 100% sure what the configured settings should be.
So, first off I made sure I checked out the Push/PFN setting on a working device. After firing off the localmdm command, it showed me the same Product Family Name (PFN), I noticed in the Declared Configuration Document:
MicrosoftCorporationII.WindowsStoreWNS.WNSMMPC_8wekyb3d8bbwe

With this information, things became a bit easier. I created a new SyncBody with the same information in it and fired off the command after temporarily changing the EnrollmentType from the MMP-C Enrollment to 14 (To match the localmdm one)
$test1 = @"
<SyncBody>
	<Add>
      <CmdID>12</CmdID>
      <Item>
        <Target>
          <LocURI>./Device/Vendor/MSFT/DMClient/Provider/Microsoft%20Device%20Management/Push/PFN</LocURI>
        </Target>
<Data>MicrosoftCorporationII.WindowsStoreWNS.WNSMMPC_8wekyb3d8bbwe</Data>
      </Item>
    </Add>
</SyncBody>
"@


send-localmdmrequest -SyncML $test1
This is what happened on my device! Within a second or 2, the missing PushLaunch task arrived on my device and the device seems to have registered itself to the PFN service to receive the MMP-C push notifications.
Once the device was registered to receive Push Notifications, the app was approved within like 10 minutes (with the 5 delay from the queued schedule in it)
Conclusion
The EPM Support Approved function could help out customers who need some self-elevation. I can’t wait to see more additions and improvements to this feature.