This blog will be about automating your Conditional Access Rules with Powershell and some troubleshooting withe the new-AzureADMSCAPolicy command
Last week I published an overview of the best Conditional Access policies for the SMB. It can come in handy when deploying conditional access to your customers. Hopefully, you don’t make any mistakes when configuring the policies. Like “oops” I just locked myself out of the Tenant.
So why not create a baseline, you can simply import in your tenant? I have seen a lot of scripts that can do the same. You have to create an App in your tenant with some permissions. After the app has been created you have to change the ID (from the app) in the deployment script.
No, no, no sir… I like to have my conditional access “to go”
UPDATE 03-06-2021

Instead of using invoke restmethod with Powershell you could also use New-AzureADMSConditionalAccessPolicy. Of course, I will show you both options.

UPDATE 23-11-2021

I needed to also add the posibility to deploy conditional access with a click of a button
So I am going to divide this blog into multiple Parts:
1.Using New-AzureADMSConditionalAccessPolicy
With the connect-azuread module from July 2020 it’s possible to use the new-azureadmsconditionalaccesspolicy to create new Conditional Access rules.
PowerShell Gallery | AzureAD 2.0.2.104

Manually creating new rules can be a little bit hard…
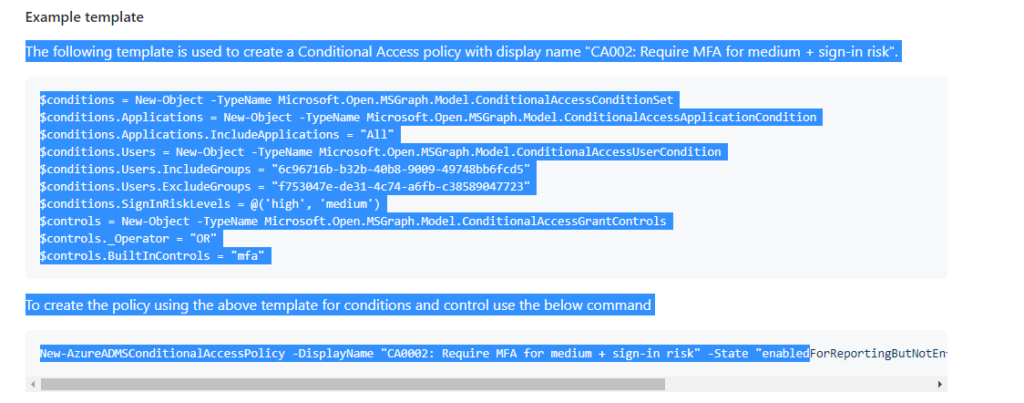
New-AzureADMSConditionalAccessPolicy -DisplayName “CA0002: Require MFA for medium + sign-in risk” -State “enabledForReportingButNotEnforced” -Conditions $conditions -GrantControls $controls
As shown above, you will need to specify the conditions and controls. Maybe exporting your current configuration is a way better option so you don’t need to spend your valuable time manually creating them.

Backup Script
Connect-AzureAD

$AllPolicies = Get-AzureADMSConditionalAccessPolicy

foreach ($Policy in $AllPolicies) {
    Write-Output "Backing up $($Policy.DisplayName)"
    $PolicyJSON = $Policy | ConvertTo-Json -Depth 6
    $PolicyJSON | Out-File "c:\carules\$($Policy.Id).json"
}
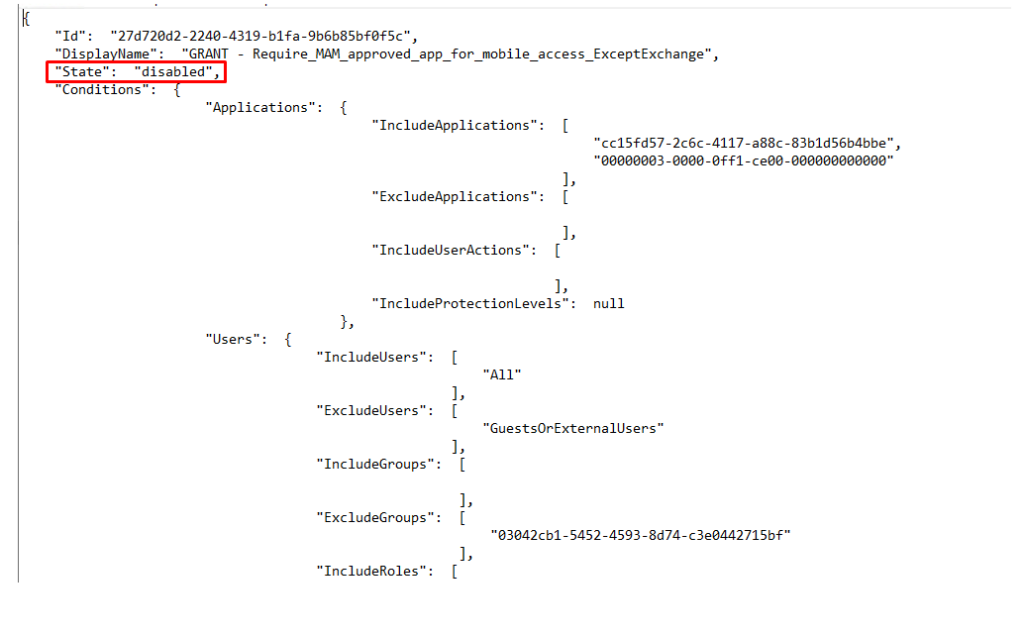
Running this script will export all existing policies into separate JSON files with the config in them. Let’s take a look at how the JSON looks like:

When you have your baseline configured (please make sure the state is configured to disabled!) you can import it to another tenant with this PowerShell script
Restore Script
Connect-AzureAD

$BackupJsons = Get-ChildItem C:\install\CA -Recurse -Include *.json
foreach ($Json in $BackupJsons) {

    $policy = Get-Content $Json.FullName | ConvertFrom-Json
    $policy.DisplayName

    # Create objects for the conditions and GrantControls
    [Microsoft.Open.MSGraph.Model.ConditionalAccessConditionSet]$Conditions = $Policy.Conditions
    [Microsoft.Open.MSGraph.Model.ConditionalAccessGrantControls]$GrantControls = $Policy.GrantControls
    [Microsoft.Open.MSGraph.Model.ConditionalAccessSessionControls]$SessionControls = $Policy.SessionControls

    # Create an object for the users.
    # By going through the members we only add properties that are not null
    $OldUsers = $Policy.Conditions.Users
    $UserMembers = $OldUsers | Get-Member -MemberType NoteProperty
    $Users = New-Object Microsoft.Open.MSGraph.Model.ConditionalAccessUserCondition
    foreach ($member in $UserMembers) {
        if (-not[string]::IsNullOrEmpty($OldUsers.$($member.Name))) {
            $Users.($member.Name) = ($OldUsers.$($member.Name))
        }
    }
    $Conditions.Users = $Users

    # Do the same thing for the applications
    $OldApplications = $Policy.Conditions.Applications
    $ApplicationMembers = $OldApplications | Get-Member -MemberType NoteProperty
    $Applications = New-Object Microsoft.Open.MSGraph.Model.ConditionalAccessApplicationCondition
    foreach ($member in $ApplicationMembers) {
        if (-not[string]::IsNullOrEmpty($OldApplications.$($member.Name))) {
            $Applications.($member.Name) = ($OldApplications.$($member.Name))
        }
    }
    $Conditions.Applications = $Applications
    $NewDisplayName = $Prefix + $Policy.DisplayName
    $Parameters = @{
        DisplayName     = $NewDisplayName
        State           = $policy.State
        Conditions      = $Conditions
        GrantControls   = $GrantControls
        SessionControls = $SessionControls
    }

   $null = New-AzureADMSConditionalAccessPolicy @Parameters
}
2.Troubleshooting the restore script
But unfortunately, some Conditional access policies can’t be imported? So here comes the troubleshooting part. The first error.

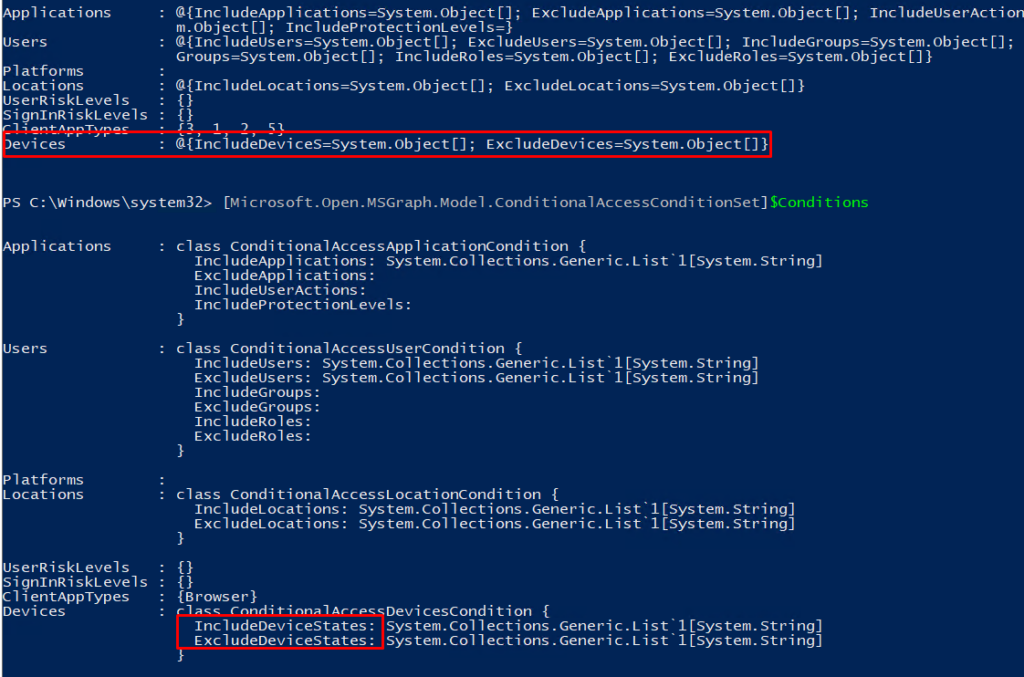
After checking the JSON file which was exported I noticed the values were missing to include or exclude devicestates.

So I entered them manually and opened Fiddler to take a good look at what Microsoft has to say about the JSON now.


Okay? Another error I tried to google it, but nothing useful was found. Except for this “opened issue”

after digging into the restore script I noticed the ConditionalAccessConditionset has the wrong device conditions configured

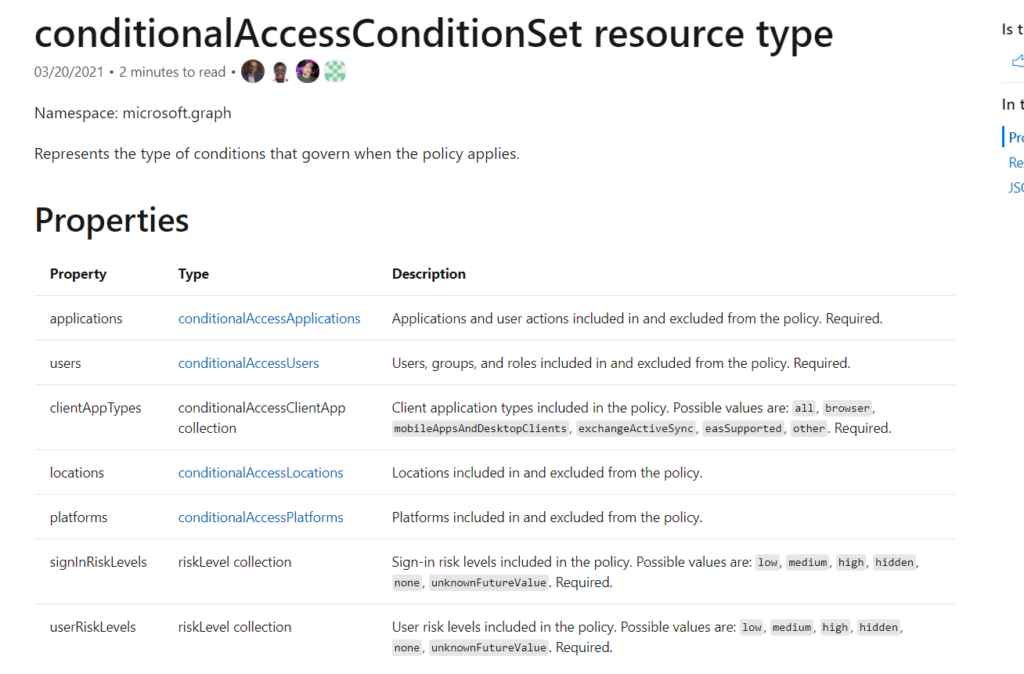
Take a look at what Microsoft has to tell about the conditions.

I guess we are missing the device’s property…When looking at the beta, it exists of course.
conditionalAccessConditionSet resource type – Microsoft Graph beta | Microsoft Docs
But for now, it’s not going to work to specify the DeviceConditions because the Microsoft Graph Model is telling us to specify the IncludeDeviceStates even when it will fail after you want to import the rule!

The next thing I thought was a wise thing to do, is to update the AzureAd Powershell module. but after updating….. the whole device’s property is gone.

Why? Just like I told you earlier… it will be deprecated in the near future!! so please pretty please don’t use it 🙂

3. Updating the existing CA rules to skip the “require devicestate”
UPDATE 05-06-2021

After a talk with Alex Fields I realized that I could alter some of the ca Rules so it won't require the devicestate.
Explanation about the block sharepoint/exchange rules:
When you are preventing/blocking downloads from SharePoint or Exchange online you really don’t need to specify the exclusion of the compliant device because the restrictions already state that unmanaged devices can’t download, this is based on the properties set on the Sharepoint site or in Exchange Online
Explanation about the required MFA on unmanaged devices:
You can just select the: “Require MFA” or “Require Compliant Devices” and only require one of the selected controls. Just say it up out loud and you will get the Point. So when your device is compliant… it does not need MFA

Please note: The only 2 rules which I don’t get to work, are 2 block rules. To block all devices which are not in a trusted location/country and the never persistent browser on unmanaged devices.
https://call4cloud.nl/wp-content/uploads/2021/06/CA.zip
But luckily you can use filters! So you could make sure all devices that aren’t compliant or not HAADJ will be blocked
device.trustType -ne “ServerAD” -or device.isCompliant -ne True
4. Invoke-Restmethod
Even when there is an official PowerShell command available I would still use the possibility to use the invoke-restmethod. You can use Fiddler to find the settings/JSON you will need
So I created a very simple Powershell script, which can be deployed to any tenant by using PowerShell and the URI: https://main.iam.ad.ext.azure.com/api/Policies within a few seconds. (The CA Rules are Disabled by default!!) “
https://call4cloud.nl/wp-content/uploads/2021/04/DeployAll.zip
Here is a video to see the deployment in action
You will notice this option has no problems at all when it is importing CA rules with specific device state excluded or included.

5. Using the Conditional Access Templates (preview)
And there it is, the possibility to deploy a set of conditional access rules (templates) to your Microsoft 365 tenant with just a click of a button. Isn’t that cool? Just open Intune and click on “new Policy” and select “Create new policy from templates (preview)”

And select the category for which you want to create the new conditional access rules for

Identities:

Devices

And after pressing on “create policy” the policy is created with the state you configured

I was hoping there was some more “magic” at the backend, but it “just” uses some predefined JSON’s you can push to https://main.iam.ad.ext.azure.com/api/Policies.

But then again, I truly love this addition as it really helps people to implement a solid conditional access baseline implementation!
Conclusion
In my opinion not using conditional access is just like buying a very expensive television and keeping your front door open when you are on vacation. You will need to configure it! Now you have got 2 options to deploy them


Hello, a big thank you for the very informative and helpful information in Mcas. I am learning a great deal by following your articles.
Do you mind sharing the PS script you mention in the article about automating conditional access?
Thank you very much.
Dmitry
Hi,
Thanx for the compliment
No problem at all. I will email it to you
HI rudyooms,
Likwise I’d love to look at the code.
I have to depoly CA a lot and the manual process / graph is a pain.
Would you share?
Kind regards
Chris
Ziet er (wederom) super interessant uit! Ik ga binnenkort wat spelen met Azure. Zou je mij je scriptje kunnen mailen bij gelegenheid? Ben benieuwd!