Last Updated on August 19, 2022 by rudyooms
This blog will show you how you could map some drive letters to a SharePoint site with a CSP.
In one of my latest blogs, I showed you why you don’t necessarily need to hybrid join your devices to get an SSO to your on-premise file servers and legacy apps. I even showed you how you could map Drive letters by using a CSP in Intune.
I am going to divide this blog into multiple parts
1. Introduction
As I showed you in an earlier blog ”DBD”: Devices Before Data. You need to make sure, your users could still access the on-premise file servers when their device is replaced and it is azure adjoined only. You can’t migrate everything by night?
But what if you are migrating your data to Microsoft 365 and your users are pretty stubborn and still want to use the old-fashioned drive letters instead of OneDrive?
In my opinion, using drive letters is not the best practice at all, you really want to benefit from all the advantages OneDrive has to offer. You will need to start collaborating and without using Onedrive that’s going to be very difficult. Even when people are telling you Onedrive has its limitations:
I have got 99 problems but OneDrive isn’t one
Call4Cloud The Grand OneDrive Hotel and the 260 Limitations
But I guess in some situations, some users still need to have access to SharePoint by using drive letters/ explorer for some reason.
Of course, you can do this with a nice Powershell Tool. Jos Lieben created the famous DriveMapping tool, it’s great when you (just like he also says….) have no other choice!
But this time I am going to show you how you could facilitate this by using a CSP.
Before I am going to show you how you could map a drive letter to a SharePoint site (still I am recommending OneDrive) I need to show you some background information about Network Providers and Provider Types.
Background Information
I will begin with some background information, which is needed when we need to understand the DriveMapping.admx file. We will start with the provider names
1.ProviderNames
When you are installing Windows 10, there are by default 4 Network Providers installed.
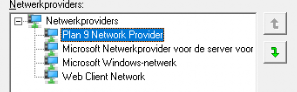
1.Plan 9 Network Provider:
I needed to google this one…. When Windows 10 1903 was released, Plan 9 was added. With Plan 9 you will be able to mount the Linux files as a network share.
2.Microsoft Remote Desktop Session host Server Network Provider
I guess Microsoft Terminal services, just says it all. No further explanation needed

3.Microsoft Windows Network
The LanmanWorkstation service is necessary when you want to create network connections to remote servers using the SMB protocol.

4. Web Client Network
The Web Client Network service is necessary when you want to access WebDav shares (Web-based Distributed Authoring and Versioning) in your explorer.

2.Provider Types
The network provider type code is the high word of a network type. The list of network types is given in the Winnetwk.h header file (WNNC_NET_* values). It’s very important the Provider type is specified. There is almost no real good documentation about the provider types, except this Microsoft Doc.
FILE_REMOTE_PROTOCOL_INFO (winbase.h) – Win32 apps | Microsoft Docs
Did you take a good look at the Microsoft Doc above?
2. SharePoint Drive Letter CSP
I am going to divide this part into 4 subcategories because we need to create the admx, the drive mapping itself, and some additional settings because…. It’s WebDAV. And we need to test it/ troubleshoot it
1.ADMX
First, we need to download the admx file.
https://call4cloud.nl/wp-content/uploads/2021/03/DriveMapping.zip
 <item key="Network\D" valueName="ProviderName">
           <value>
             <string>Microsoft Windows Network</string>
           </value>
         </item>
 <item key="Network\D" valueName="ProviderType">
           <value>
             <decimal value="8192" />
           </value>
         </item>
I guess it’s no coincidence I mentioned the Provider Name and Provider Type earlier. I guess the Provider Name speaks for itself as we have seen the corresponding names and services. But what about the provider type? How are we going to make sure we have the proper Providertype?
It’s very easy, just mount a WebDav share and open the registry and open the HKCU\Network\Driveletter
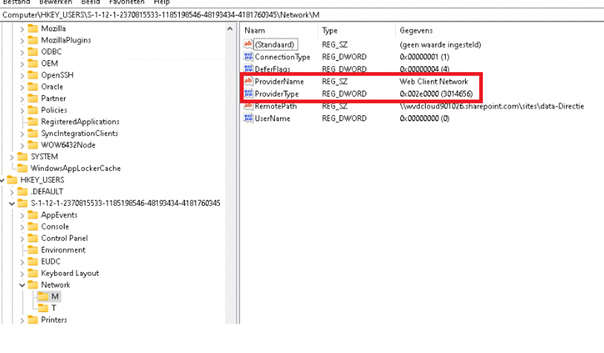
WNNC_NET_DAV –> 0x002e0000 –> 3014656
Now we have both values go find and replace!!!
What to replace:
Microsoft Windows Network –> Web Client Network
8192 –> 3014656
So the new Drivemapping.admx looks like this.
 <item key="Network\L" valueName="ProviderName">
           <value>
             <string>Web Client Network</string>
           </value>
         </item>
 <item key="Network\L" valueName="ProviderType">
           <value>
             <decimal value="3014656" />
           </value>
         </item>
Save it and upload the ADMX file, just like I mentioned in the blog I specified earlier.
2.Drive mapping
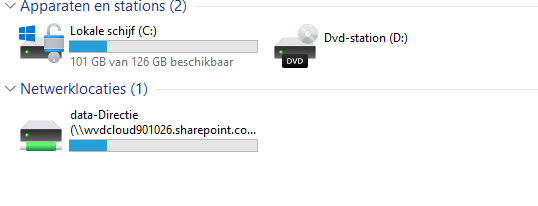
Of course, you will need to specify the Sharepoint site location in a CSP
as an example: \\wvdcloud901026.sharepoint.com@SSL\sites\data-Directie
Create an additional CSP

OMA URI: ./user/Vendor/MSFT/Policy/Config/DriveMapping~Policy~DriveMapping/Drive_T

 VALUE
 STRING
 <enabled/>
 <data id="Drive_T_RemotePath" value="\\wvdcloud901026.sharepoint.com@SSL\sites\data-Directie"/>
3.Additional settings:
As mentioned earlier, it’s Webdav so you will definitely need to specify some additional settings.
Take a look at Microsoft Docs
Troubleshoot “Open with Explorer” issues in SharePoint Online – SharePoint | Microsoft Docs
They are telling us some things:
- Add the website to the trusted zone
- Check the webservice client (With my addition:disable protected mode and file locking)
- Persistent Cookies… and I love my cookies
- CSP (Intune)
OMA URI:
./User/Vendor/MSFT/Policy/Config/InternetExplorer/AllowSiteToZoneAssignmentList
VALUE:
STRING
<Enabled/>
<Data id=”IZ_ZonemapPrompt” value=”https://*.sharepoint.com2″/>
- Powershell script:
This simple powershell script will make sure the webclient service is configured to start automatically and it will disable the protected Mode and file locking.
Set-Service WebClient -StartupType Automatic -ErrorAction SilentlyContinue | Out-Null
Start-Service WebClient -ErrorAction SilentlyContinue | Out-Null
Set-ItemProperty -path “HKLM:\Software\Policies\Microsoft\Windows\CurrentVersion\Internet Settings\Zones\1” -Name 2500 -Value “3”
Set-ItemProperty -path “HKLM:\Software\Policies\Microsoft\Windows\CurrentVersion\Internet Settings\Zones\2” -Name 2500 -Value “3”
Set-ItemProperty -path “HKLM:\Software\Policies\Microsoft\Windows\CurrentVersion\Internet Settings\Zones\3” -Name 2500 -Value “3”
Set-ItemProperty -path “HKLM:\Software\Policies\Microsoft\Windows\CurrentVersion\Internet Settings\Zones\4” -Name 2500 -Va
REG ADD “HKLM\SYSTEM\CurrentControlSet\Services\WebClient\Parameters” /v “SupportLocking” /t “Reg_Dword” /d “0” /f
- Cookies
We can configure a SPOTenant setting so SharePoint issue’s a special cookie that will allow this feature to work even when “Keep Me Signed In” is not selected
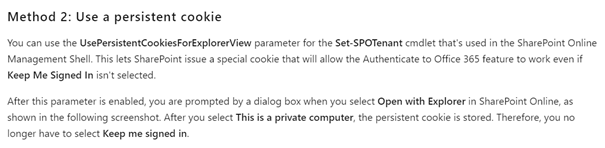
Set-SPOTenant -UsePersistentCookiesForExplorerView $true
Testing it
Of course, we need to be sure everything works like expected. The first time you will log in, you will notice the network drives are created and present but in a disconnected state.
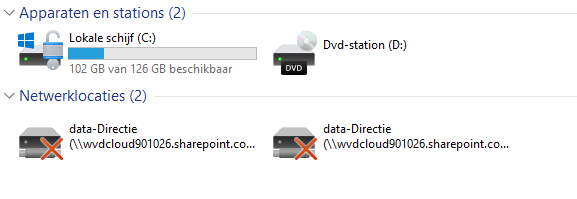
They are disconnected because you still need to open the Sharepoint site. I really hoped/thought that this wasn’t necessary anymore with an Azure Ad Joined device.
I am testing this on an Azure Ad Joined compliant device, so there will be an SSO to the SharePoint site but if you want the drive letters to work, you will need to open the Sharepoint Site in Internet explorer once in a while.
I have created an additional PowerShell script that makes sure the SharePoint site is opened in Internet Explorer when the user logs in.
 $WshShell = New-Object -comObject WScript.Shell
 $Shortcut = $WshShell.CreateShortcut("$env:ProgramData\Microsoft\Windows\Start Menu\Programs\StartUp\sharepoint.lnk")
 $Shortcut.TargetPath = '"C:\Program Files (x86)\Internet Explorer\iexplore.exe"'
 $Shortcut.Arguments = "SharepointSite"
 $Shortcut.WorkingDirectory = '"C:\Program Files (x86)\Internet Explorer"'
 $Shortcut.Save()
I guess it does its job….
Conclusion:
You will need to start using the Onedrive client, it’s up to you to make sure the adoption succeeds. I heard some questions if it was possible to mount a drive letter to SharePoint online with the CSP/ Drivemapping.admx. It’s indeed possible, but can anyone explain to me why they need it? It was fun to dig into it…but GO USE ONEDRIVE 🙂