
Last Updated on January 10, 2022 by rudyooms
This time a blog about how to automate your deployment of Proactive Remediation scripts and maybe more important, how to get them back from Intune with PowerShell!
Like always, I am going to devide this blog into multiple parts.
- About Pro Active Remediations (PAR)
- Manually configure PAR and my examples
- The CSV report option
- Deploying PAR with PowerShell and Graph
- Getting your Detection and Remediations Scripts back with PowerShell
- Conclusion
1. About Proactive Remediations
Proactive remediations are script packages that can detect and fix common support issues on a user’s device before they even realize there’s a problem. These remediations can help reduce support calls. You can create your own script package, or deploy one of the script packages we’ve written and used in our environment for reducing support tickets.
Each script package consists of a detection script, a remediation script, and metadata. Through Intune, you can deploy these script packages and see reports on their effectiveness.
If you want to read some more information about it, Microsoft has some nice documentation.
Tutorial – Proactive remediations – Microsoft Endpoint Manager | Microsoft Docs
If you are reading my blogs often, you will know I want to automate it! So A good place to start should be the PowerShell Intune samples GitHub page. There are a lot of nice PowerShell scripts on it which can help you to automate your Intune deployments.
But I’m missing the PowerShell scripts for Proactive Remediations?
So let’s create some PowerShell scripts to deploy/monitor and restore your Proactive remediations.
2. Manually configure PAR and my examples
Open Intune and go select Reports –> Endpoint Analytics –> Pro Active Remediations
Endpoint analytics – Microsoft Endpoint Manager admin center
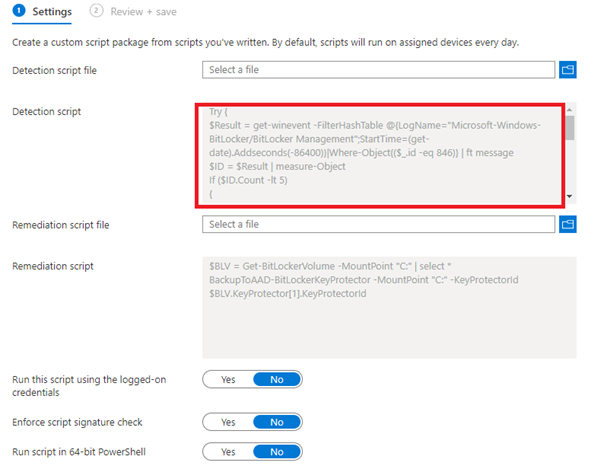
Like I told you in first part, you only need to select a Detection and a Remediation script.
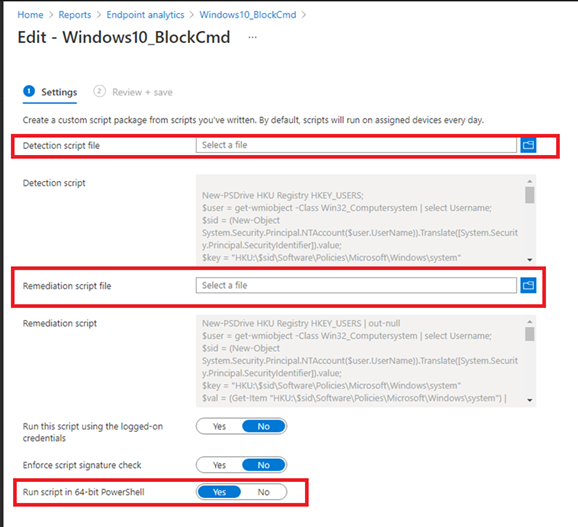
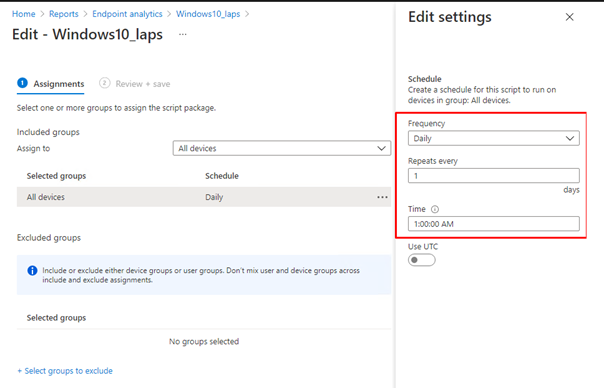
After we selected our scripts we need to assign it and create a schedule!
As we have seen now, it’s very easy to deploy Proactive remediations. The most work you will get is in creating some good working scripts. I guess I have done my part.
Take a look at my blog:
Proactive Remediations – Call4Cloud
Please beware, when you are putting sensitive information in these kinds of scripts, you will need to remove it from the intunemanagement.log and the registry! In my blog about LAPS, I will show you how to do so by creating a task schedule that simple search the intunemanagement.log and only removes the values needed.

3. The CSV report Option
In the “what’s new in Microsoft Intune” section, I noticed something new.
What’s new in Microsoft Intune – Azure | Microsoft Docs
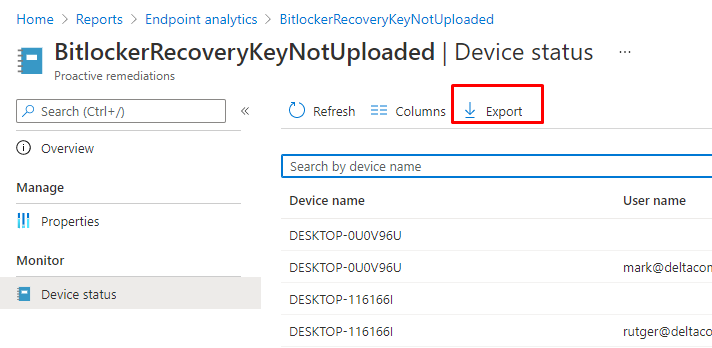
The Possibility to export the outputs to a csv:

But I couldn’t find it anywhere? I was hoping to see a nice export button somewhere.
UPDATE 07-07: And there it is!!!
(UPDATE 03-07-2021)
I had some time to update the export function to make sure you get a nice CSV with all the deviceRunStates information you need!
https://call4cloud.nl/wp-content/uploads/2021/06/ProActiveRemToCsv.txt
Long live some nice large filters…

4. Deploying PAR with PowerShell and Graph
Before we are going to simply launch the Full PowerShell script, we need to understand what we need to do and how to build it. First, let’s download the whole file itself to take a good look at it.
https://call4cloud.nl/wp-content/uploads/2021/06/PushProActiveem.txt
Before we could create a connection, we need to fetch the famous Authentication Token.
$clientId = " d1ddf0e4-d672-4dae-b554-9d5bdfd93547"
$redirectUri = "urn:ietf:wg:oauth:2.0:oob"
$resourceURI = "https://graph.microsoft.com/"
$authority = "https://login.microsoftonline.com/common"
$AadModule = Import-Module -Name AzureAD -ErrorAction Stop -PassThru
$adal = Join-Path $AadModule.ModuleBase "Microsoft.IdentityModel.Clients.ActiveDirectory.dll"
$adalforms = Join-Path $AadModule.ModuleBase "Microsoft.IdentityModel.Clients.ActiveDirectory.Platform.dll"
[System.Reflection.Assembly]::LoadFrom($adal) | Out-Null
[System.Reflection.Assembly]::LoadFrom($adalforms) | Out-Null
$authContext = New-Object "Microsoft.IdentityModel.Clients.ActiveDirectory.AuthenticationContext" -ArgumentList $authority
$platformParameters = New-Object "Microsoft.IdentityModel.Clients.ActiveDirectory.PlatformParameters" -ArgumentList "Always"
$authResult = $authContext.AcquireTokenAsync($resourceURI, $ClientID, $RedirectUri, $platformParameters)
$accessToken = $authResult.result.AccessToken
After we got our token we can begin to create the script and the json itself.
The application/json part, is been placed between: @” “@
This JSON part is the most important part as it is the ProActive Remediation script itself. When we take a good look at it, you will notice The PowerShell command is converted to base64.
{“displayName”:”Windows10_BlockCmd”,”description”:””,”publisher”:”admin@wvdcloud.nl “,”runAs32Bit”:false,”runAsAccount”:”system”,”enforceSignatureCheck”:false,”detectionScriptContent“:”DQpOZXctUFNEcml2ZSBIS1UgUmVnaXN0cnkgSEtFWV9VU0VSUzsNCiR1c2VyID0gZ2V0LXdtaW9iamVjdCAtQ2xhc3MgV2luMzJfQ29tcHV0ZXJzeXN0ZW0gfCBzZWxlY3QgVXNlcm5hbWU7DQokc2lkID0gKE5ldy1PYmplY3QgU3lzdGVtLlNlY3VyaXR5LlByaW5jaXBhbC5OVEFjY291bnQoJHVzZXIuVXNlck5hbWUpKS5UcmFuc2xhdGUoW1N5c3RlbS5TZWN1cml0eS5QcmluY2lwYWwuU2VjdXJpdHlJZGVudGlmaWVyXSkudmFsdWU7DQoka2V5ID0gIkhLVTpcJHNpZFxTb2Z0d2FyZVxQb2xpY2llc1xNaWNyb3NvZnRcV2luZG93c1xzeXN0ZW0iDQokdmFsID0gKEdldC1JdGVtICJIS1U6XCRzaWRcU29mdHdhcmVcUG9saWNpZXNcTWljcm9zb2Z0XFdpbmRvd3Ncc3lzdGVtIik7DQokVGltZXIgPSAkdmFsLkdldFZhbHVlKCJEaXNhYmxlQ01EIik7DQoNCiMjIyMjIyMjIyMjIyMjIyMjIyMjIyMjIyMjIyMjIyMjIyMNCiNMYXVuY2ggcGFzc3dvcmQgZGV0ZWN0aW9uICAgICAgICMNCiMjIyMjIyMjIyMjIyMjIyMjIyMjIyMjIyMjIyMjIyMjIyMNCg0KaWYoJFRpbWVyIC1uZSAxKQ0Kew0KICAgIFdyaXRlLUhvc3QgIkNNRCBpcyBub3QgYmxvY2tlZCEiDQogICAgRXhpdCAxDQp9DQplbHNlDQp7DQogICAgV3JpdGUtSG9zdCAiQ01EIGlzIGFscmVhZHkgYmVpbmcgYmxvY2tlZCINCiAgICBFeGl0IDANCn0NCg0KDQoNCg0KDQo=“,”remediationScriptContent“:”TmV3LVBTRHJpdmUgSEtVIFJlZ2lzdHJ5IEhLRVlfVVNFUlMgfCBvdXQtbnVsbA0KJHVzZXIgPSBnZXQtd21pb2JqZWN0IC1DbGFzcyBXaW4zMl9Db21wdXRlcnN5c3RlbSB8IHNlbGVjdCBVc2VybmFtZTsNCiRzaWQgPSAoTmV3LU9iamVjdCBTeXN0ZW0uU2VjdXJpdHkuUHJpbmNpcGFsLk5UQWNjb3VudCgkdXNlci5Vc2VyTmFtZSkpLlRyYW5zbGF0ZShbU3lzdGVtLlNlY3VyaXR5LlByaW5jaXBhbC5TZWN1cml0eUlkZW50aWZpZXJdKS52YWx1ZTsNCiRrZXkgPSAiSEtVOlwkc2lkXFNvZnR3YXJlXFBvbGljaWVzXE1pY3Jvc29mdFxXaW5kb3dzXHN5c3RlbSINCiR2YWwgPSAoR2V0LUl0ZW0gIkhLVTpcJHNpZFxTb2Z0d2FyZVxQb2xpY2llc1xNaWNyb3NvZnRcV2luZG93c1xzeXN0ZW0iKSB8IG91dC1udWxsDQokcmVnID0gR2V0LUl0ZW1wcm9wZXJ0eSAtUGF0aCAka2V5IC1OYW1lIERpc2FibGVDTUQgLWVycm9yYWN0aW9uICdzaWxlbnRseWNvbnRpbnVlJw0KDQojIyMjIyMjIyMjIyMjIyMjIyMjIyMjIyMjIyMjIyMjIyMjDQojTGF1bmNoIHBhc3N3b3JkIGRldGVjdGlvbiAgICAgICAjDQojIyMjIyMjIyMjIyMjIyMjIyMjIyMjIyMjIyMjIyMjIyMjDQoNCmlmKC1ub3QoJHJlZykpDQoJew0KCQlXcml0ZS1Ib3N0ICJDTUQgcmVnaXN0cnkga2V5IHdhcyBub3QgY3JlYXRlZCwgY3JlYXRpbmcgaXQgbm93ISINCgkJTmV3LUl0ZW0gLXBhdGggIkhLVTpcJHNpZFxTb2Z0d2FyZVxQb2xpY2llc1xNaWNyb3NvZnRcV2luZG93cyIgLW5hbWUgIlN5c3RlbSIgfCBvdXQtbnVsbA0KICAgICAgICAgICAgICAgIE5ldy1JdGVtcHJvcGVydHkgLXBhdGggJEtleSAtbmFtZSAiRGlzYWJsZUNNRCIgLXZhbHVlICIxIiAgLVByb3BlcnR5VHlwZSAiZHdvcmQiIHwgb3V0LW51bGwNCgkJZXhpdCAxDQoJfSANCmVsc2UNCgl7DQogCQlXcml0ZS1Ib3N0ICJDTUQgUmVnaXN0cnkga2V5IGNvbmZpZ3VyZWQgdG8gMSINCgkJU2V0LUl0ZW1Qcm9wZXJ0eSAgLXBhdGggJGtleSAtbmFtZSAiRGlzYWJsZUNNRCIgLXZhbHVlICIxIiB8IG91dC1udWxsDQoJCUV4aXQgMCAgDQoJfQ0KICAgDQoNCg0K“,”roleScopeTagIds”:[“0”]}
So let’s convert it back to a PowerShell Script. To do so, open this website and copy-paste the Red part (DetectionScript)
Base64 encode/decode online (utilities-online.info)

So instead of decoding, we could also encode a PowerShell script into a base64 value and copy/paste it back into the script you downloaded earlier to create your own ProActive Remediations automation scripts!.
Now we have the content for the Proactive Remediation script, we also need to create the assignment. Otherwise it is not going to be deployed!

Looking at the script above, I am searching all pro active remediation scripts to find the one I need. Once I got the correct one, the only thing I need is the ID.
Of course, we will need to define when the script needs to run and what it needs to target. In my example, I am targeting all devices!.
5. Getting your Detection and Remediations Scripts back with PowerShell
I guess when you are using proactive remediations a lot, it’s wise to make sure you have your own baseline with all kinds of scripts in it. But what are you going to do, when you have a new customer who is already using Proactive remediations a lot? Are you going to copy-paste the content of each remediation into a new PowerShell script?
Hell no! We are going to use PowerShell and MSGraph to export those Proactive Remediations back to some PowerShell Scripts!
Connect-MSGraph | Out-Null

$Detection = "Detection.ps1"
$Remediation = "Remediation.ps1"
$path = "c:\temp\pro"

$graphApiVersion = "Beta"
    $graphUrl = "https://graph.microsoft.com/$graphApiVersion"

$result = Invoke-MSGraphRequest -Url "$graphUrl/deviceManagement/deviceHealthScripts" -HttpMethod GET

        $scriptIds = $result.value | Select-Object id,fileName
        foreach($scriptId in $scriptIds){
            $script = Invoke-MSGraphRequest -Url "$graphUrl/deviceManagement/deviceHealthScripts/$($scriptId.id)" -HttpMethod GET
            [System.Text.Encoding]::ASCII.GetString([System.Convert]::FromBase64String($($script.DetectionscriptContent))) | Out-File -Encoding ASCII -FilePath $(Join-Path $path $($script.displayname+$Detection))
            [System.Text.Encoding]::ASCII.GetString([System.Convert]::FromBase64String($($script.RemediationscriptContent))) | Out-File -Encoding ASCII -FilePath $(Join-Path $path  $($script.displayname+$Remediation))

        }
Script Download Link:
https://call4cloud.nl/wp-content/uploads/2021/06/GetBackProActiveREms.txt
Conclusion
I Love proactive remediations but I was totally missing the possibility to automate it. Of course just like with all my other blogs… once I have some more insights or other ideas on how to improve it, I will update the blog!

Hello,
This is a great article that I can use right now.
However, I have a question:
With Powershell you can also convert from/to Base64.
I am trying to import and adapt a template Powershell file and convert it to Base64.
The problem I have is that the output Base64 format is not correct.
The PowershellScript in Intune looks like it has no line breaks.
Something is wrong with my format.
This is roughly what my code looks like:
$RemediationPS = (Get-Content -path .\remediation.ps1) -replace ”,$LocationCode
$Bytes = [System.Text.Encoding]::Unicode.GetBytes($RemediationPS)
$RemediationB64 = [Convert]::ToBase64String($Bytes)
Do you have any idea?
Thanks and have a nice weekend
You would say you are doing it right… maybe trying UTF8 instead of unicode
$Bytes = [System.Text.Encoding]::UTF8.GetBytes($Content1)
$Encoded = [System.Convert]::ToBase64String($Bytes)
Hi, after taking another look at the question.. what happens when you remove the -replace “, $locationcode?
I don’t know whats inside the powershell script… it looks like the replace could break something… but I can’t be sure if I dont know whats inside the ps1
Could you connect this to a git repository and use a pipeline to automate the process?
Hi,
Which part are you talking about? Normally everything you can do with a delegated permissions can be done with application permissions… so it should be possible to automate it
What should I use to detect local users/groups (Defaultuser100000) and then remediate/remove it? using proactive remediation?
Thanks
Hi,
I am using the proactive remediation script to install drivers.
Prior to installation I would like to inform the user about the installation and reboot.
However this script runs in system context and I am not able to send a toast notification or prompt a user about it.
Any ideas?
Did you happen to have read this blog: https://call4cloud.nl/2021/07/quality-updates-international-preview-of-mystery-update/#part10
I used pr to deploy updates with a notification to the user