This blog will be about me wrecking a Windows device during Autopilot Pre-Provisioning to see what is happening underneath. While doing so, I stumbled upon the funny /fake Foouser@ and Autopilot@ user accounts.
1. Introduction
Today, I was playing around with Windows 10 and trying to perform an Autopilot pre-provisioning. Okay, no problem here, right? Guess again, because I was trying to get a closer look at how a Windows HOME device handles the Autopilot pre-provisioning…
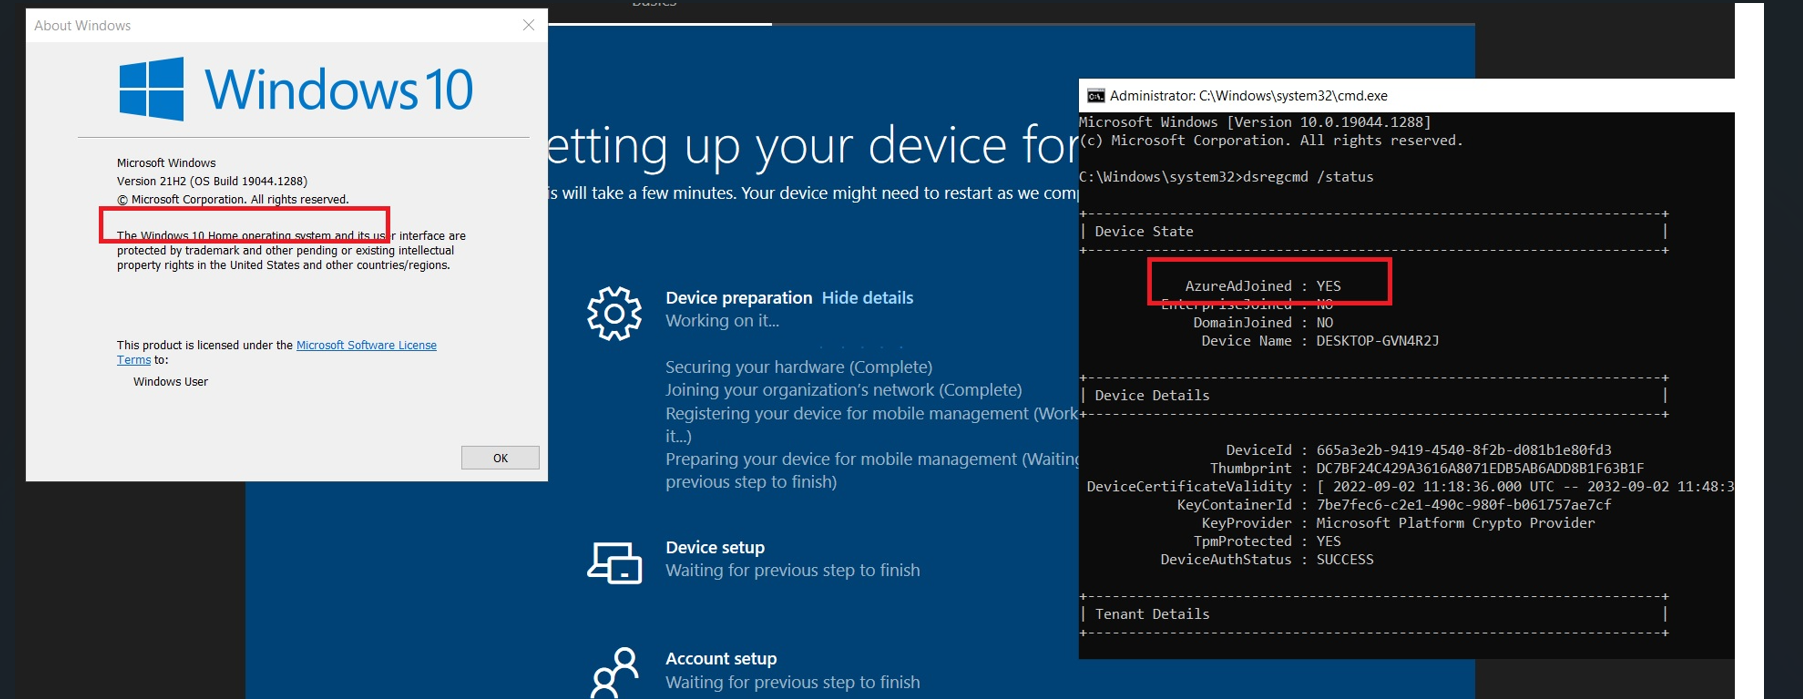
As shown above, the device “somehow” (long live attestation… even for Windows 10 home devices) managed to get enrolled into Azure Ad but it failed at the “registering your device for mobile management” step. It’s quite fun to see a Windows 11 Home device succeeding in joining the organization / becoming Entra Joined. That’s for sure! I let it time out and just continue the process and reboot the device.
The device was still Entra joined but I was missing the option to log in with a Microsoft 365 account (duhhhh…. Windows HOME) so I logged in with the normal user account I created before rebooting the device.
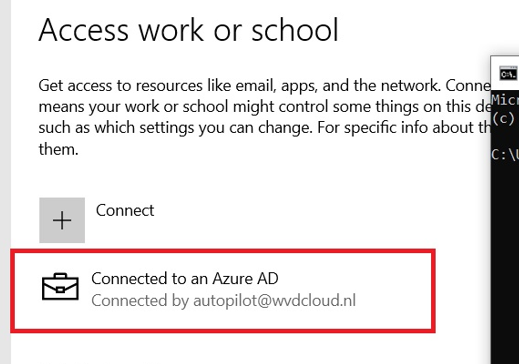
When taking a closer look at the Azure Ad account that is mentioned in the “Access work or school” settings I noticed this funny Autopilot account: Autopilot@domainname.com

At first, you might think it is using a DEM (device enrollment manager) account to enroll your device with Autopilot, but that’s not true! It’s just a fake account, nothing more!

I will try to explain the reason behind it in this blog! Of course, I wrote a blog about the Autopilot White Glove flow some time ago.
Autopilot White Glove Pre-Provisioned Deployment Flow (call4cloud.nl)
But looking back now at that blog, I have the feeling I missed out on some important parts about the Autopilot@ user, so I guess this is version 2 of that Willys White Glove Wonderland blog? I decided to take another deep dive into Autopilot pre-provisioning to determine what was going on!
2. The Flow
Let’s start by reviewing a chronic overview of what happens when starting Autopilot deployment for pre-provisioned deployments. I divided the overview into main tasks and their corresponding subtasks.


3. Explaining the Flow
Now we have seen the chronicle flow, let me talk you through each step. So, looking at the chronicle flow, we will notice that the device will start the Attestation, and after the TPM attestation, it will complete the “Securing your Hardware” step

I already wrote a lot about TPM Attestation and why it could haunt you. So, I will advise you to first read some of these blogs to get a better understanding of what is happening during this step
Attestation and Compliance Series – Call4Cloud
If you have read some of the blogs, you may continue this blog…

After the important TPM Attestation part is finished, the AADDiscovery will start by sending the foouser@domainname.com email address to the discovery service.

To do so, it will make use of the following API DsrGetJoinInfoEx in the dsreg.dll file and will reach out to the discovery service
https://enterpriseregistration.windows.net/wvdcloud.nl/discover?api-version=1.7
Please note: FOO will normally be used when a programmer can’t think of a better name. But as the domain name is very important, it needs an email address(more on this later on), so I guess that’s why they came up with the MakeFakeUserEmail Function and the “fooUser”

After sending the foouser@domainname.com to the discovery service, It will receive the information it needs to start the Azure Ad Join.

The Entra Domain join request is initialized again using a “fake” email address. This time, NO “fooUser” for us but a nice autopilot@domainname.com pcszuseremail address.
In this process, it will create its transport key with the tenant domain name in it and it will retrieve the AIK certificate.
This AikCertificate and the AttestationData will be sent out to the https://enterpriseregistration.windows.net/EnrollmentServer to request the MS-Organization Certificate

Besides requesting the Aik Certificate, it will pre-create the device object. (which I also showed in the white glove blog)

After receiving the MS-Organization-Access Device Certificate, it will add 2 SIDS (“Global Administrator Role” and the “Device Administrator Role”) to the Local Administrators group

After those SIDs are added to the local administrator group, the MS-Organization-Access device certificate will be installed in the LocalMachine Certificate store.

Feel free to read another blog of mine! That blog will show you which certificate will end up in which certificate store, depending on the Enrollment.
When we examine the exact moment more closely, we will also notice that the device will become Entra Joined. 
But before the “Joining your Organization’s Network” phase will be completed it still will need to make sure the certificate is the right one by checking the OID values

Funny right, OID values. It’s a good thing I also wrote a blog about that one so you will know everything there is to know about it. Sounds almost like a coincidence right? Or maybe not?
https://call4cloud.nl/2022/07/the-tenantid-from-toronto
If we “pause” the Autopilot Enrollment now, we could also notice some fun behavior. As mentioned before, the device will initiate the join request by a fake pczuseremail address: “Autopilot@domainname.com“

When opening the “Access work or School” settings, we will notice that the device is connected to An Azure Ad by autopilot@wvdcloud.nl
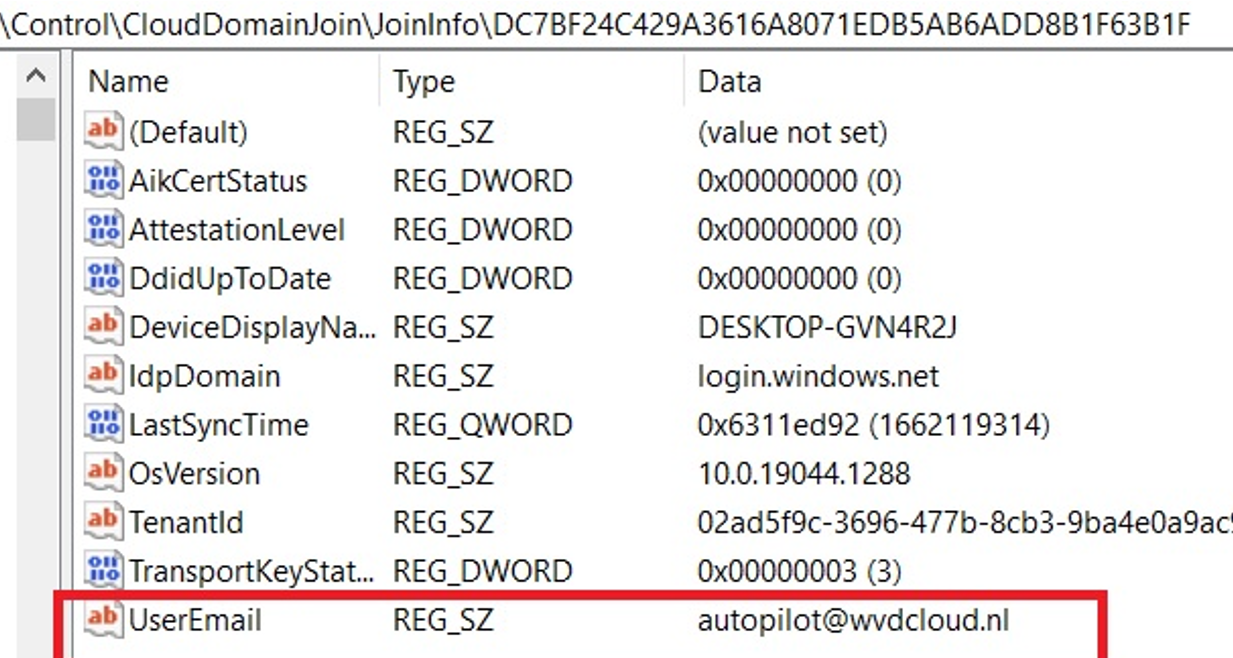
This information is also stored in the JoinInfo part of the CloudDomainJoin information in the registry
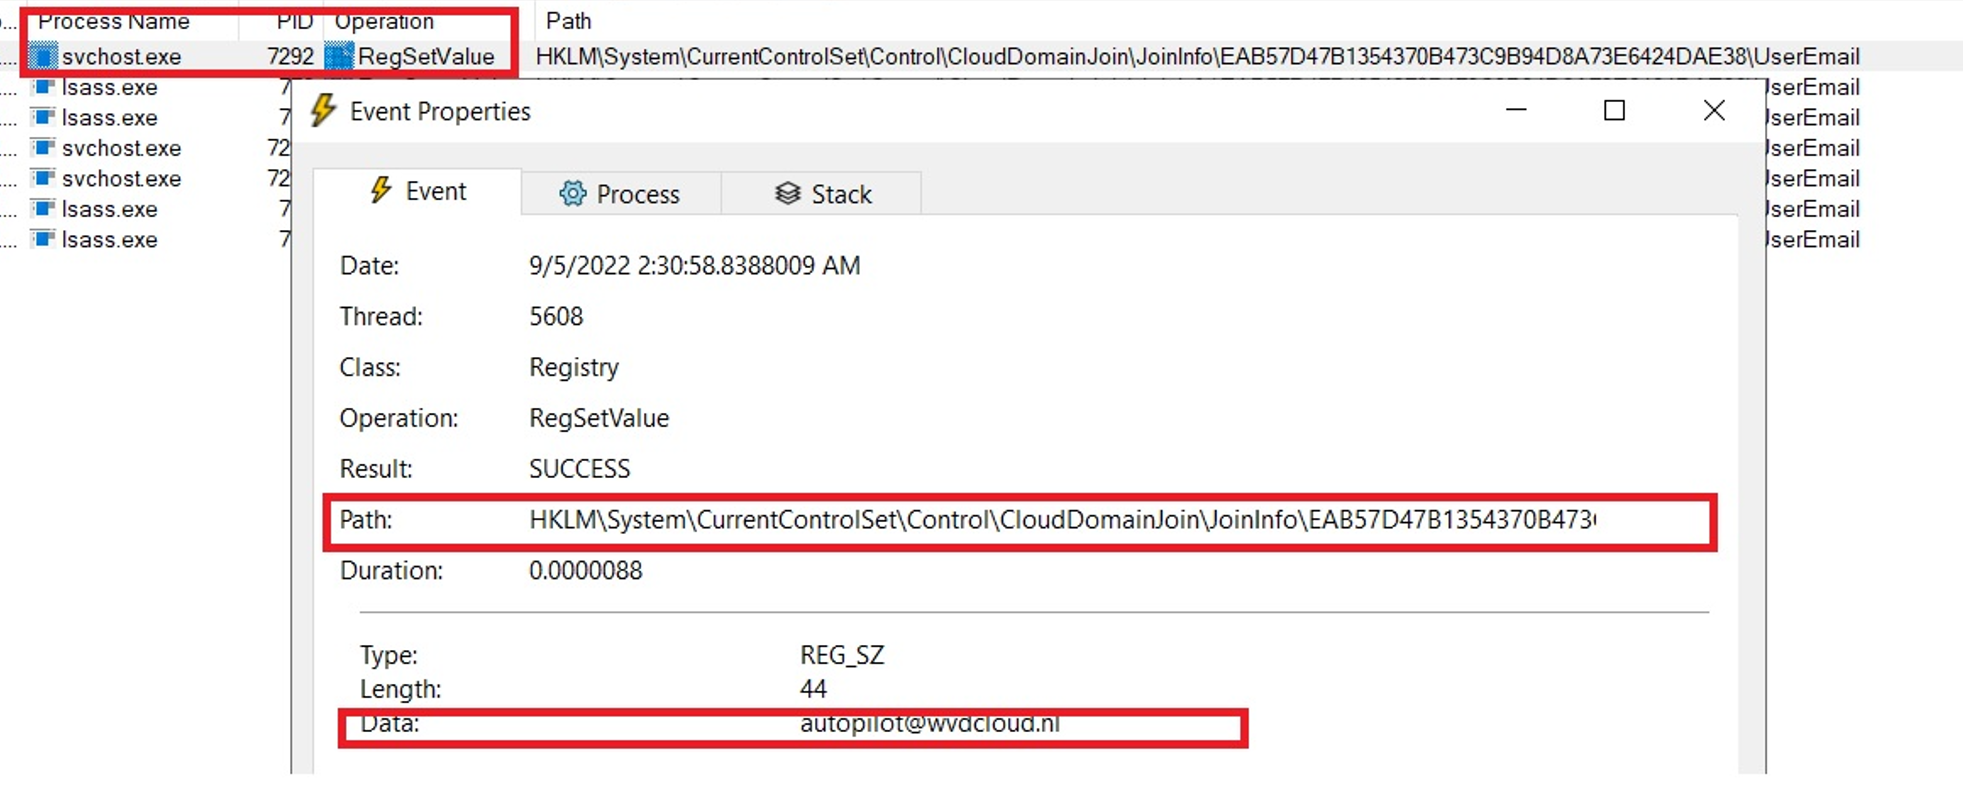
If you would run Procmon at that point in time, you will notice that this key will be set by the Svchost.exe process (I was expecting another process.. but hey, I am not complaining)
After the device is Azure Ad Joined, it will launch the ESTS Ticket (enrollment security token service ticket) phase.

It will request an access token to authenticate against the enrollment services during this phase.

When looking at the windows.management.service.dll and the AcquireESTSTicketForMDM, we will spot the same behavior

This leads us to the MSADeviceTicket Function

We will notice that it will receive and caches the requested token/ticket for the enrollment.manage.microsoft.com and the enterpriseregistration.windows.net resources. When taking a look back at Procmon at that same time, we will notice that it also stored the 2 corresponding tbres files on the device in the system local appdata tokenbroker\cache folder

When decrypting those files from the system tokenbroker cache with this wonderful tool. this is what we get
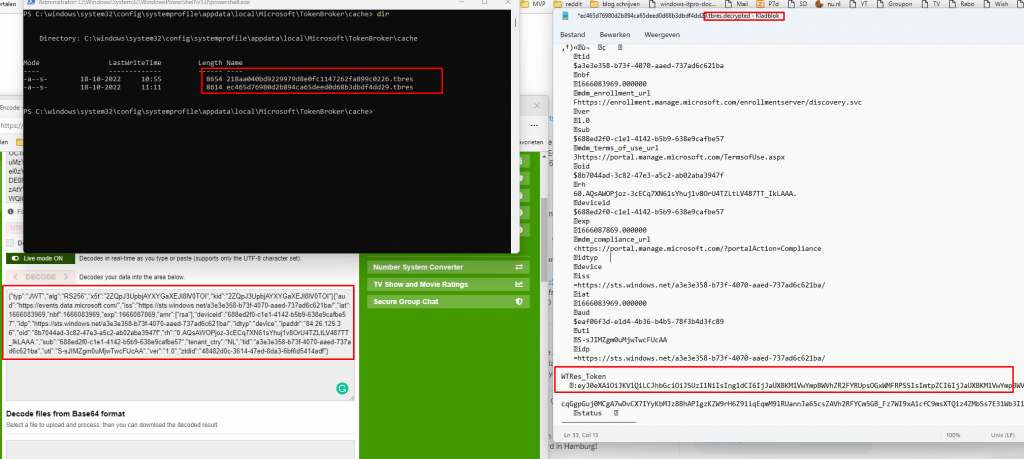
As shown above, those 2 tbres files contain a lot of information such as the WTres_token (With the base64 encoded JWT token) and some other information like the MDM enrollment URLs, etc.
When you want to read more about those nice TBRES files.. please pay a visit to Adam Chester (@_xpn_) / Twitter and his blog about decrypting those files WAM BAM – Recovering Web Tokens From Office – XPN InfoSec Blog (xpnsec.com)
Before it can use these enrollment tokens, it will again start a discovery process with the “fake” email address, we also noticed this earlier


This time I will explain, why the email address is so important during the discovery even when the username is fake. When taking a closer look at the MDE2 (Mobile Device Enrollment) flow, we will notice that the domain suffix from the email address is used to resolve the address to the Directory Service (DS)
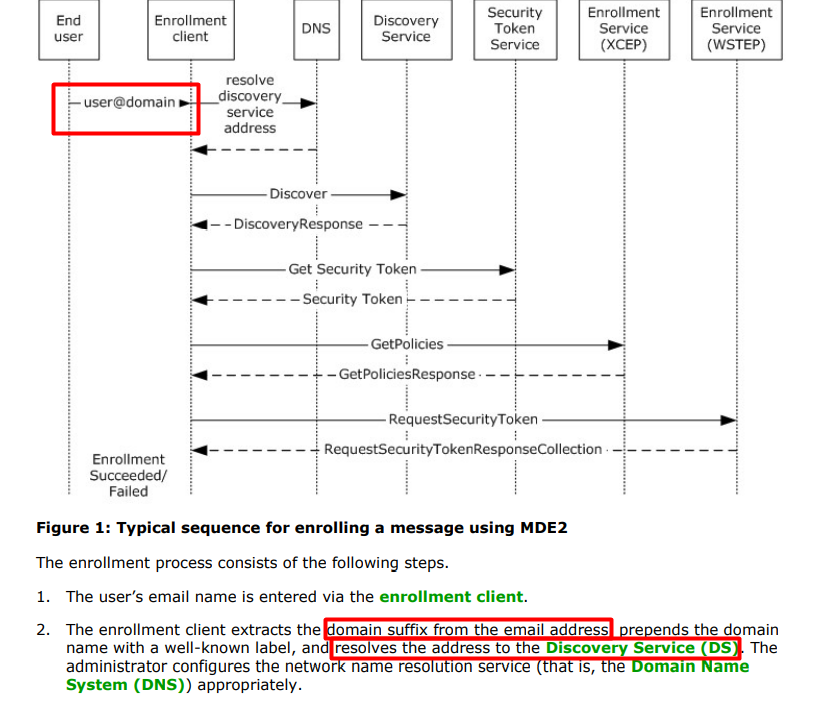
With the fake email address in the discovery request, it will retrieve it will get a DiscoverResponse with the Enrollment URLs

When it received the enrollment URLs it can start the Intune MDM enrollment by reaching out to the Enrollment ServiceUrl
https://fef.amsub0302.manage.microsoft.com/StatelessEnrollmentService/DeviceEnrollment.svc
When taking a closer look at the header below, we will notice that it will send the JWT Security token it got earlier (TBRES files) with the enrollment request

In that same request, after the token is validated the device will receive back the Intune Device Certificate as shown below. Yes…. you can click on the picture to get a closer look… do you remember my latest blog mentioning Certificate Stores?? Stores=My;System

After the Intune device certificate is created and imported into the Local Machine Certificate store it will also create the corresponding Enrollments registry key
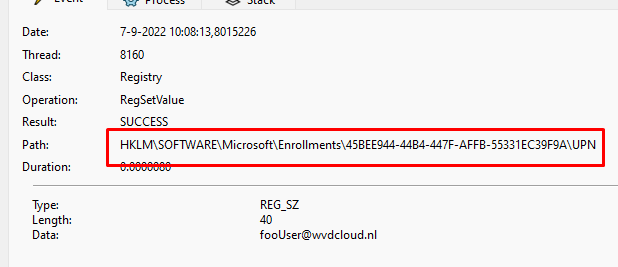
Enrollment Created: HKLM\SOFTWARE\Microsoft\Enrollments\45BEE944-44B4-447F-AFFB-55331EC39F9A\UPN set: fooUser@wvdcloud.nl
A small but maybe big small note: you can use this UPN and the foouser@ value to determine if the device is undergoing pre-provisioning.

At the same time, it will also create the corresponding Intune schedules to start the real Intune enrollment

After the device got enrolled into MDM/Intune, we still have a device that is Entra joined with the fake autopilot@domainname.com account and that can’t be good right?

First, we need to ask ourselves why the device needed to become Azure Ad Joined in the first place. The device will also be Azure Ad UNJoined after it is enrolled into Intune. I guess that’s pretty simple because the Intune Enrollment relies on the Azure Ad Join to fetch the enrollment URLS!
Let’s proceed to the Unjoin to make sure the device could be Azure Ad joined with a valid user when the user turns on the device for the first time after the Pre-previsioning succeeded! To do so, it will start an Azure Ad Unjoin just some milliseconds after the MDM Enrollment,

Luckily Microsoft is describing this in their documentation

Ow, wait… guess not… Alrighty then!

To start the Azure Ad Unjoin process, it only needs to find the right Certificate and trash it. I guess we know how this is done, right? Again, using the OID value, it will try to find the right device cert it needs to delete by searching for that specific OID value 1.2.840.113556.1.5.284.7 and making a note of the thumbprint.
If the device finds the MS-Organization-Certificate with that specific thumbprint, it will delete the corresponding certificate and run another OID check to ensure the certificate is deleted. When no device cert is left, it will finish the device_Unjoin step, and the device is no longer Azure Ad Joined!
4. FooUser@ and Autopilot@ user
As mentioned earlier in this blog, the discovery will be based on the domain name of the email address and NOT on the email address itself.

But you can never be 100% sure right? So I decided to create a Foouser and Autopilot user in my own tenant


I made sure it didn’t get a license and where NOT included in the MDM scope

After the settings were set to prove it doesn’t use those accounts for real, I started the Autopilot PreProvisioning
As shown below, it finished successfully with an existing unlicensed fooUser and Autopilot user which weren’t in the MDM scope

The elapsed time (36 minutes!!! way too long) is a different issue…
Conclusion
And with this flow explained, I will finish this blog because, in my opinion, it explained why it needed the Entra Certificate to enroll into MDM and the need to delete the certificate, and by doing so the Azure Ad Join!
If you even spot the fooUser@ or the Autopilot@ user, you know why!



Hey Rudy great post.
How did you document the flows with timings?
I am seeing an odd behaviour where our build is suddenly taking longer